With pin and stretch technique, the force of the stretch is focused on the region of the muscle that is between the pinned point and the attachment that is moved.
Although there are many “techniques” in the world of massage/manual therapy, the actual number of fundamental hands-on skillsets that underlie these techniques are few. This is especially true in the world of clinical orthopedic manual therapy (COMT), which is oriented at remedying specific musculoskeletal conditions with which the client presents.
Essentially, fundamental hands-on skillsets of COMT might be listed as:
- soft tissue manipulation (massage)
- stretching
- joint mobilization.
Most every massage therapist utilizes soft tissue manipulation; indeed that is what most people associate with the profession of massage. But when working to remedy a client’s musculoskeletal condition, the effectiveness of a massage therapist’s care is greatly enhanced when stretching is added to the client’s treatment plan.
Stretching:
Although there is a lot of controversy about stretching, the concept of stretching is actually quite simple and straightforward. Stretching is a mechanical process of lengthening soft tissue. All soft tissues have certain fundamental properties, including the property of “creep.” Creep describes the gradual change in shape (deformation) of a tissue that occurs when it is subjected to a force that is applied to the tissue in a slow and sustained manner. Applying the principle of creep to stretching, stretching is simply a tensile force that gradually deforms the soft tissue by lengthening it, in other words, making it longer. So, for all the controversy that surrounds stretching, the essential principle of stretching is valid. If performed well and performed regularly, by the property of creep, stretching does work; in other words, stretching does succeed at lengthening tight/taut/shortened myofascial tissue.
Creep:
All soft tissues have what is termed an elastic range and a plastic range. Elasticity of a tissue describes its ability to return to its normal length after being stretched. If the elastic range of a tissue is exceeded, plasticity describes that the tissue will remain altered or deformed* to some degree. Therefore, creep describes when a soft tissue’s elastic ability is exceeded and the tissue enters its plastic range. Differing soft tissues will have differing resistances to being stretched and lengthened. Indeed, fibrous fascial tissue is remarkable for its tensile strength, in other words its ability to resist lengthening. But fundamental to all soft tissues is their ability to change their shape and lengthen. Also, the effect of plasticity/creep is not necessarily permanent, so whatever positive effects are gained by stretching must be repeated or the soft tissues will gradually shorten and tighten again. Stretching is not something that one can do once or for only a short period of time and then expect to remain loose for the rest of their life. Stretching must be an ongoing part of one’s lifestyle.
*The term “deform” usually has a negative connotation, but when a myofascial tissue has become “locked short,” in other words, tight, “deforming” it by lengthening it would be considered to be a positive change because it would potentially increase flexibility in the body.
Neural Inhibition Stretching Techniques:
Essentially, stretching is a mechanical process of applying a physical tensile force to a soft tissue. However, when stretching musculature, mechanical stretching can be enhanced by adding neural inhibition techniques. These neural inhibition techniques take advantage of nervous system spinal cord reflexes that relax/inhibit muscle tone. Classically, it has been stated that there are two nervous system reflexes that can be utilized to relax musculature and therefore facilitate a stretch. They are the Golgi tendon organ (GTO) reflex and reciprocal inhibition (RI) reflex.
The GTO reflex occurs when a muscle’s contractile tension increases, thereby pulling on its tendons. This tension at the tendon feeds back into the nervous system to inhibit that muscle (and its synergists) from contracting so hard. This reflex is often interpreted as protecting the tendon from being torn by an excessively forceful muscle contraction. RI reflex occurs when a muscle concentrically contracts and shortens. The nervous system receives this input and reflexively relaxes (inhibits from contracting) the antagonistic musculature so that it can lengthen, thereby allowing the contracting muscle to successfully shorten.
The GTO reflex has been said to be operative in the stretching technique known as contract relax (CR), also known as post-isometric relaxation (PIR), also known as proprioceptive neuromuscular facilitation (PNF) stretching. And RI has been stated to be the operative reflex in agonist contract (AC) stretching, the basis of Aaron Mattes’ Active Isolated Stretching (AIS) technique. (Note: AC stretching is also sometimes referred to as PNF stretching, which can create confusion with the GTO-mediated technique.) In recent years there has been controversy regarding the role of the GTO reflex. It appears that higher nervous system centers in the brain might also be involved, but it still seems likely that the GTO reflex is a part of the inhibition process with CR/PIR/PNF stretching.
Logistical Challenges to Stretching:
However, as wonderful as stretching can be, there are often logistical challenges when applying stretching to the client. For example, if a stretch is applied to a muscle, it is applied to the entire length of the muscle, pulling one or both attachments of the muscle away from the other. This effectively dilutes the effectiveness of the stretching force by spreading it across the entire length of the muscle. But a client’s muscle is not always uniformly tight from one attachment to the other. Sometimes only a small region of the muscle is tight; or perhaps there is a tight myofascial trigger point (TrP) located in one region of the muscle. If the stretch is applied to the entire muscle, it might be so diluted as to not be sufficiently strong enough to stretch the target region/TrP that is tight. Even more problematic, looser areas of the muscle might compensate for the tighter region, in effect absorbing the stretch and effectively relieving the tight region from having any stretch force placed upon it; in effect, hypermobile tissue compensates for hypomobile tissue. In these cases, the application of the stretch force must be modified so as to be focused on the tight region. This can be done by performing pin and stretch technique.
Pin and Stretch Technique:
Pin and stretch technique focuses the force of a stretch to a specific region of the muscle. The therapist uses their hand (or other body part such as elbow or forearm) to manually place a pin into the belly of the muscle and then moves/stretches one of the muscle’s attachments away from that pinned point. The pin acts to stop the stretch force from spreading to the rest of the muscle beyond the pin point.
Therefore, with pin and stretch technique, the force of the stretch will be concentrated to the region of the muscle that is between the pinned point and the attachment that is moved.
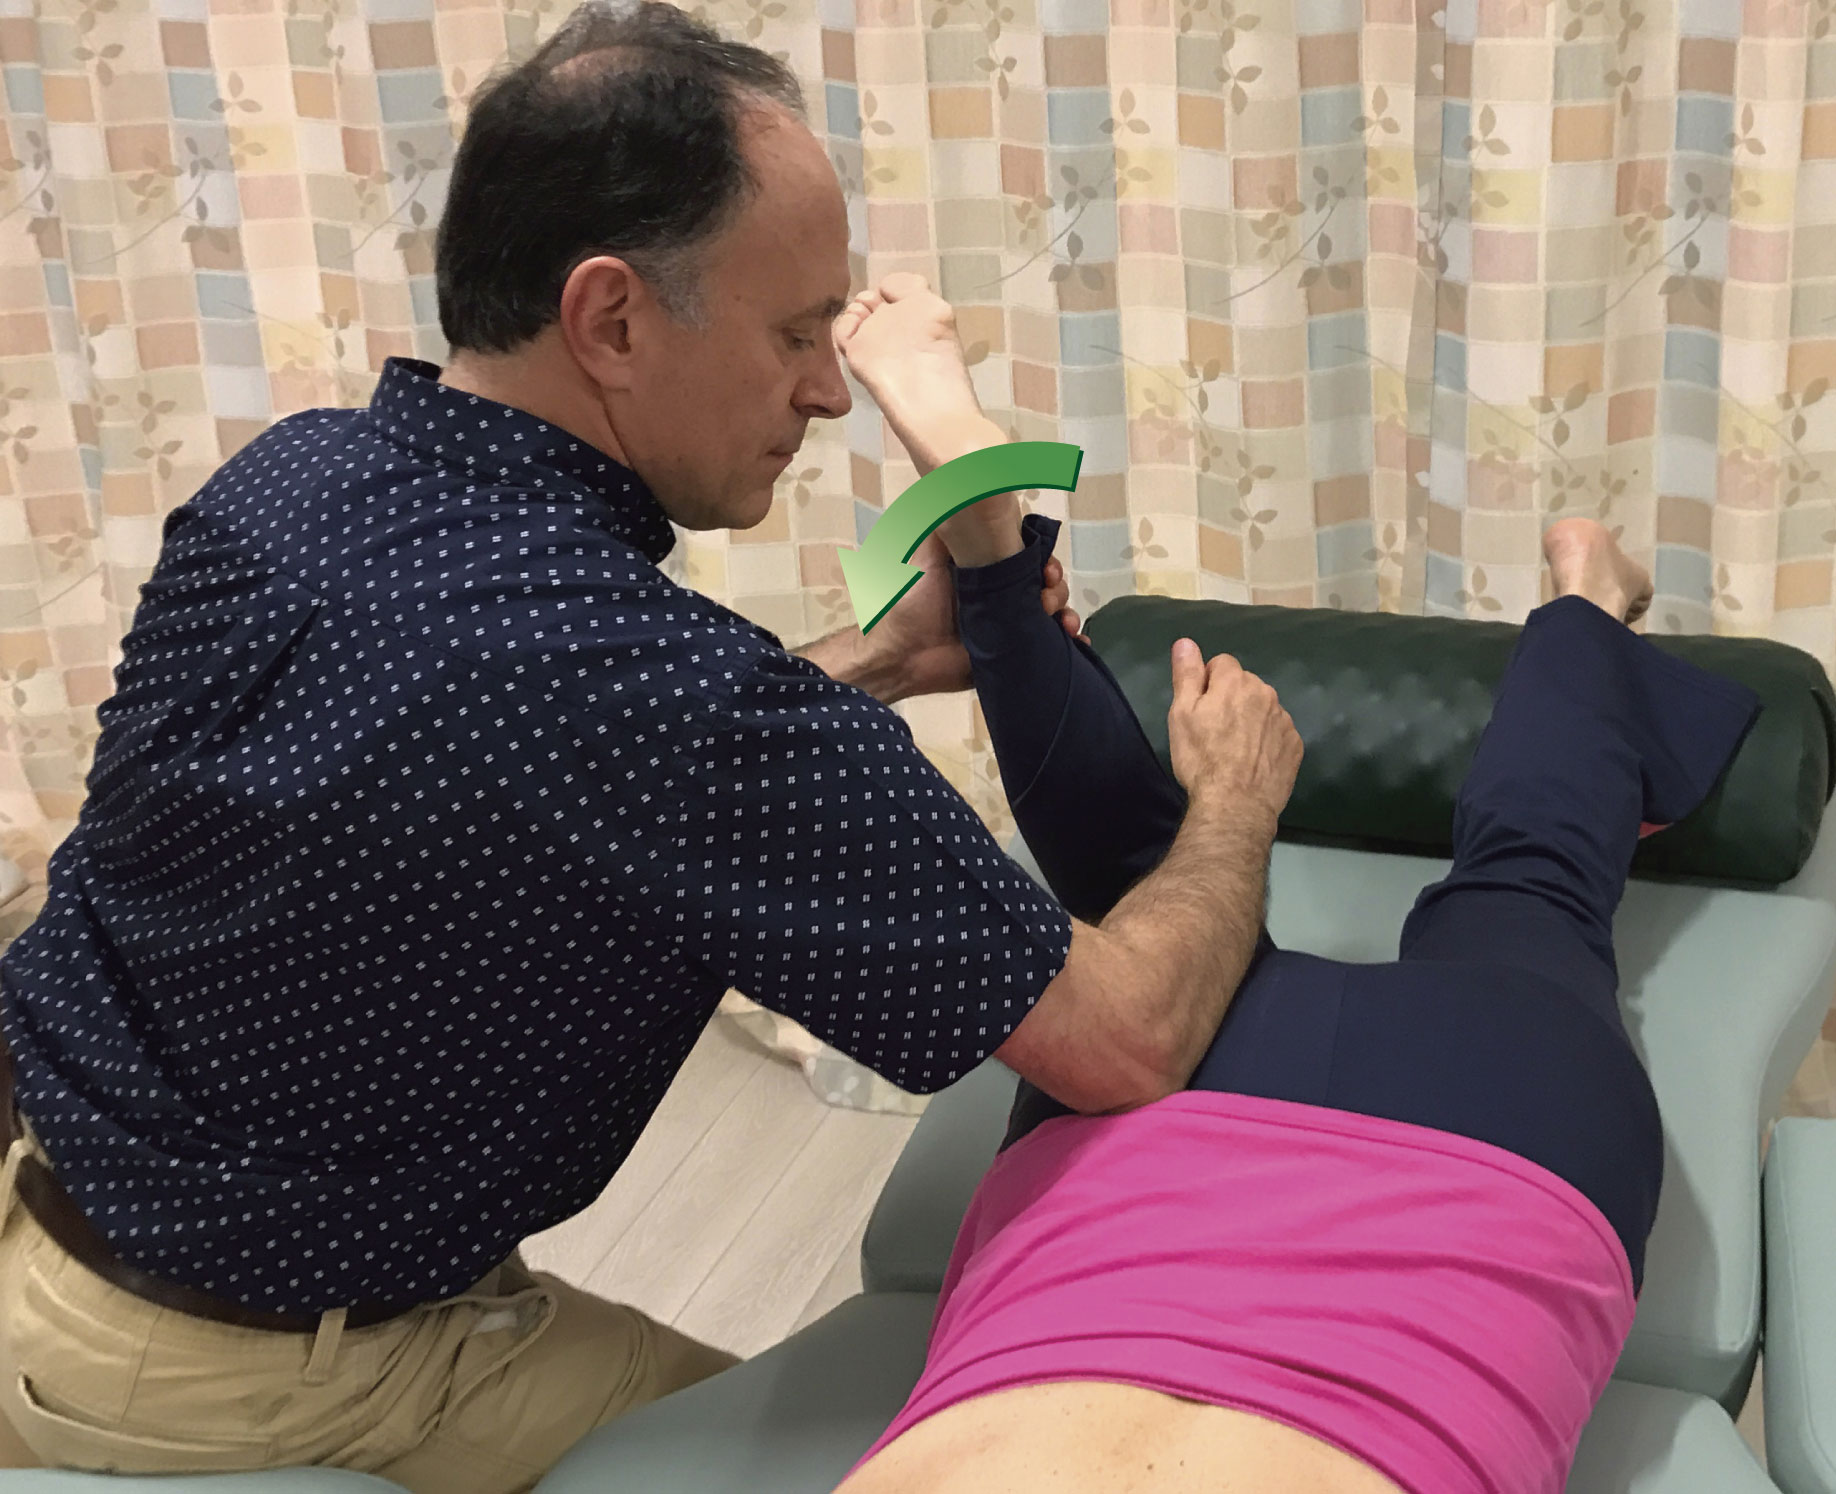
Figure 1 demonstrates pin and stretch technique using the musculature of the head and neck (cervicocranial musculature), specifically the right upper trapezius as the target muscle and the head/neck is attachment that is moved away from the shoulder girdle (scapuloclavicular) attachment. In Figure 1A, the therapist has placed the pin somewhat close to the scapuloclavicular attachment of the muscle; this results in the stretch being focused on the region of the muscle that is indicated by hatch marks. When the pin is moved closer to the cervicocranial attachment as seen in Figure 1B, the focus is narrowed to a more concentrated region of the upper trapezius near the cervicocranial attachment. And if the pin is moved even closer to the cervicocranial attachment as seen in Figure 1C, the stretch is even more strongly focused on a narrow region of the muscle close to the head/neck. In each case, as the pin moves closer to the attachment that is moved, the focus of the stretch narrows to a smaller region of the muscle; and because the stretch force is concentrated over a smaller region, it becomes more powerful. Therefore, the entire reason for pin and stretch technique is to focus a powerful stretch to a specific region of the target muscle.
Note: Given how often clients present with tight and spasmed muscles of the neck, pin and stretch can be an especially valuable technique to employ in this region.
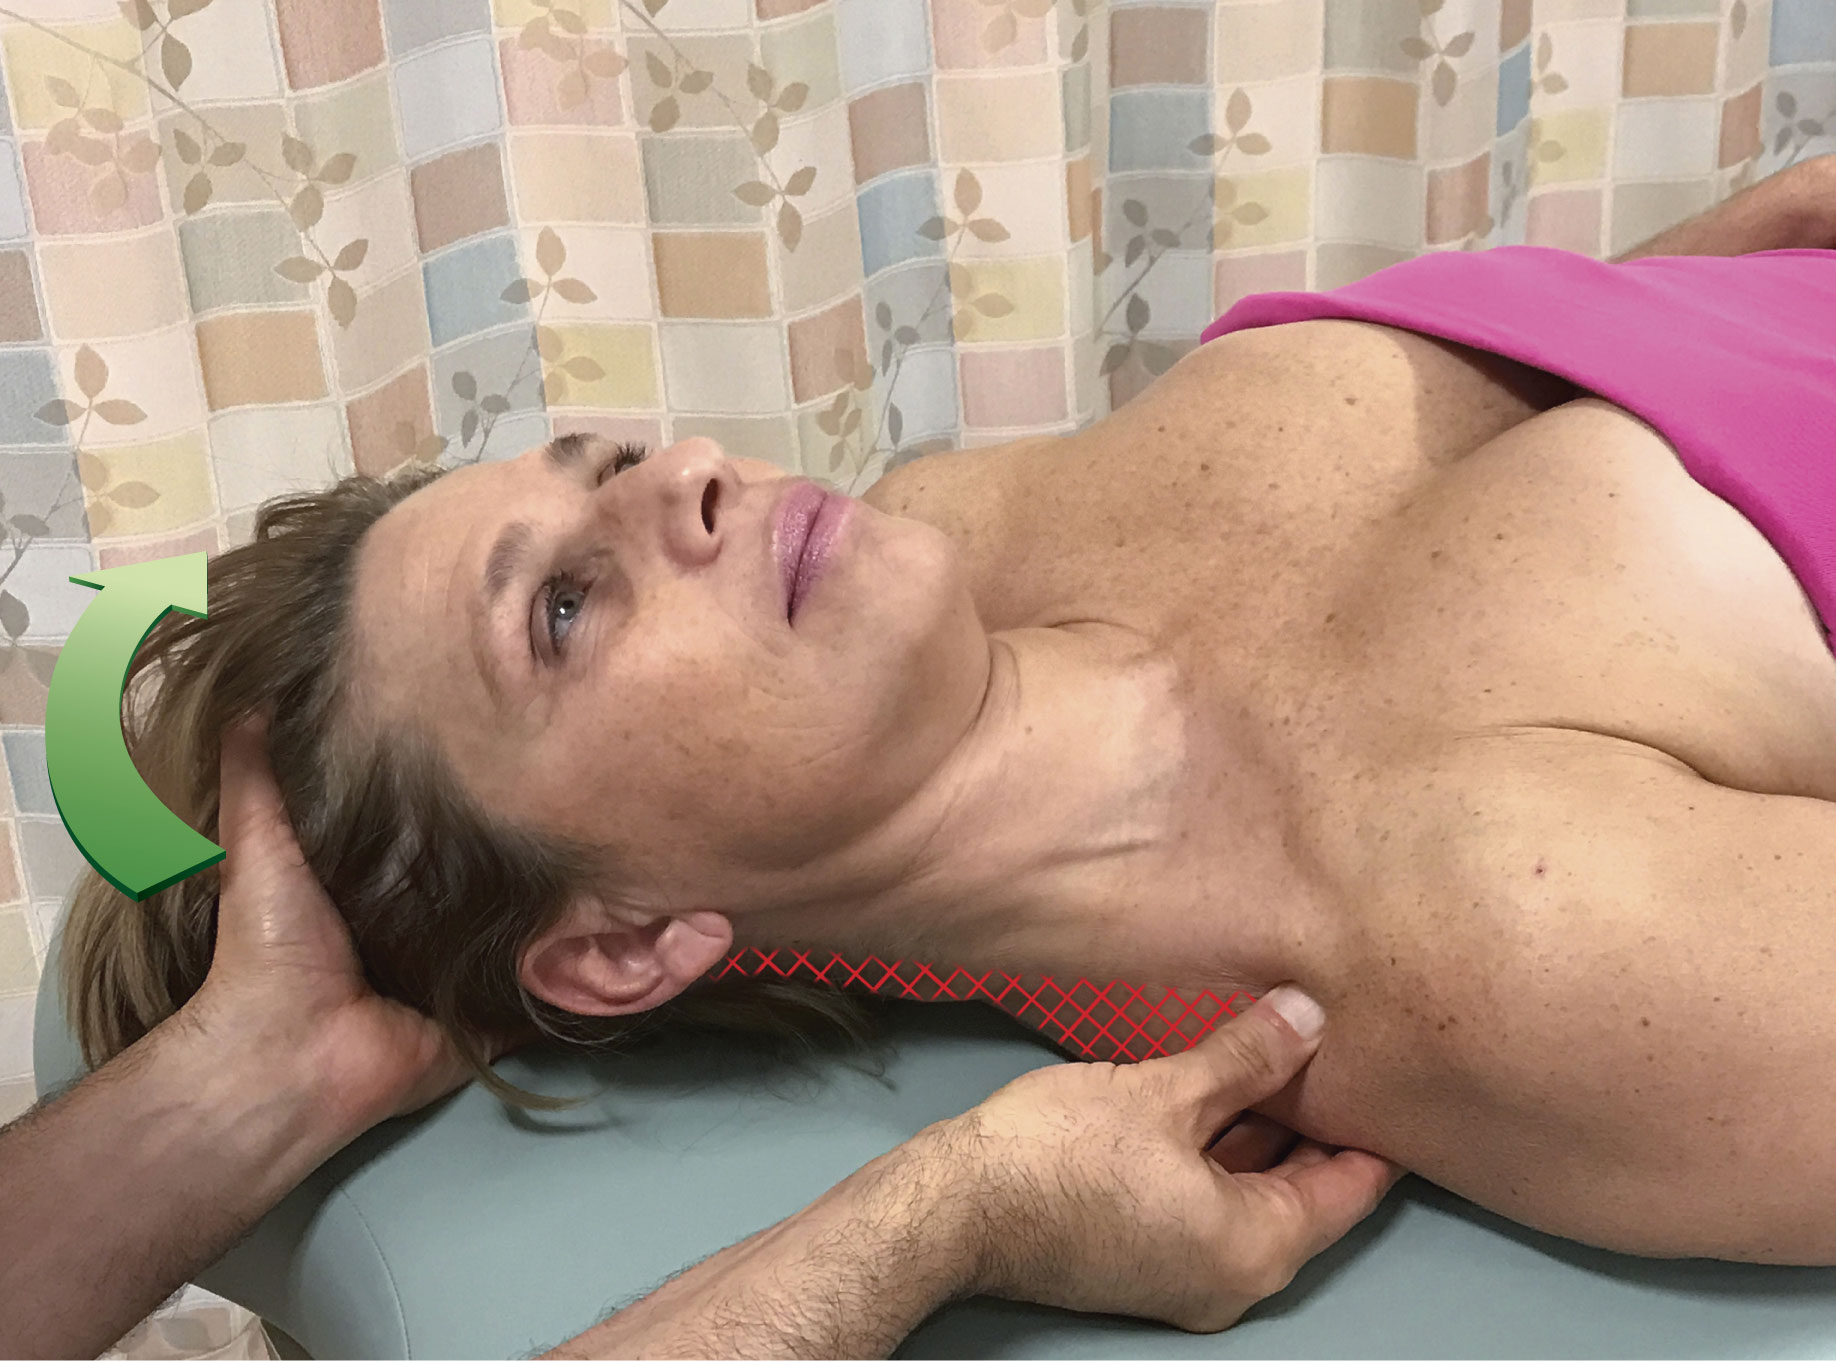


Figure 1. Pin and stretch of the right upper trapezius. The head/neck (cervicocranial) attachment is the attachment that is moved. For each position of the pin, the hatch marks indicate the focus of the stretch.
Active Pin and Stretch Technique…Pin and stretch technique is often performed with the client passive as the therapist moves the client’s body part into the stretch (as seen in Figure 1). However, pin and stretch can also be performed actively. In other words, instead of the client remaining passive as the therapist moves their body part into a stretch, the client actively moves her own body part into the position of stretch. Performing pin and stretch actively does not make a mechanical difference on focusing the stretch to one region of the muscle, but it does make a difference neurologically. When the client actively concentrically contracts musculature on one side of the joint, the antagonist musculature on the other side of the joint is reciprocally inhibited (see Neural Inhibition Stretching Techniques Box). For example, if the target muscle being stretched is the right upper trapezius, then if the client actively moves her head/neck into left lateral flexion, then in additional to the pin and stretch benefit of focusing the stretch force to one region of the target muscle, the stretch will be further facilitated by the target muscle being reciprocally inhibited, in other words relaxed, so it can be better stretched and lengthened (see Accompanying Figure).
Joint Mobilization:
At the outset of this article, I posited that there are three fundamental skillsets in the world of Clinical Orthopedic Manual Therapy (COMT): soft tissue manipulation, stretching, and joint mobilization. However, I believe this list can be culled down to only two fundamental skillsets: soft tissue manipulation and stretching. I say this because joint mobilization is actually a type of stretching. If we name the two bones at a joint Bone A and Bone B, then the technique of joint mobilization is performed by pinning Bone A and then moving Bone B away from Bone A. Therefore, joint mobilization is actually a form of pin and stretch technique. But instead of placing the pin in a muscle belly to focus the stretch toward one end of the muscle or the other, the pin is placed on a bone to focus the stretch on the intrinsic fascial tissue (the joint capsule/ligamentous complex) between that bone and the other bone of the joint. For this reason, I like to refer to joint mobilization as “arthrofascial stretching” (arthr means joint).
Given the tremendous emphasis in recent years placed on treating fascia, it is surprising that more manual/massage therapists to do not perform joint mobilization / arthrofascial stretching as part of their treatment. After all, if we recognize that it is important to treat myofascial tissue (as recognized with Tom Myers’ work), and it is important to treat visceral fascial tissue (as recognized with Barral’s work), and it is important to treat subcutaneous fascial tissue (as done with skin rolling and cupping), then why would we want to leave intrinsic fascial tissue untreated? The type of joint mobilization that can be legally and ethically practiced by most massage therapists is Grade IV Joint Mobilization.* Grade IV joint mobilization is performed with slow oscillations. (A fast thrust is never used! Fast thrust joint mobilization is typically performed by chiropractic and osteopathic physicians.)
As with any technique, it is extremely important that the skill be learned and that the therapist has a proficiency in performing the technique before using it on clients. Even though the technique of joint mobilization / arthrofascial stretching can be learned from an article or video content, given the precision required for this technique, small in-person continuing education classes with one-on-one guidance is recommended.
* Before employing any new technique, including joint mobilization / arthrofascial stretching, please check with your Licensure/Certification body to be sure that it is legal and ethical for you to use.
Pin and stretch technique is often performed similar to how it is shown in Figure 1, with the therapist starting the position of the pin far away from the attachment that is moved, often at or near the other attachment of the muscle, and then gradually and successively moving the position of the pin to be closer to the attachment that is moved. However, if we critically think through the underlying mechanism of this technique, we will see that not only is it not necessary to carry out pin and stretch technique in this manner, it does not necessarily make sense. If the point of pin and stretch is to focus the stretch force on a specific taut region of a muscle, say a myofascial TrP, then it would make sense that the most efficient method to employ this technique would be to place the pin directly next to the TrP (or other taut tissue), on the “other side” of the TrP that is “away” from the attachment that will be moved; then perform the stretch.
Again, using the upper trapezius as our example, if the TrP is located in the upper trapezius as indicated in Figure 2, then the best place to position the pin is as close to the TrP as possible, but on the “other side,” in this case the “scapuloclavicular side,” of the TrP as shown in the figure. In this example, if the pin were to be placed anywhere between the TrP and the cervicocranial attachment, it would be ineffective because the pin would block the stretch force from even making it to the TrP. And the farther the pin is positioned from the TrP on the scapuloclavicular attachment side, the more diluted will be the stretch. So, when working with pin and stretch technique, the most effective manner in which to perform the technique is to place the pin as close to the TrP as possible, on the side of the TrP that is away from the attachment that is being moved
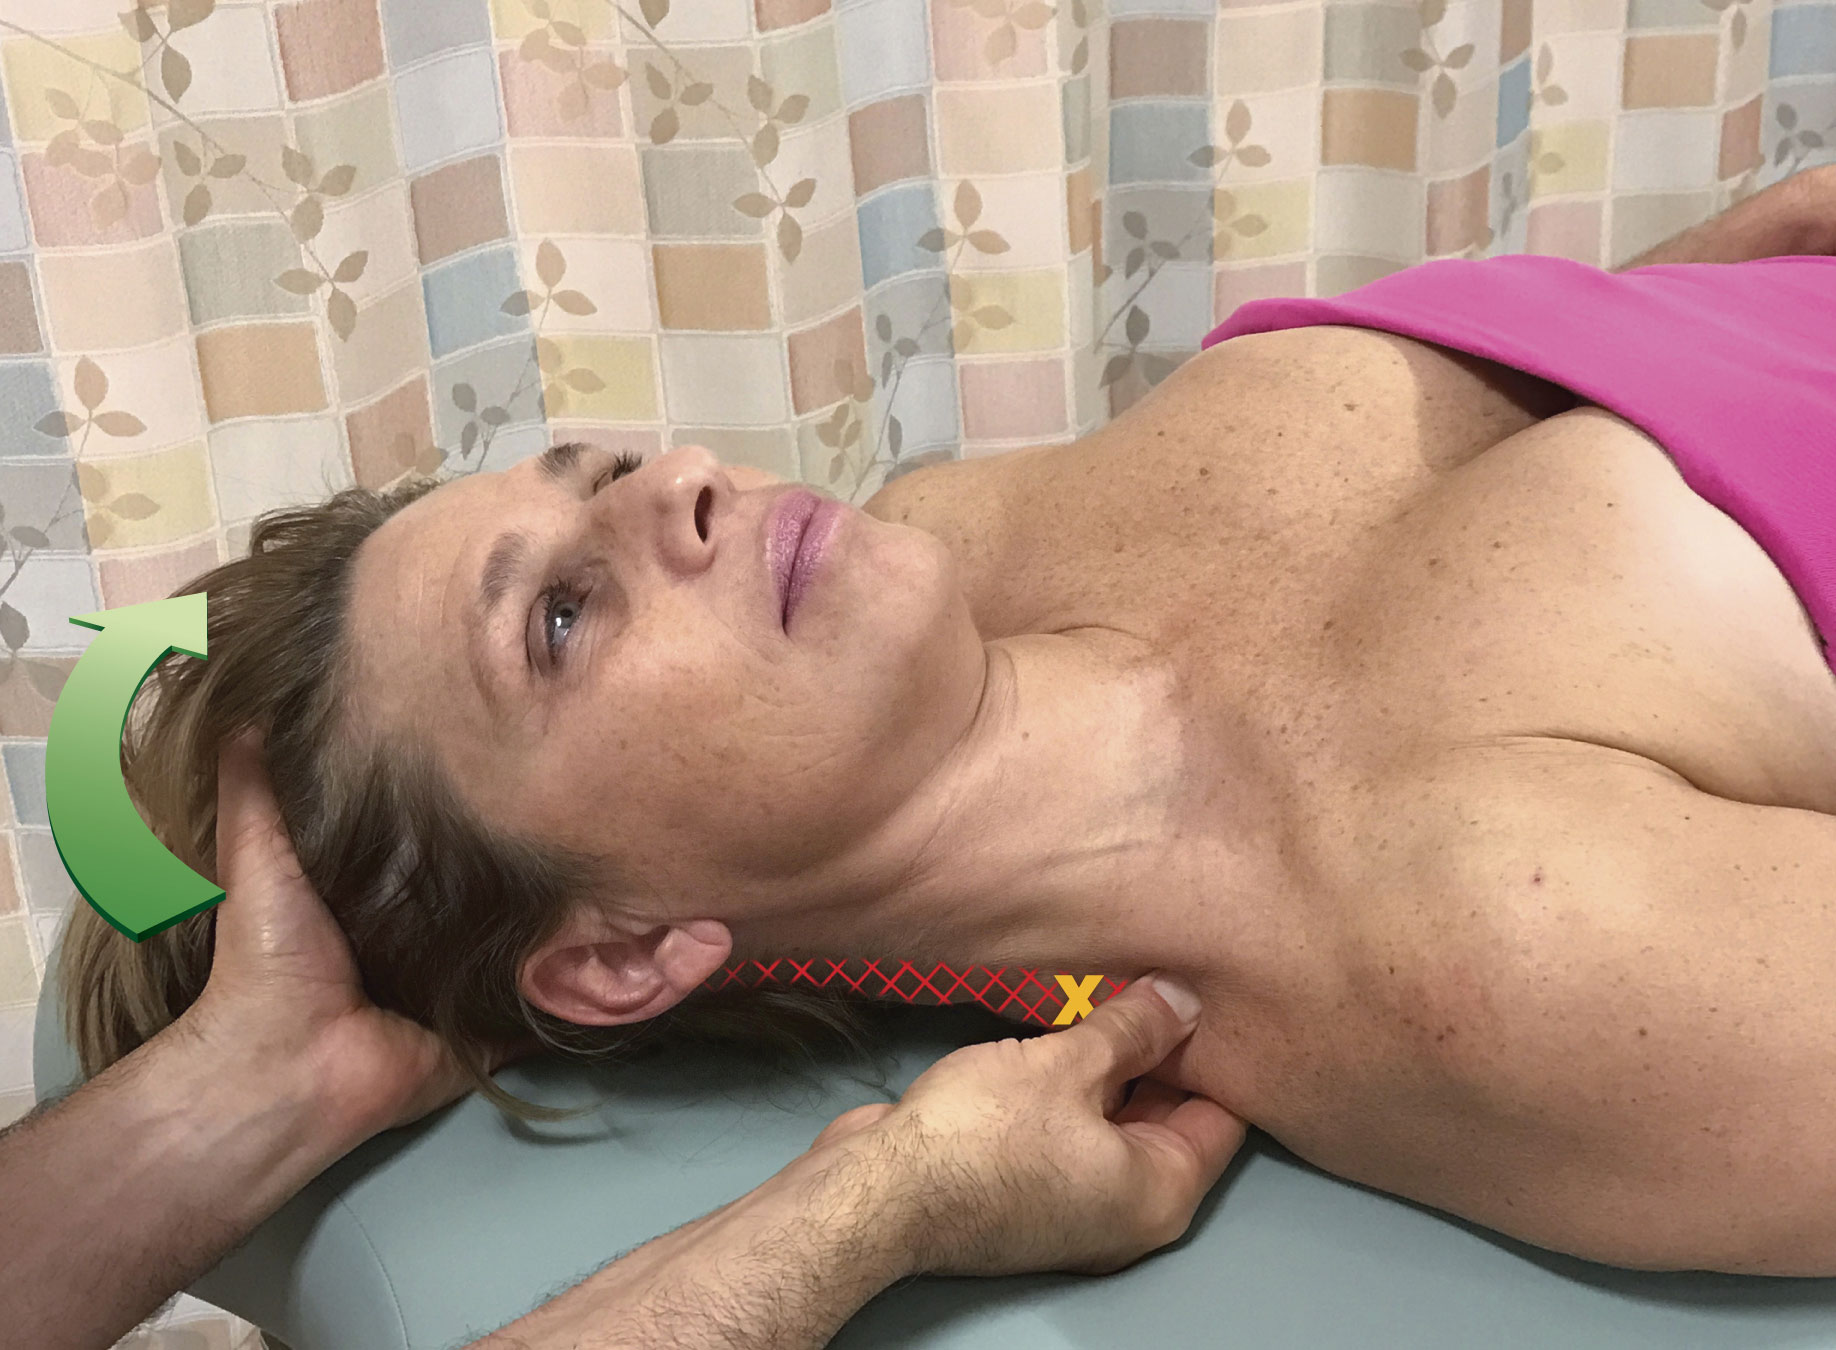
Figure 2. Pin and stretch to the right upper trapezius with the head/neck (cervicocranial) attachment moved. Given the location of the TrP (indicated by the X), the best location for the pin is shown.
Which Attachment Do We Move?
When the target tissue of the pin and stretch technique is in a muscle in which both attachments are easily mobile, it is possible to focus the force of the stretch toward either end of the muscle. Again, let’s use the upper trapezius as our example. In Figure 1, the cervicocranial attachment was moved, so the stretch force was focused toward the cervicocranial attachment end of the muscle. But if the TrP that we want to focus the stretch on were toward the scapuloclavicular attachment, then we would need to instead move the scapuloclavicular attachment when performing pin and stretch technique. So if the TrP is toward the scapuloclavicular attachment, we would want to place our pin as close to the TrP as possible, but on the “other side” of the TrP, in this case the “cervicocranial side,” and then move the scapuloclavicular attachment away from the client’s head and neck as seen in Figure 3.
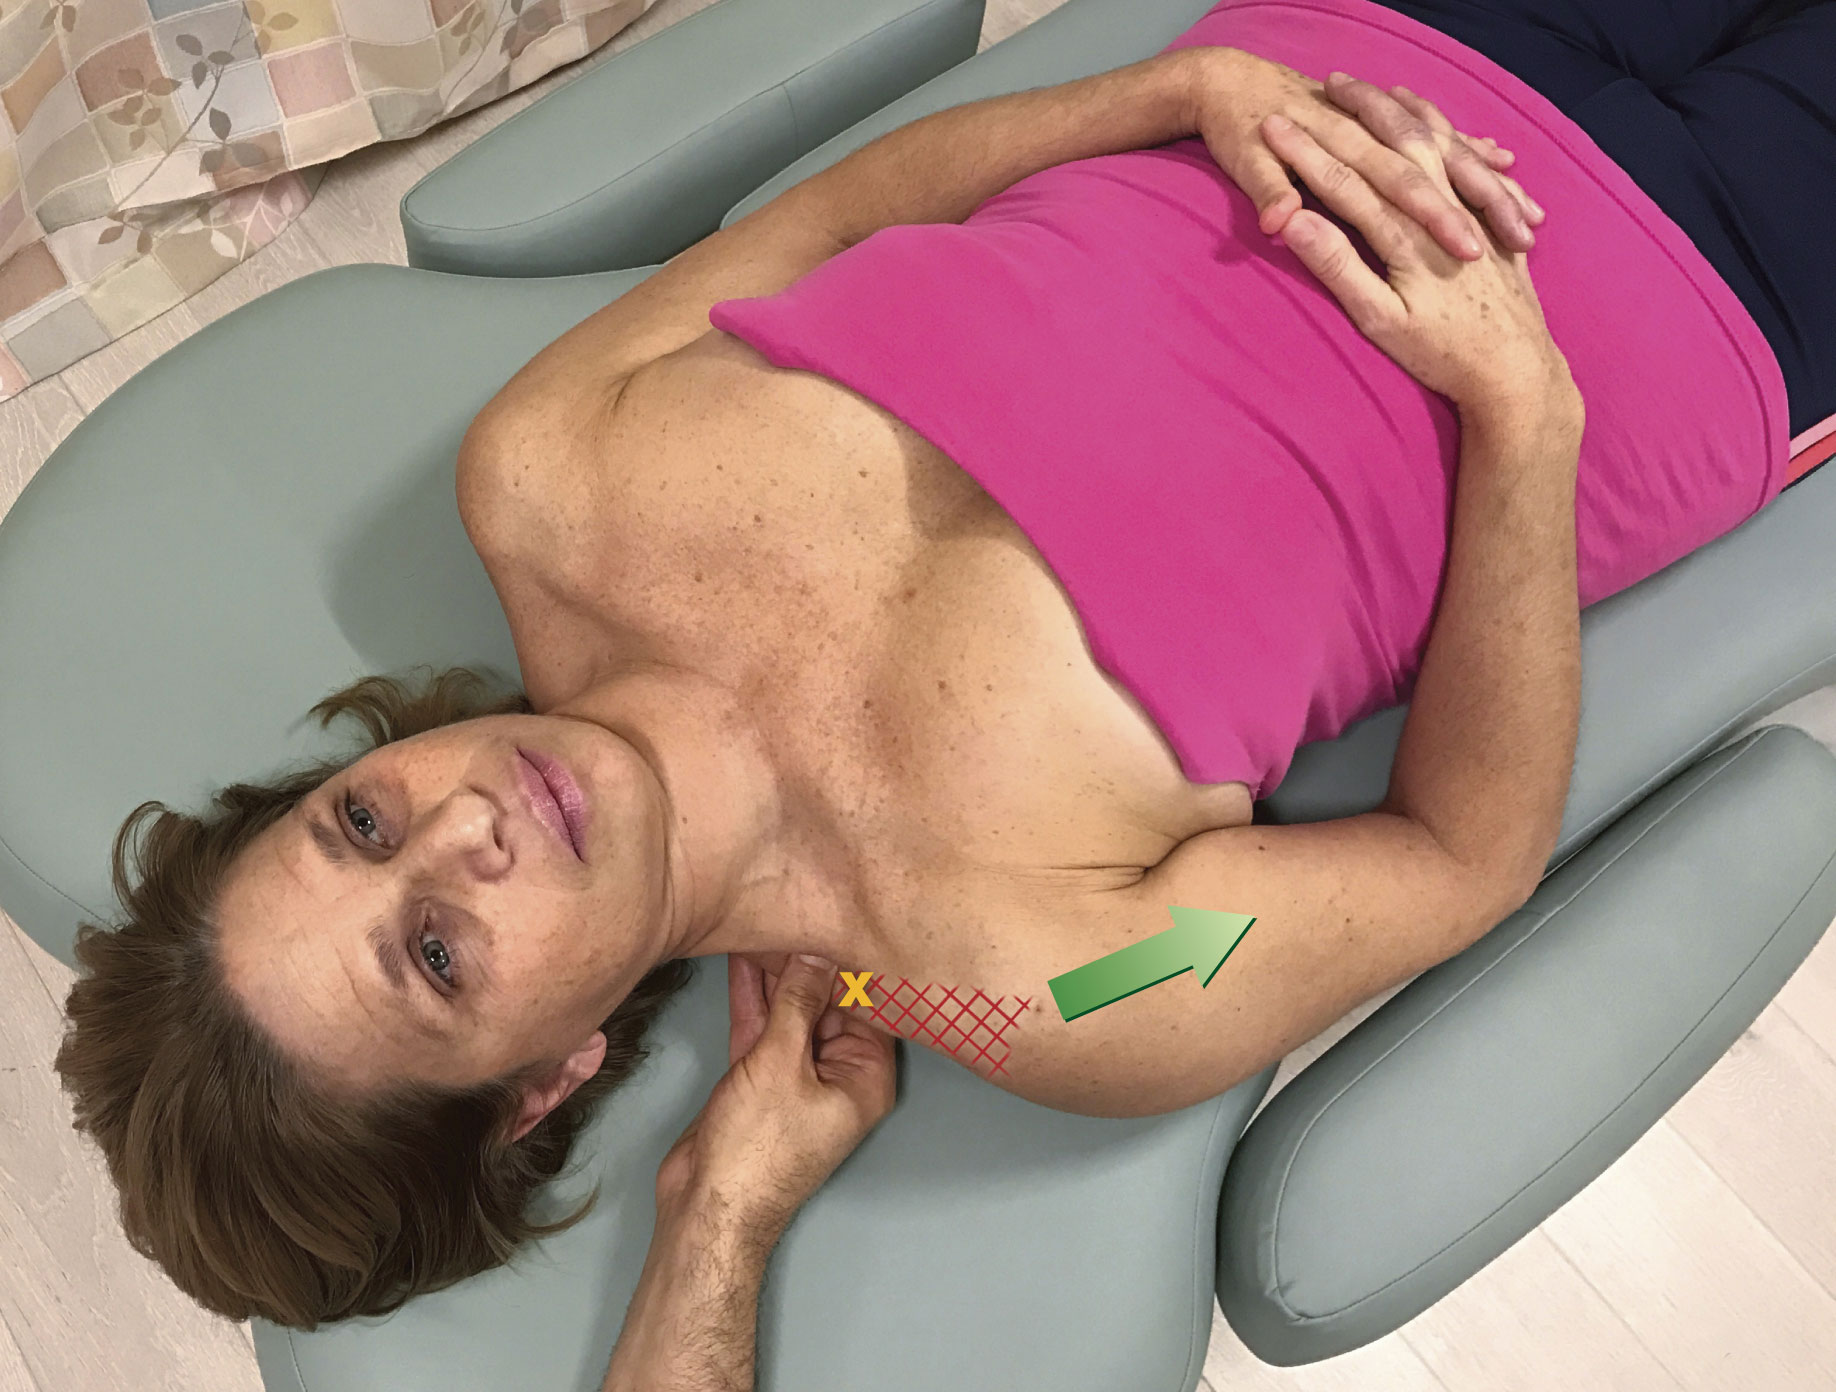 Figure 3. Pin and stretch to the right upper trapezius. The shoulder girdle (scapuloclavicular) attachment is the attachment that is moved. The hatch marks indicate the focus of the stretch. The location of the trigger point (TrP) is indicated by the X.
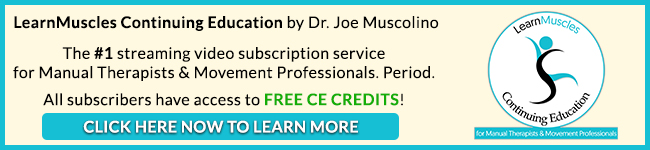
Unfortunately, for most muscles, only one attachment is easily mobile, and that attachment is usually the distal attachment. For this reason, pin and stretch technique is usually most effective when the goal is to focus the stretch on a region of the muscle that is closer to the more mobile, usually the distal, attachment of the muscle. Two excellent examples of this, one in the upper extremity and one in the lower extremity are shown in Figures 4 and 5. Figure 4 shows pin and stretch technique being performed on the right flexor carpi radialis muscle, one of the muscles involved in golfer’s elbow); two positions of the pin are shown (note: pin and stretch technique is also extremely valuable to employ with clients/patients who have tennis elbow). Figure 5 shows pin and stretch technique being performed on the right piriformis muscle; three positions of the pin are shown.
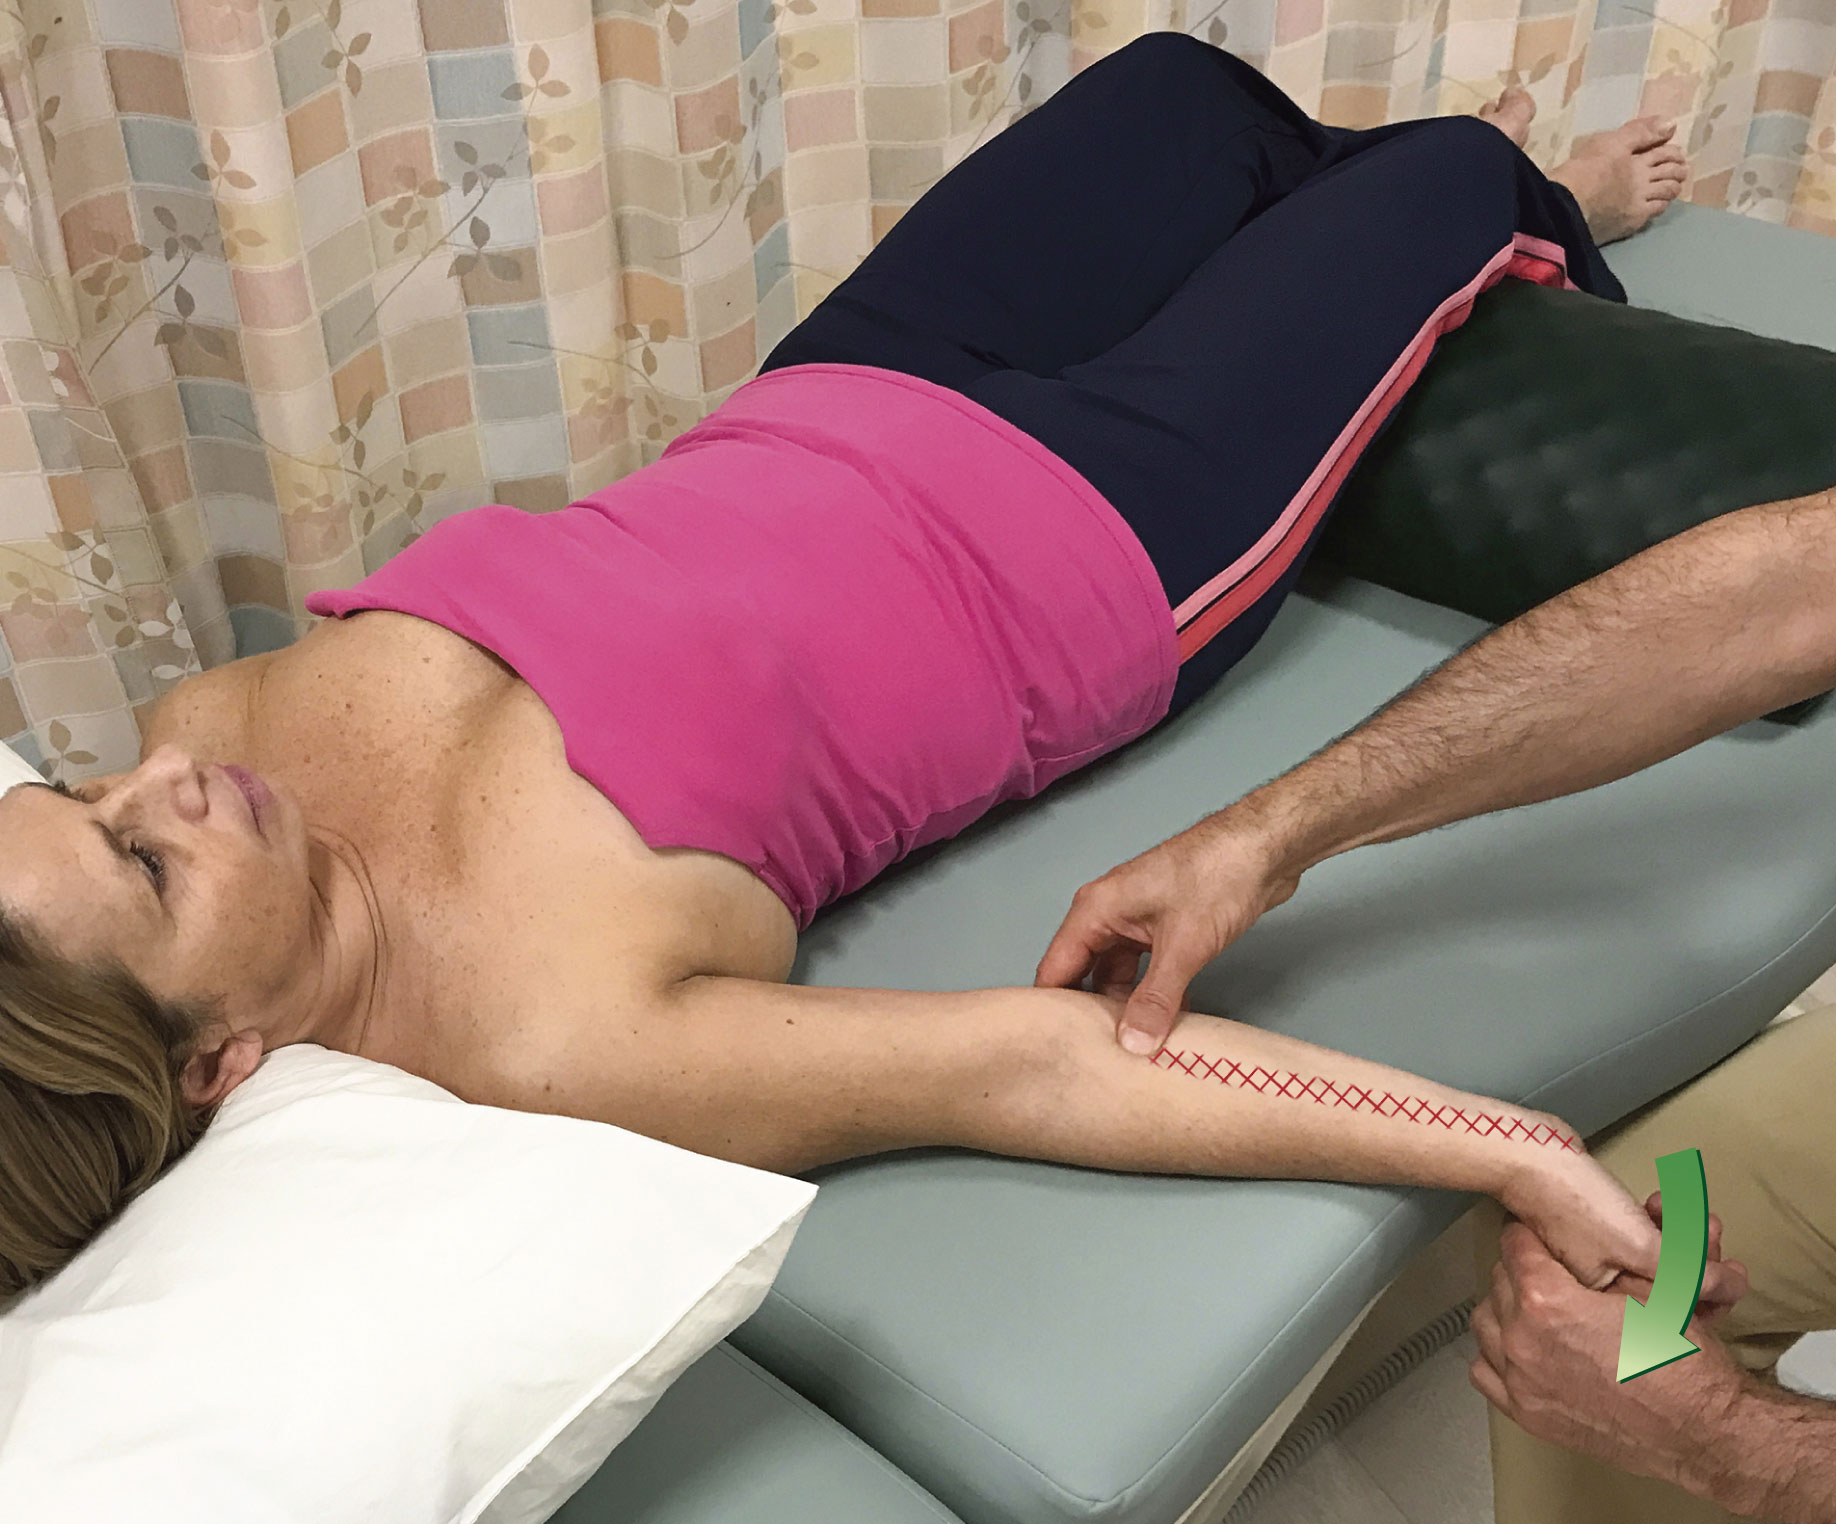
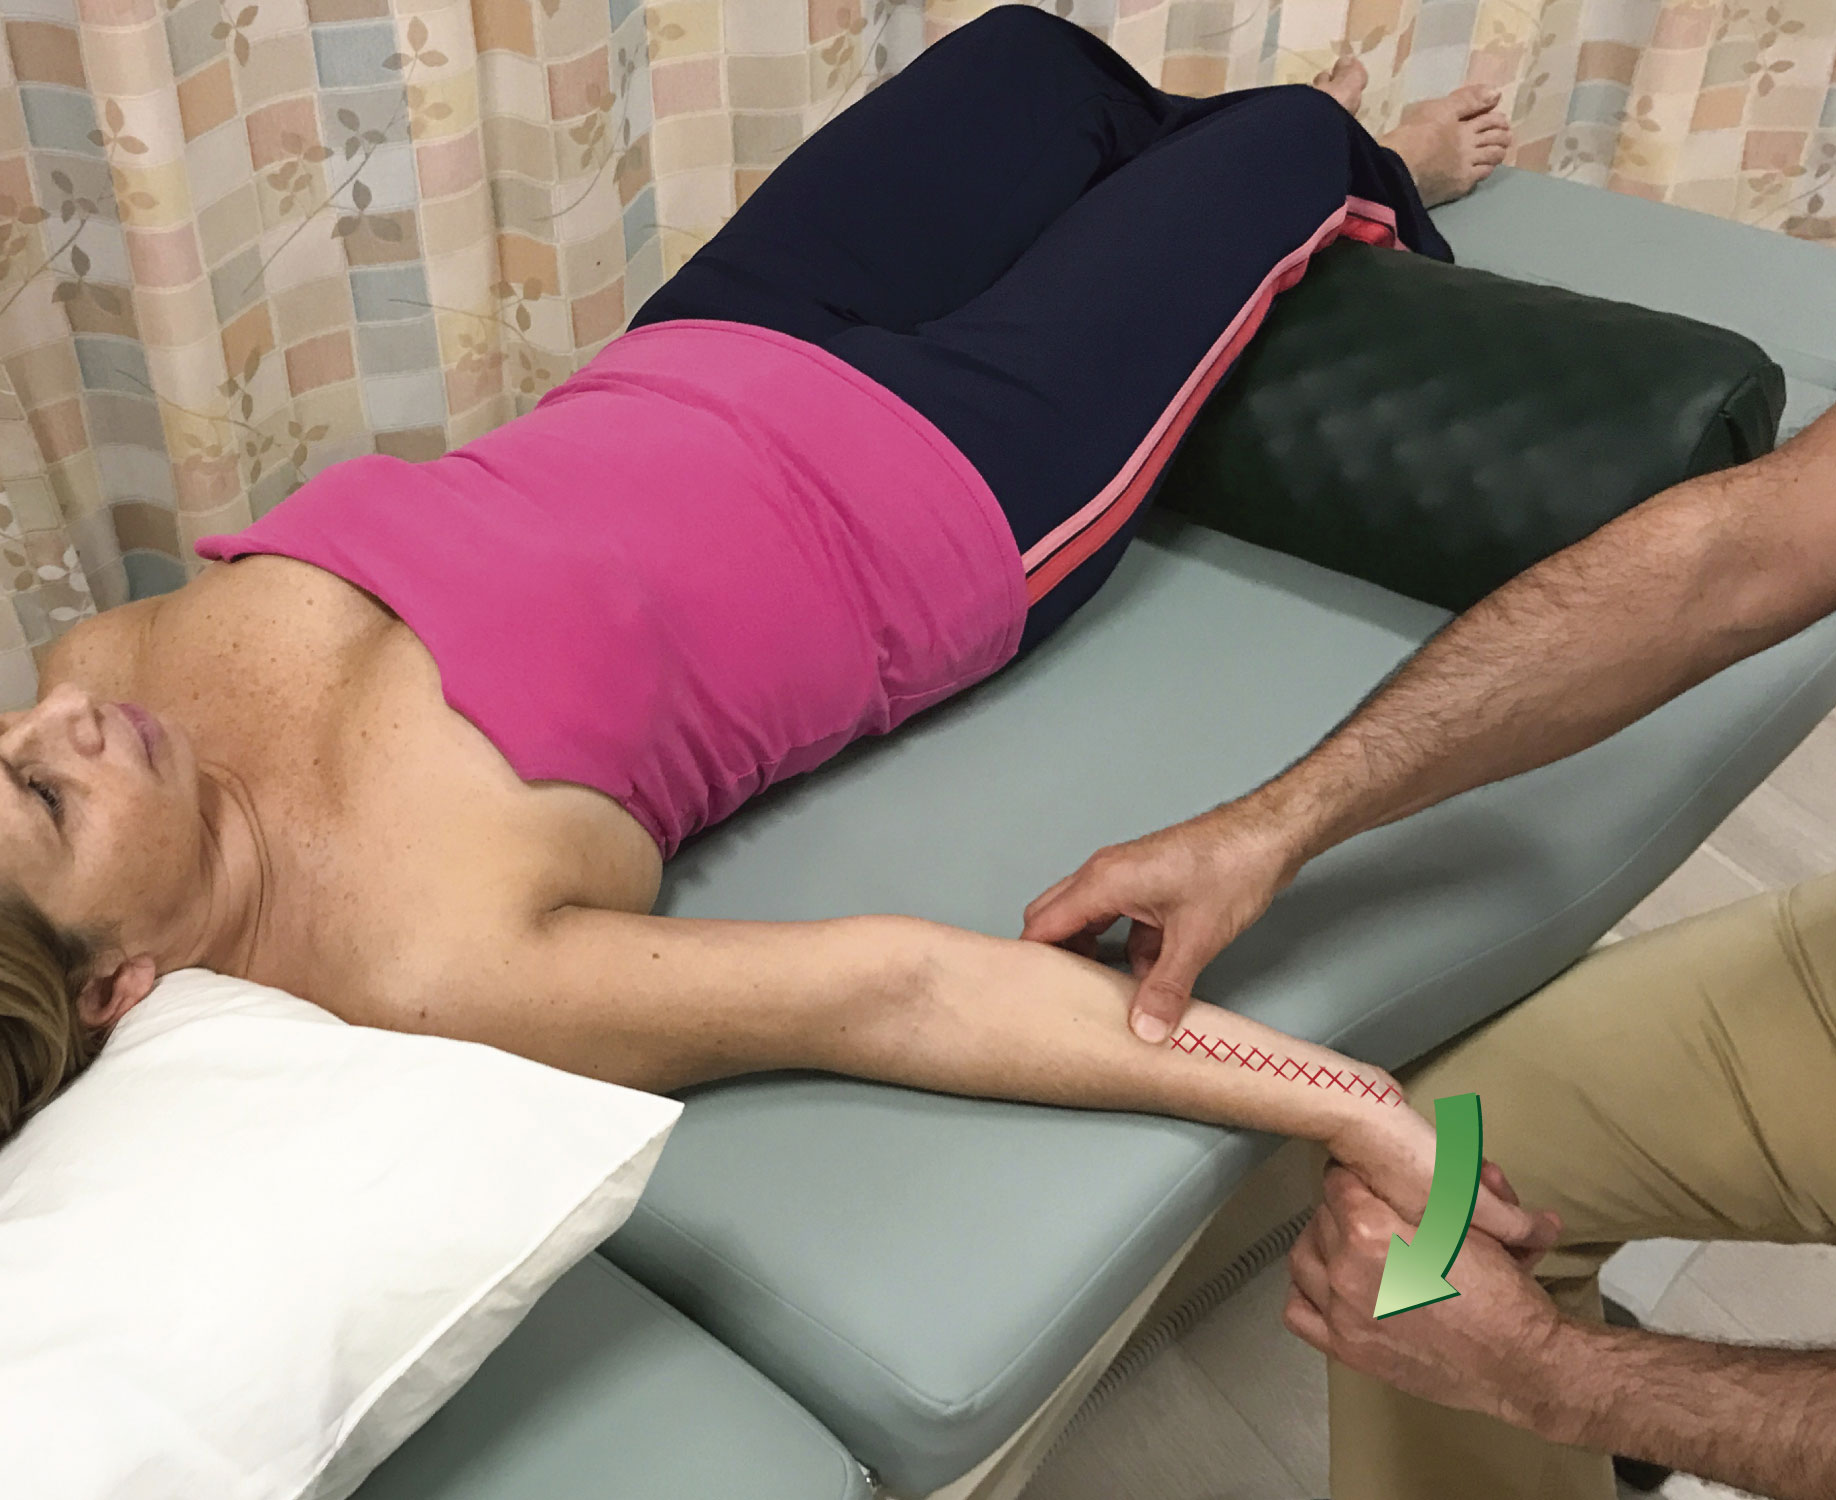
Figure 4. Pin and stretch to the right flexor carpi radialis. The distal/hand attachment of the flexor carpi radialis is the attachment that is moved. The hatch marks indicate the focus of the stretch. Two positions for the pin are shown.
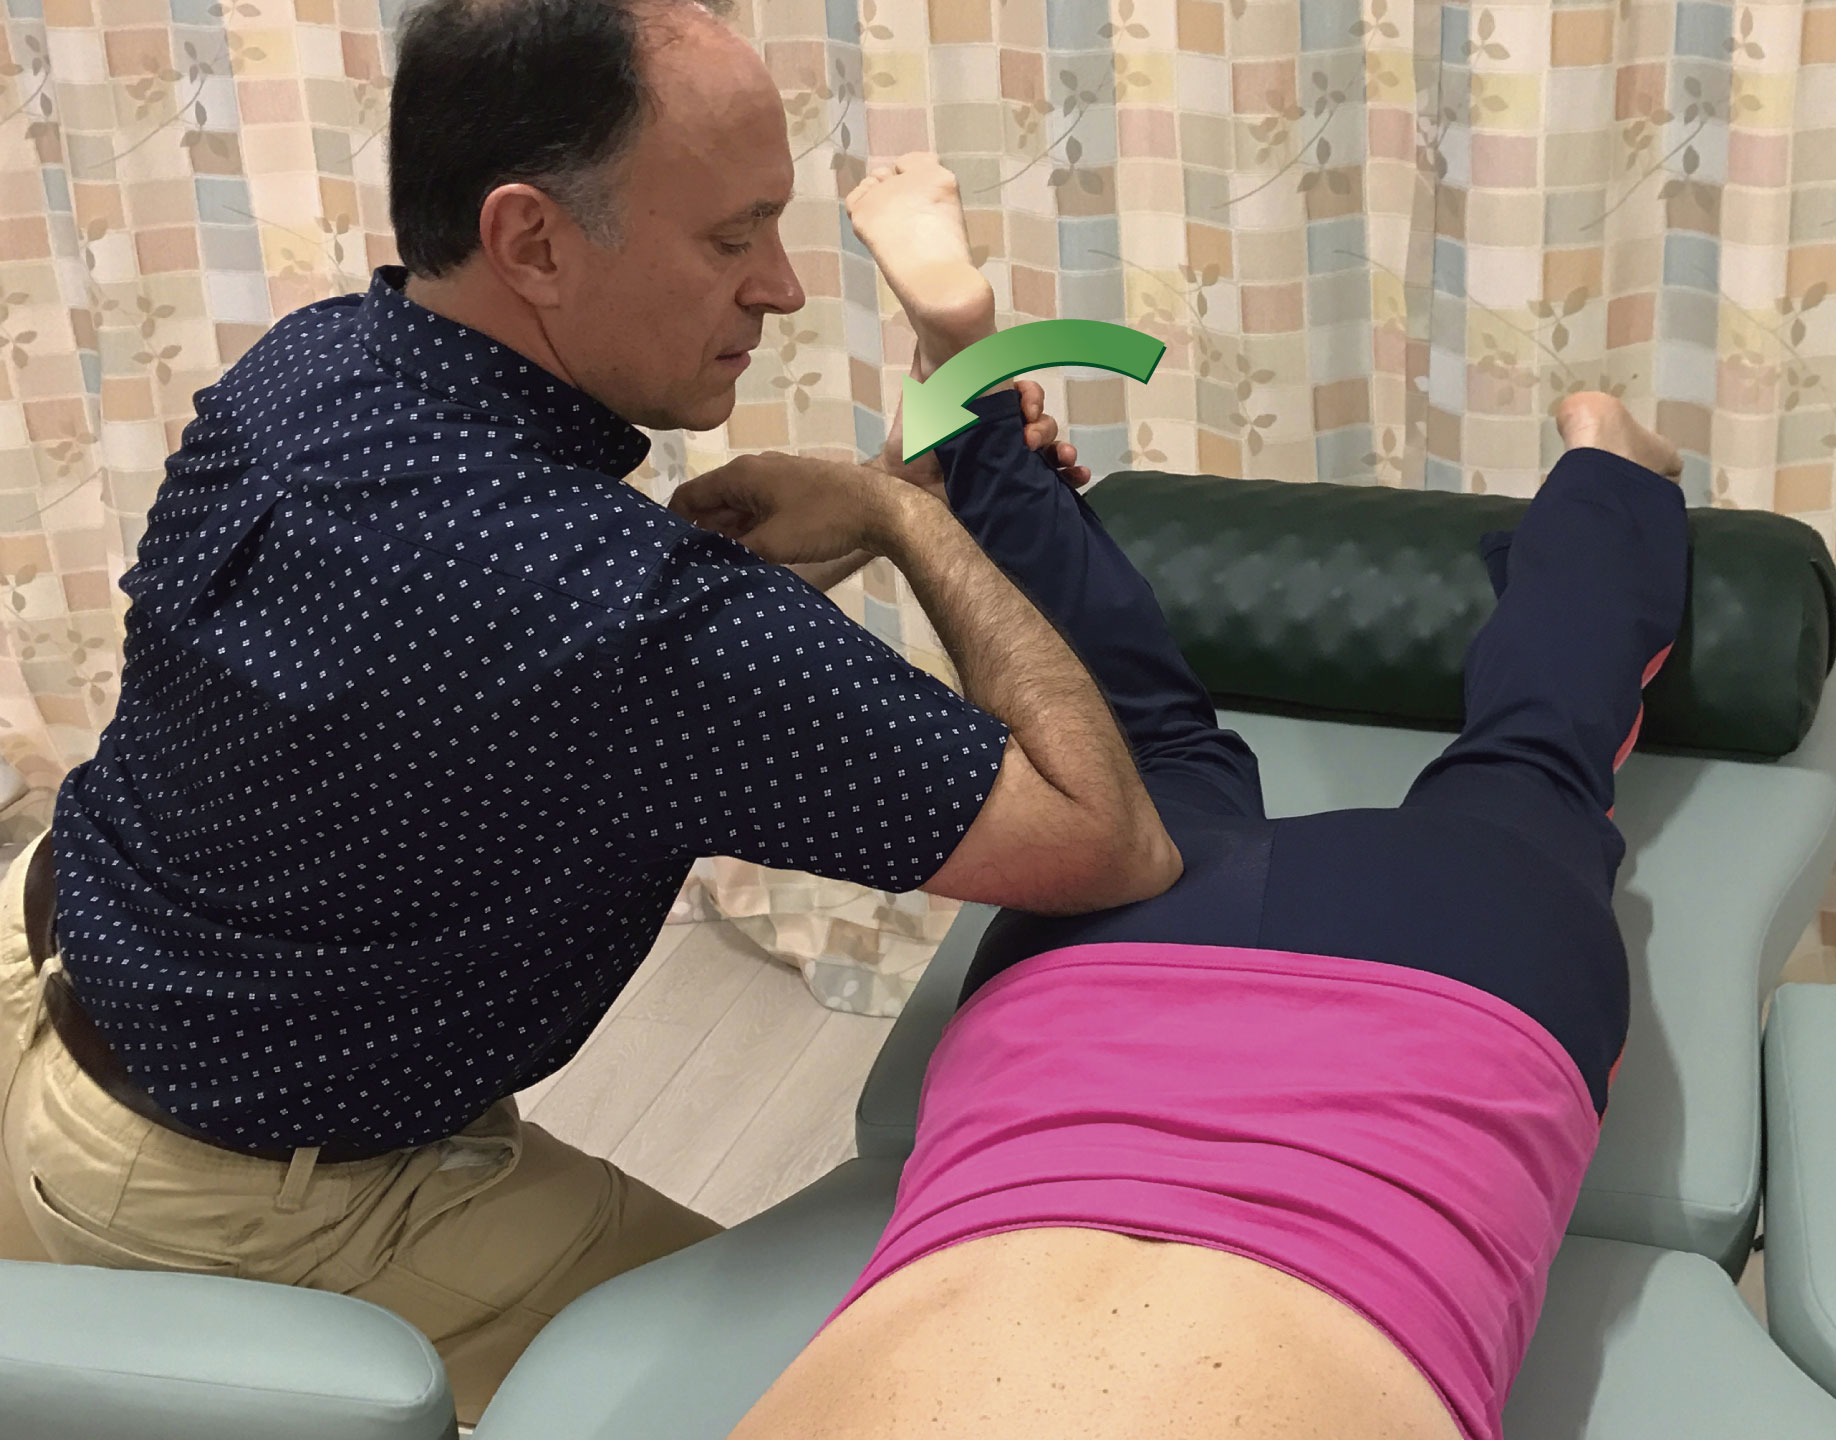
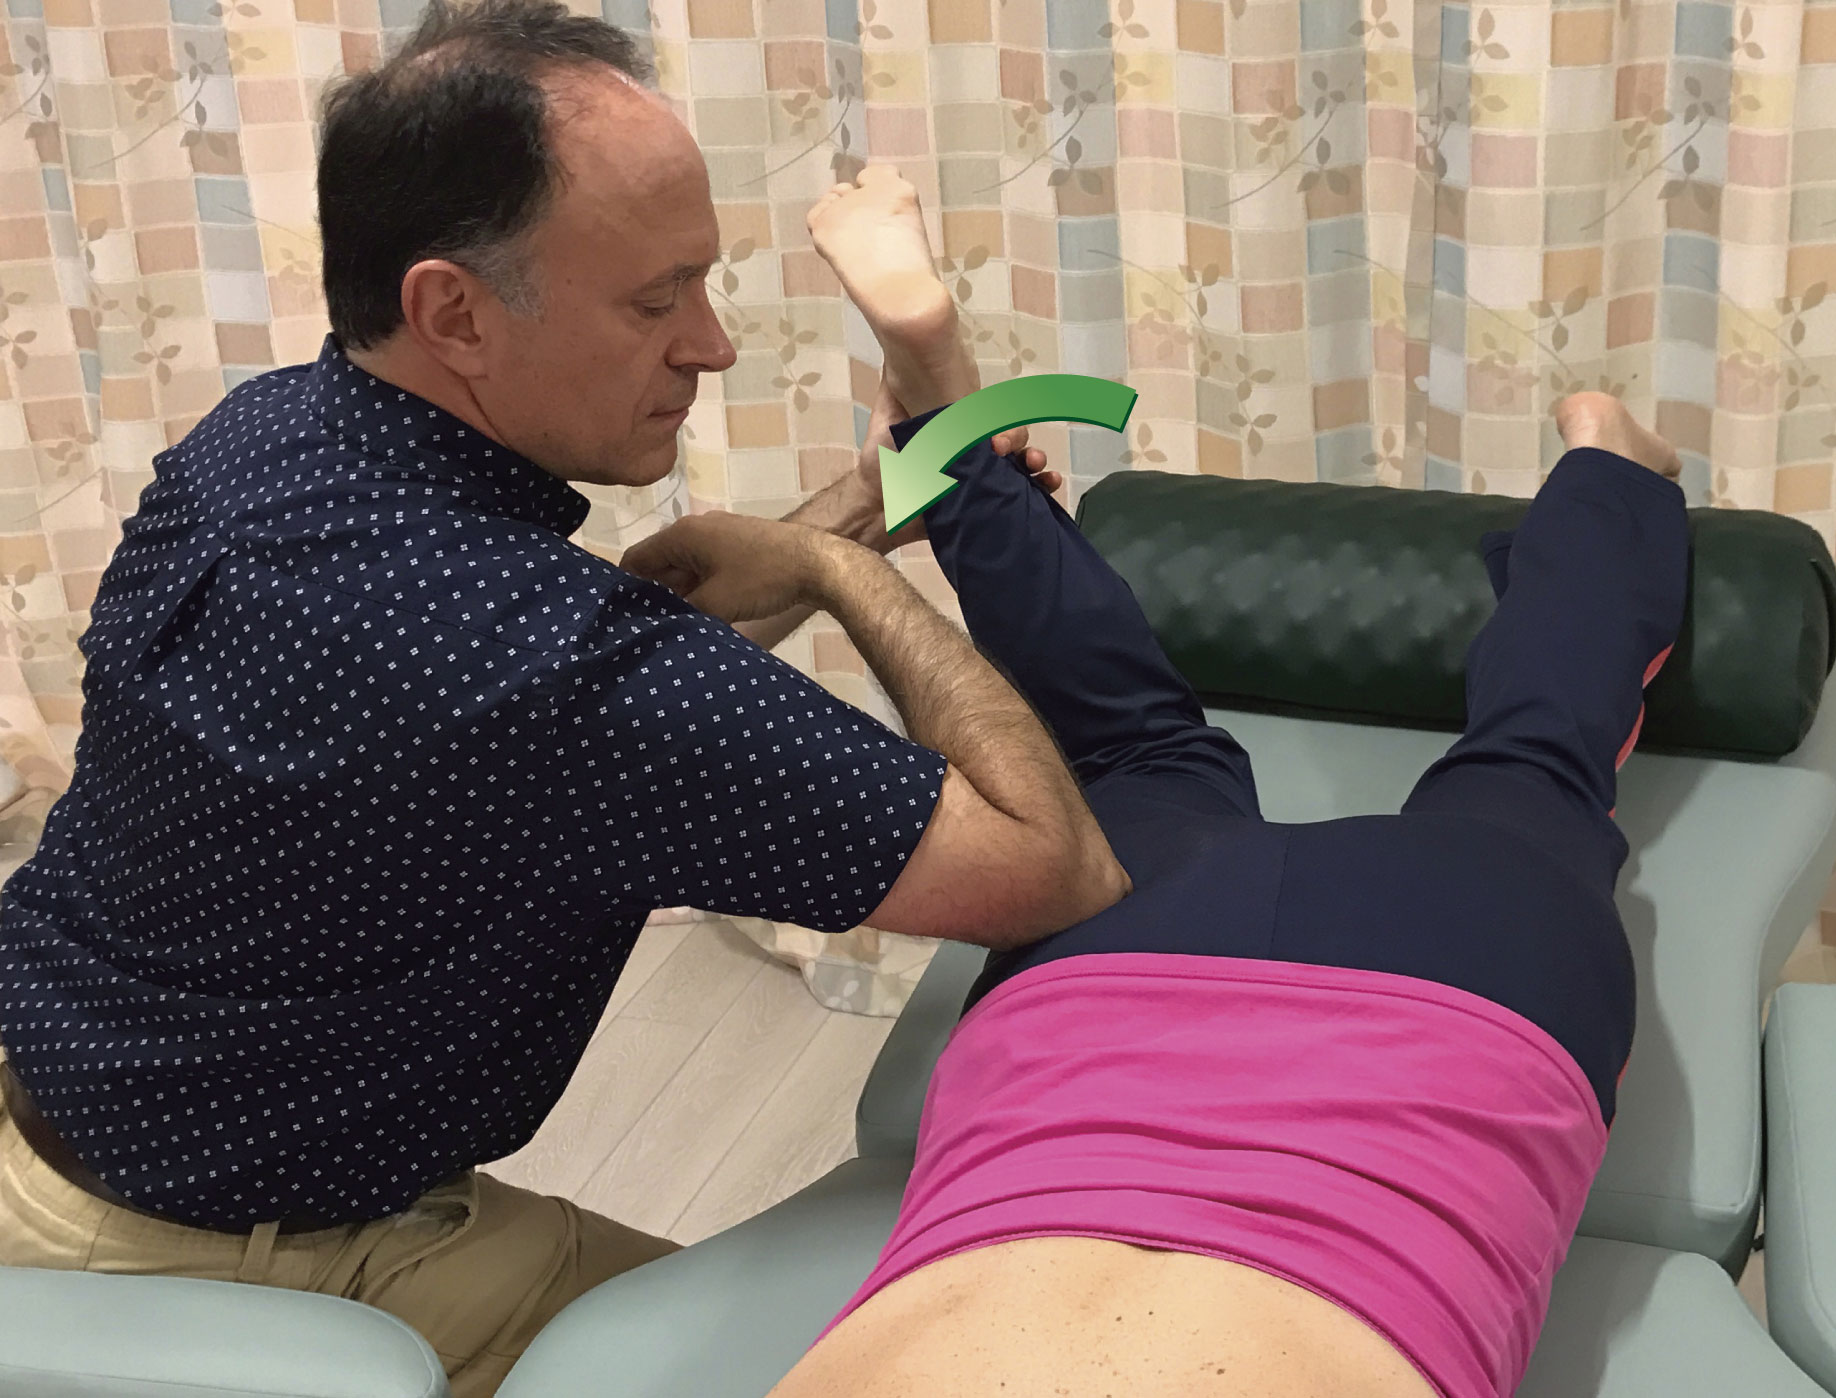
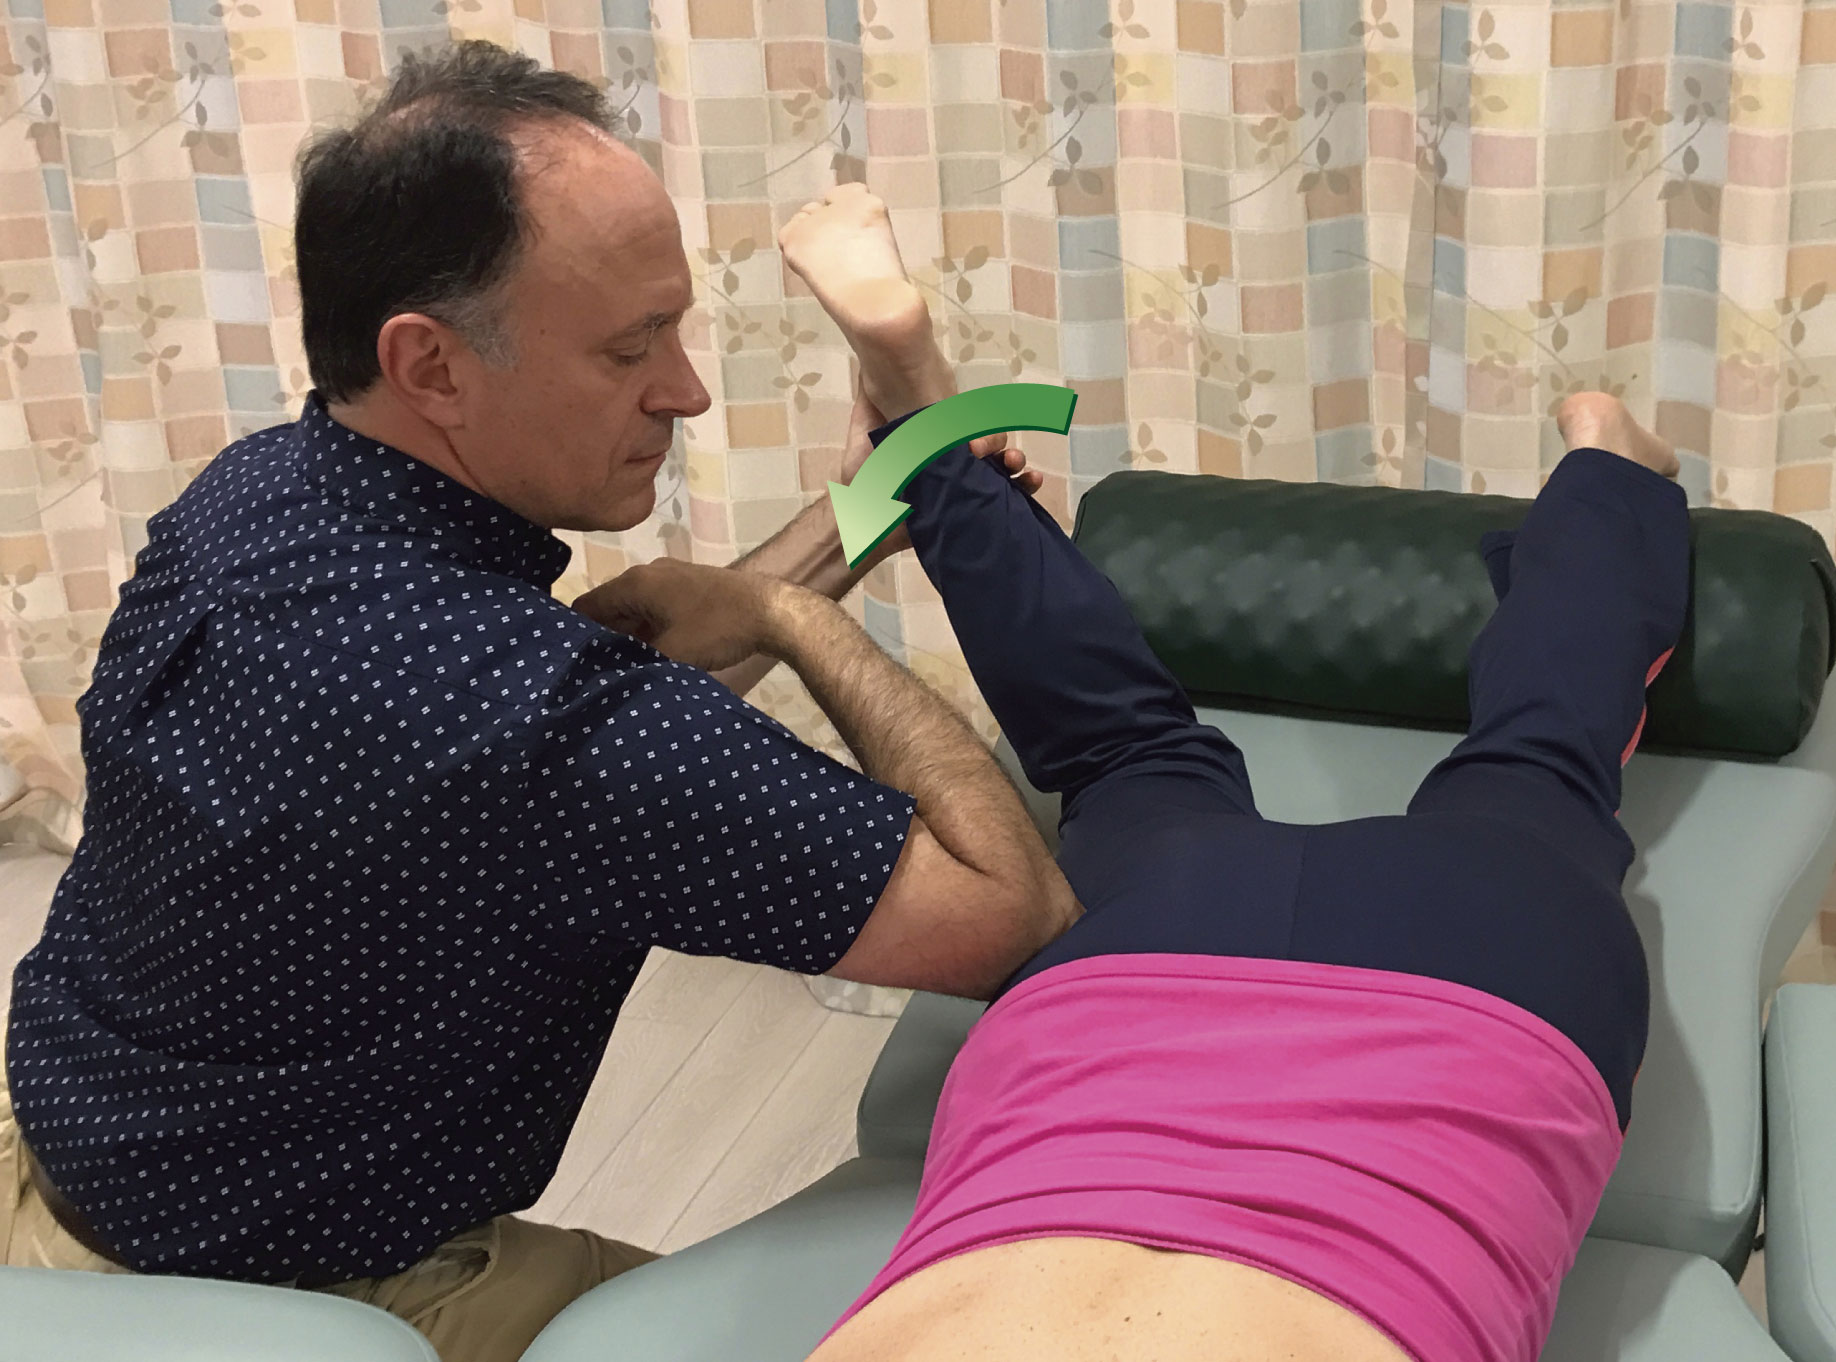
Figure 5. Pin and stretch to the right piriformis. The distal/thigh attachment of the piriformis is the attachment that is moved. Three positions for the pin are shown.
Pin Contact:
When performing pin and stretch technique, it is possible to use any contact for the pin. Usually, the smaller the contact, such as finger pads or thumb pad, the more precise the therapist can be with the technique. However, smaller contacts also tend to be a bit pokey and uncomfortable for the client. Larger contacts might seem to be more assertive, but when the pressure is appropriately modulated, because larger contacts tend to better spread out the force on the client’s body, they are usually more comfortable for the client. And because they are larger, they are more powerful and comfortable for the therapist. Figure 6 demonstrates the use of various contacts employed when performing pin and stretch technique on the right piriformis.
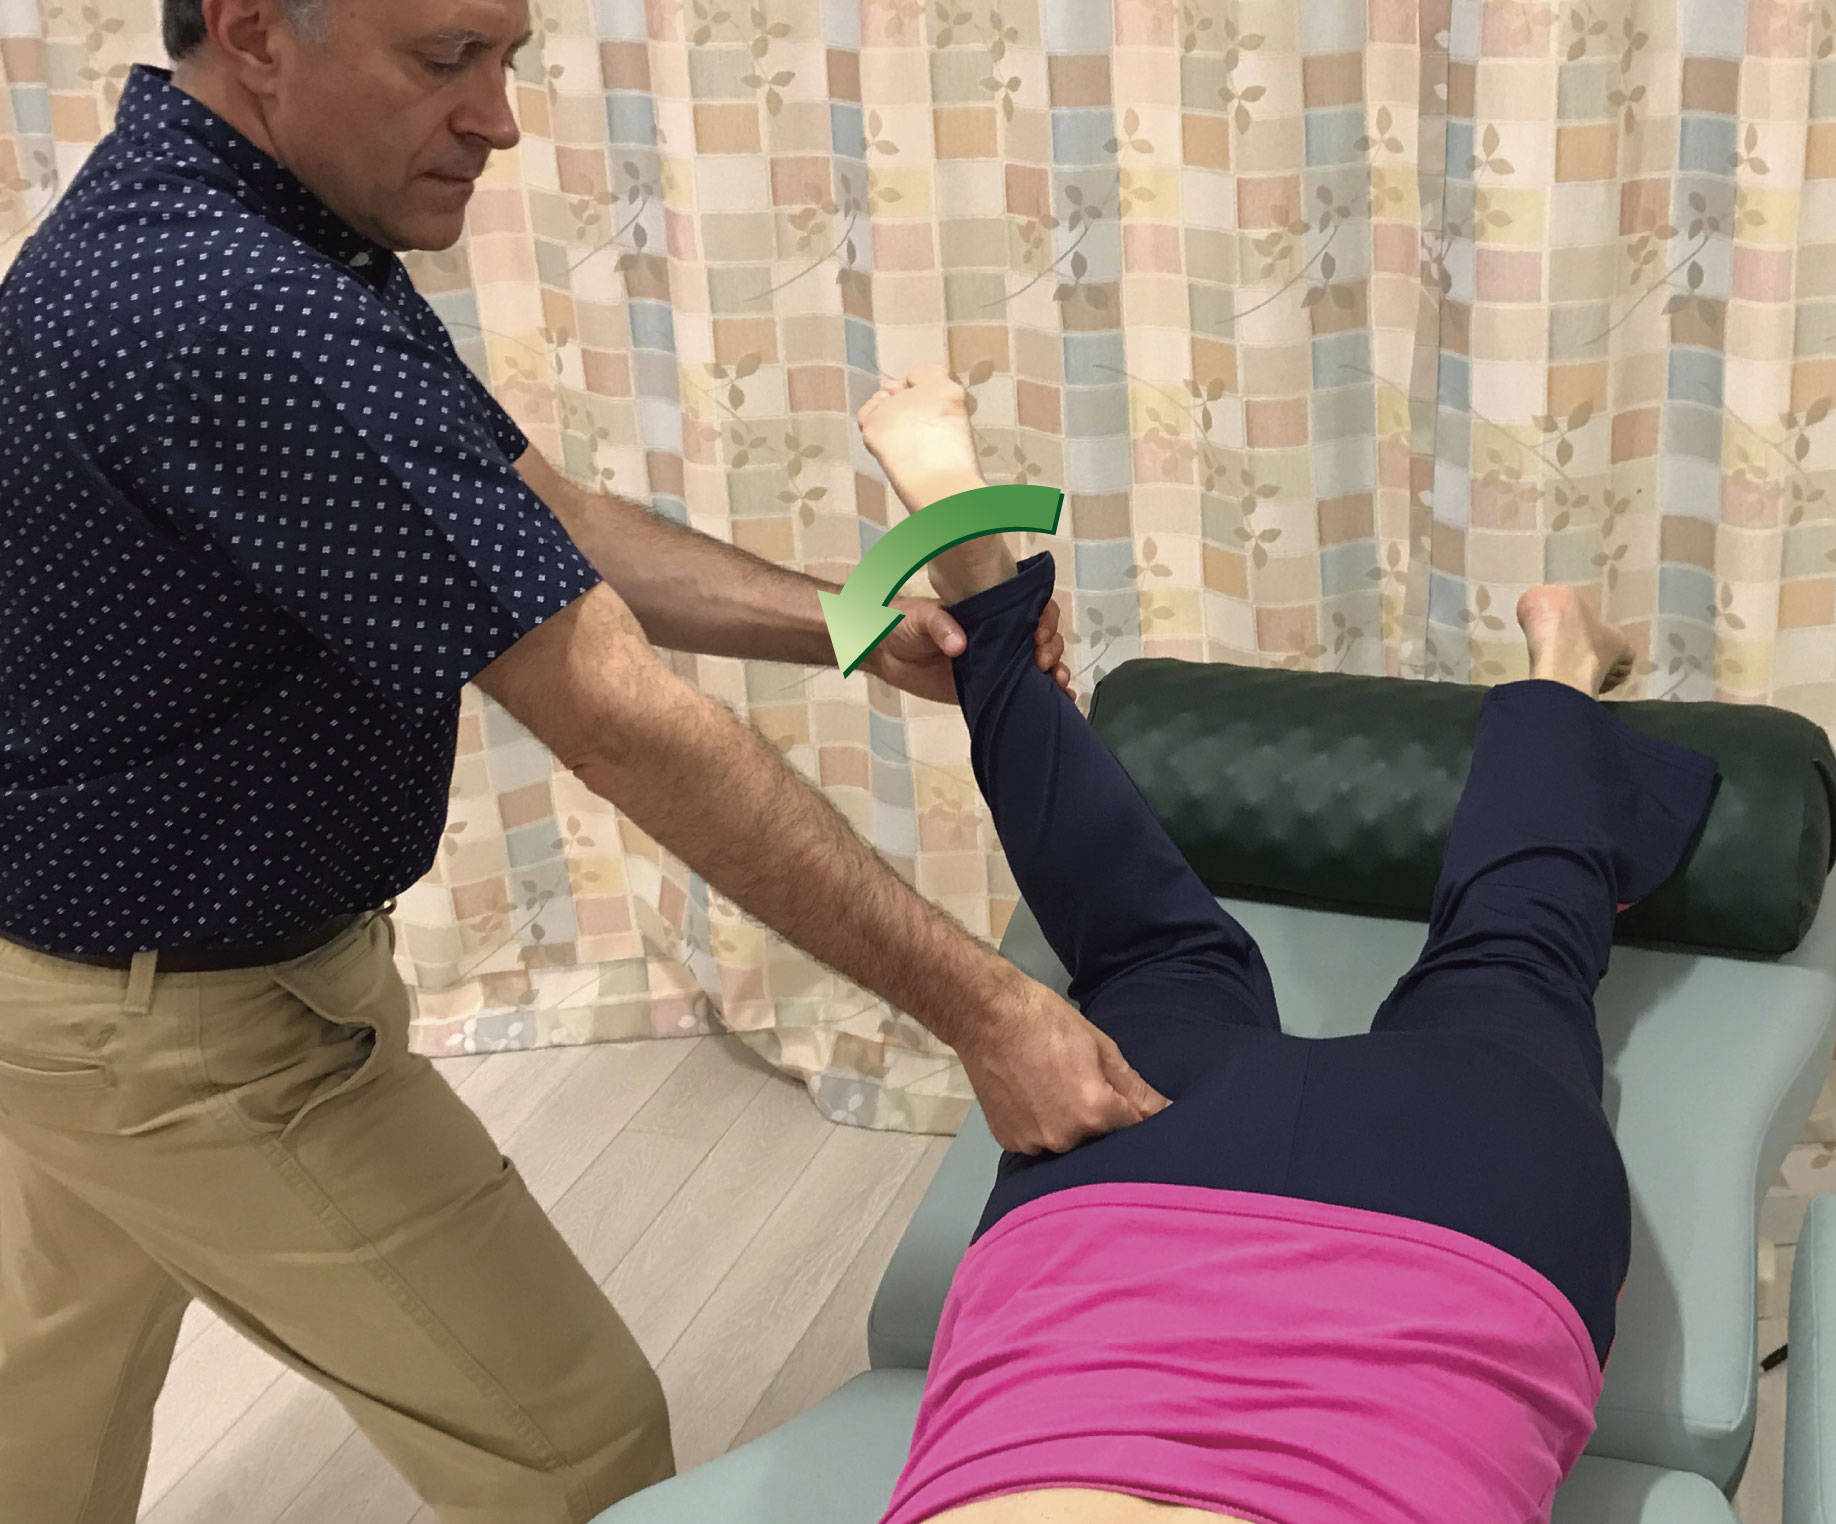
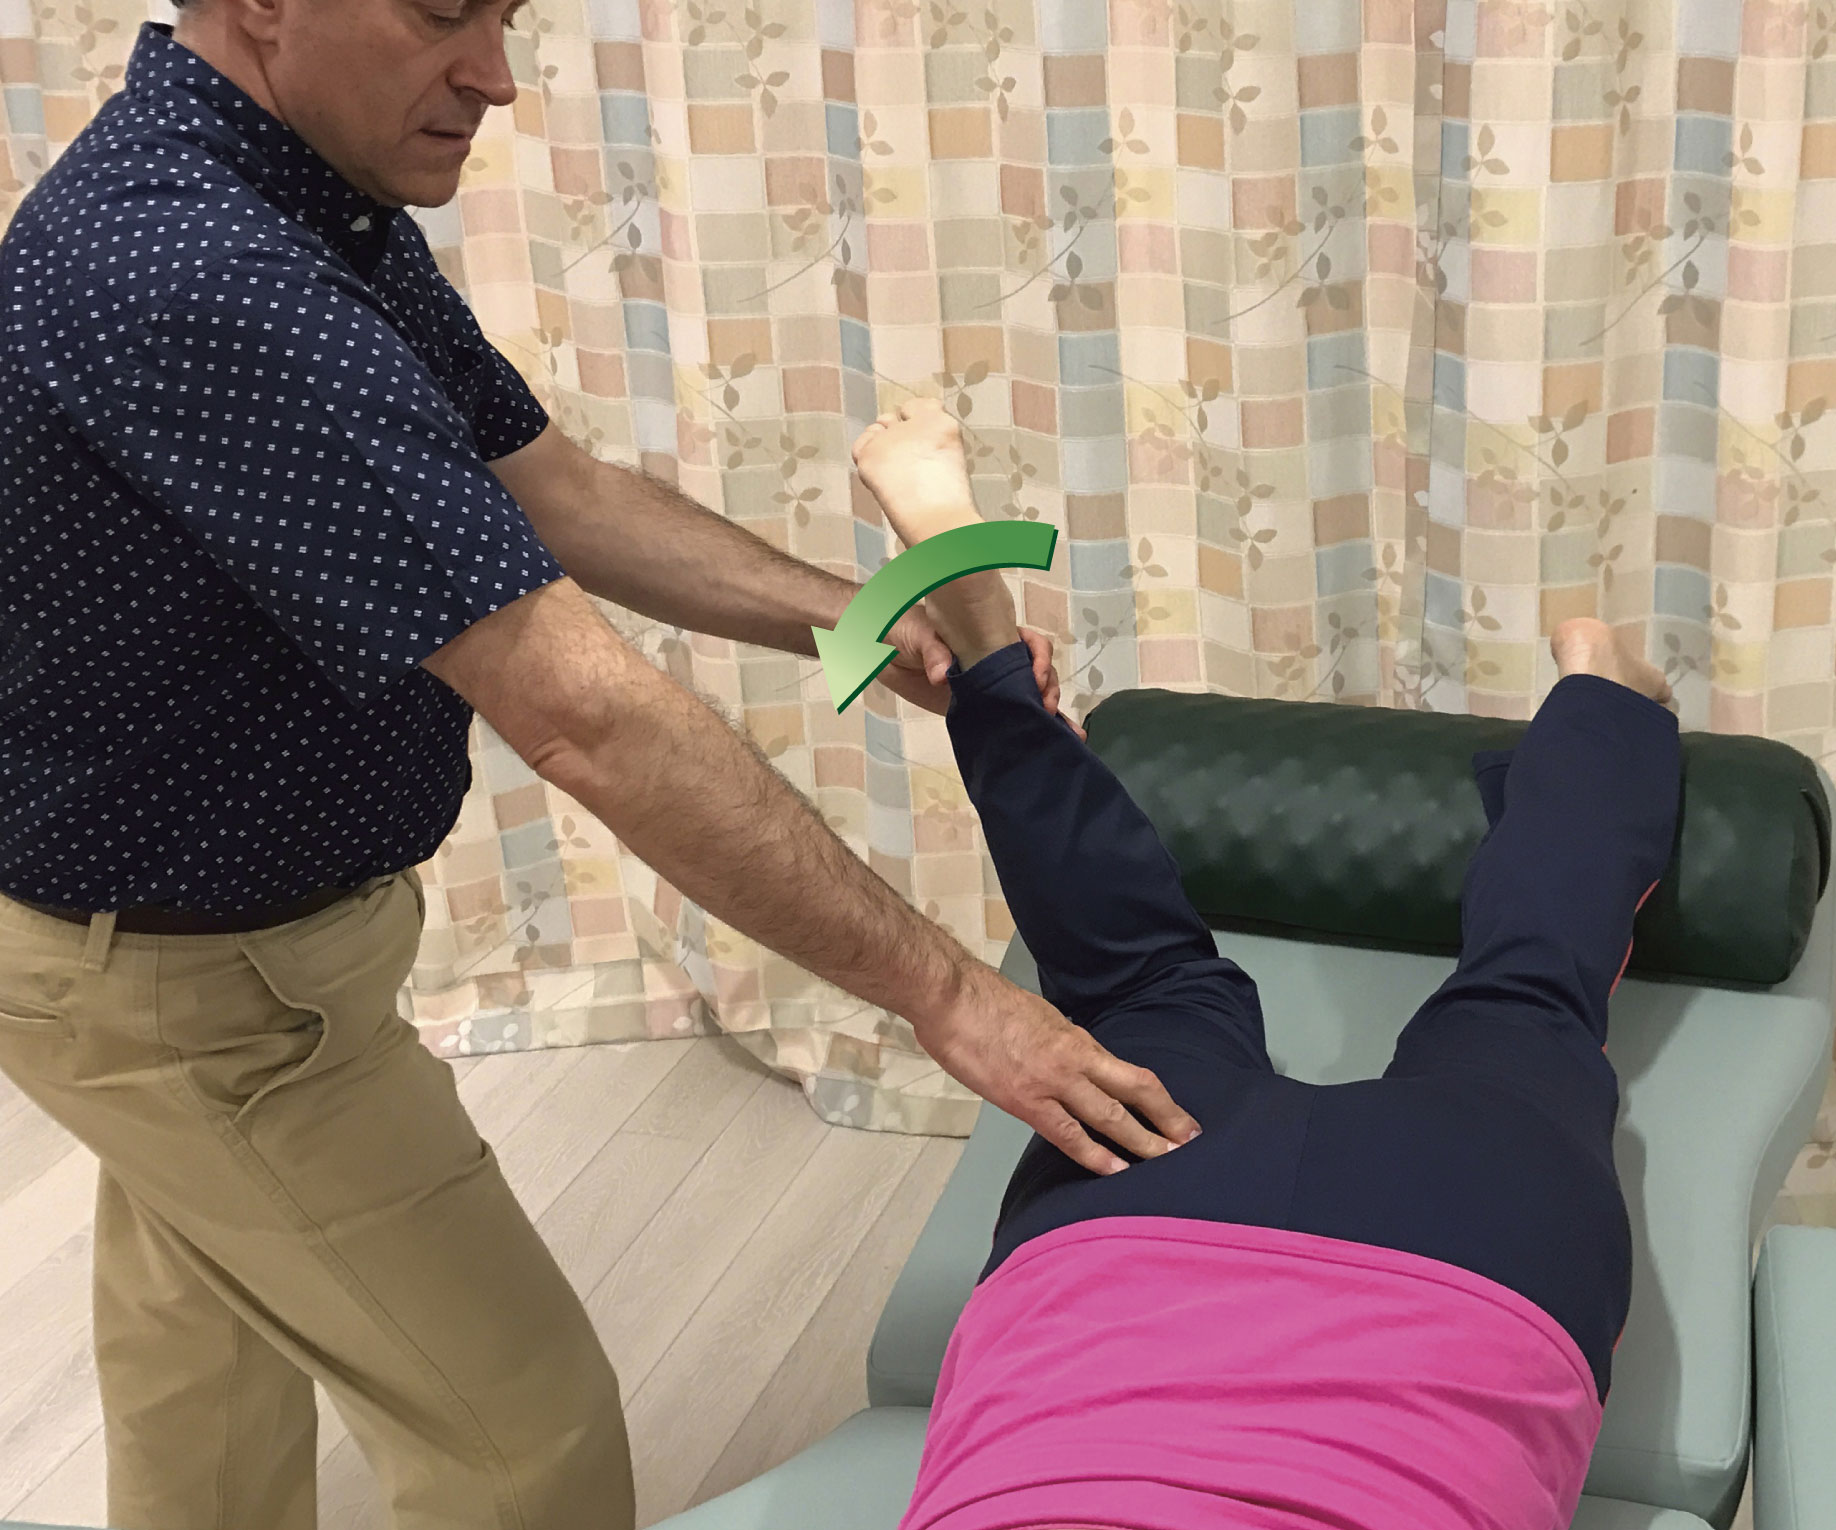

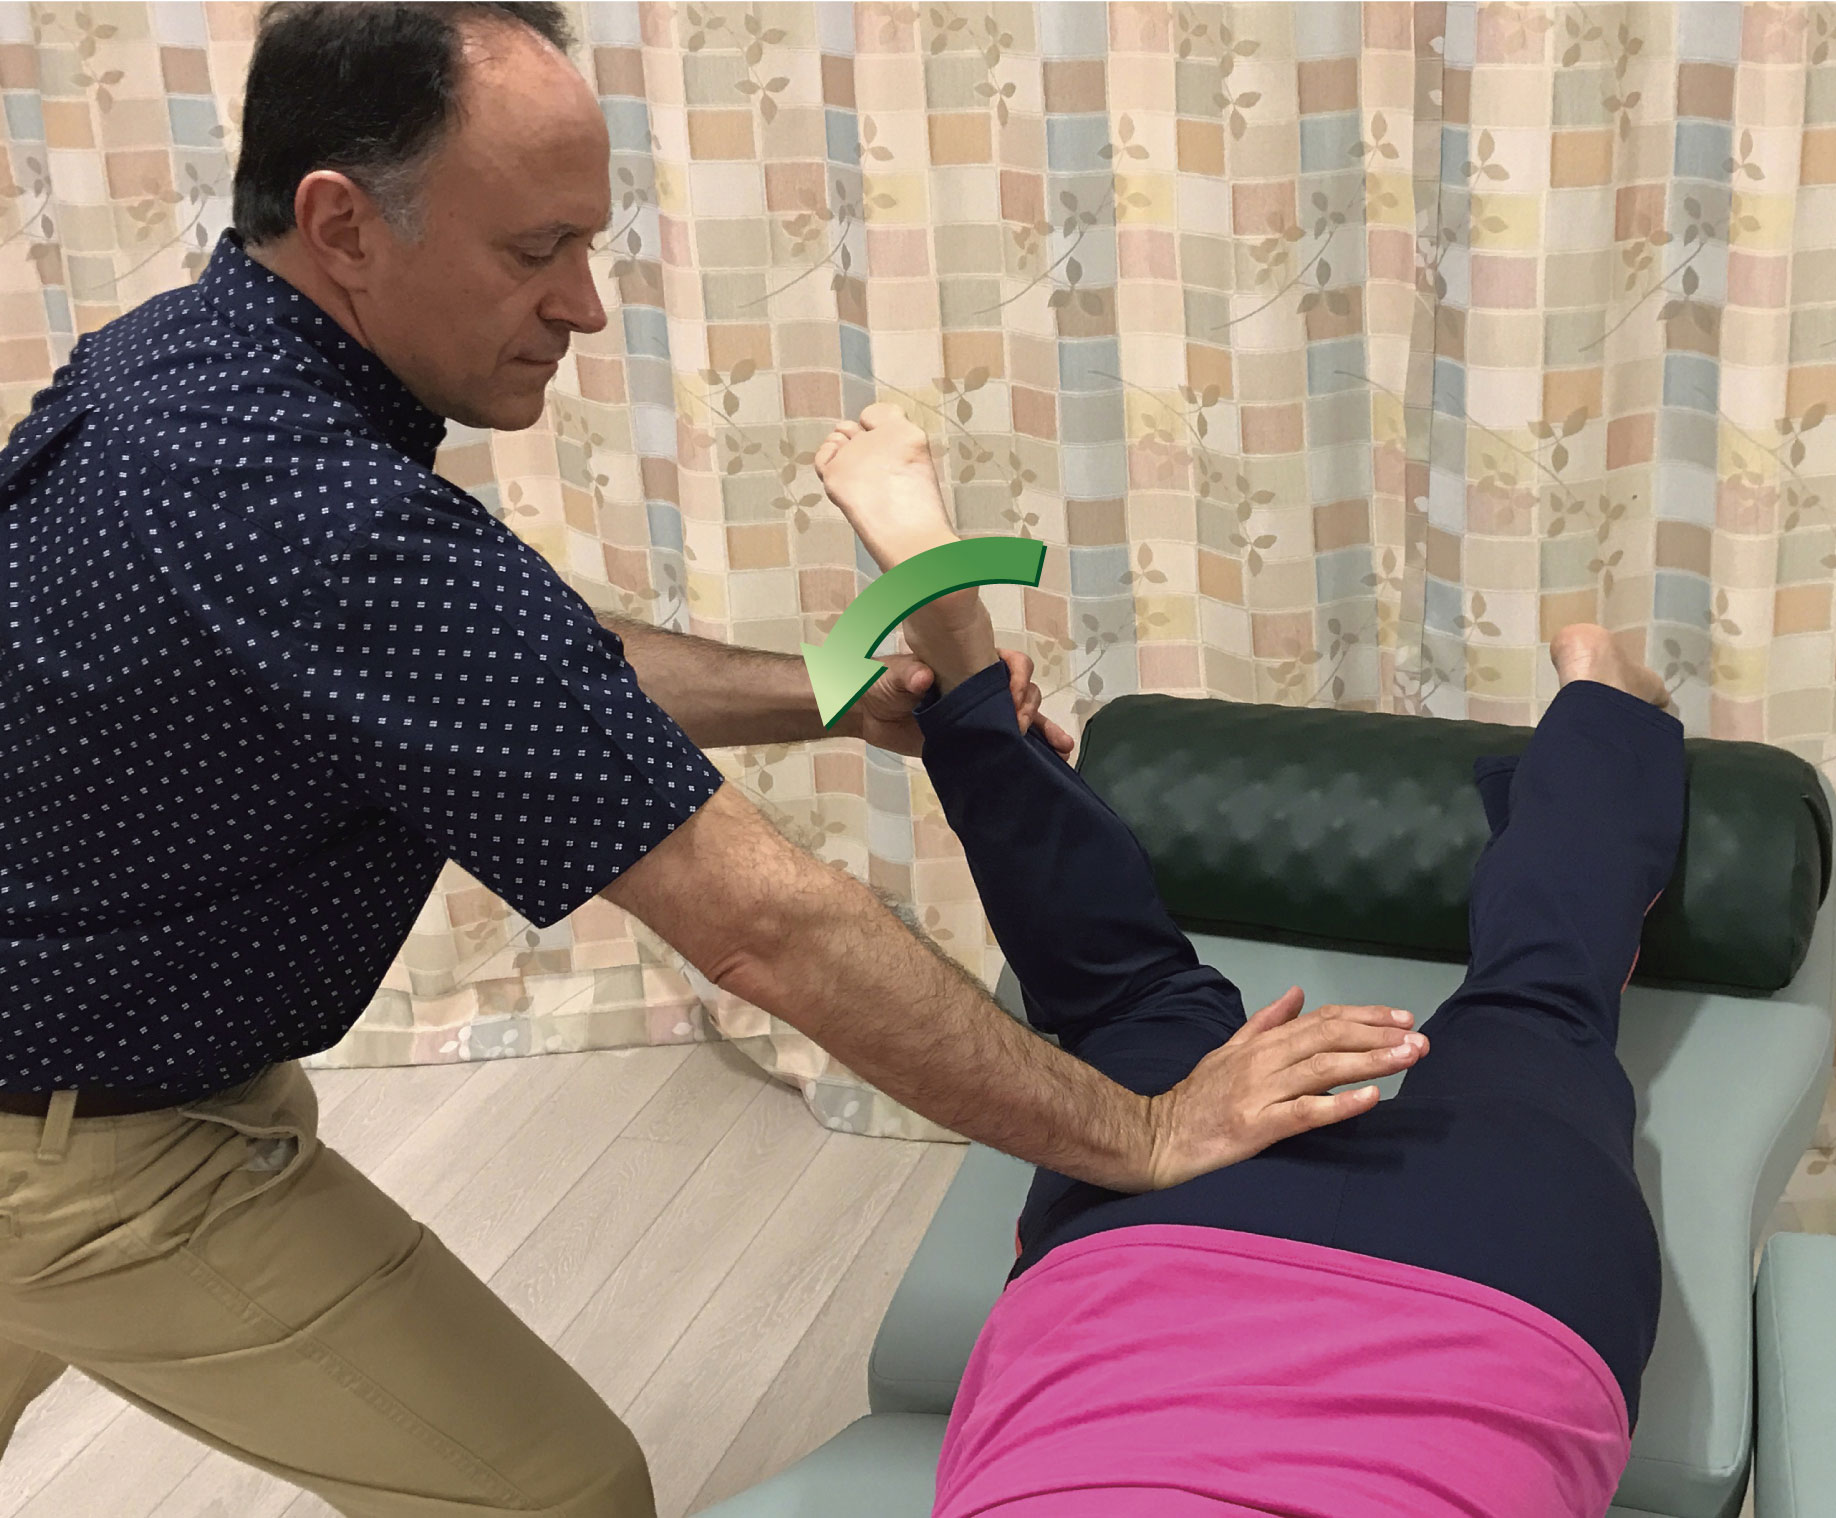
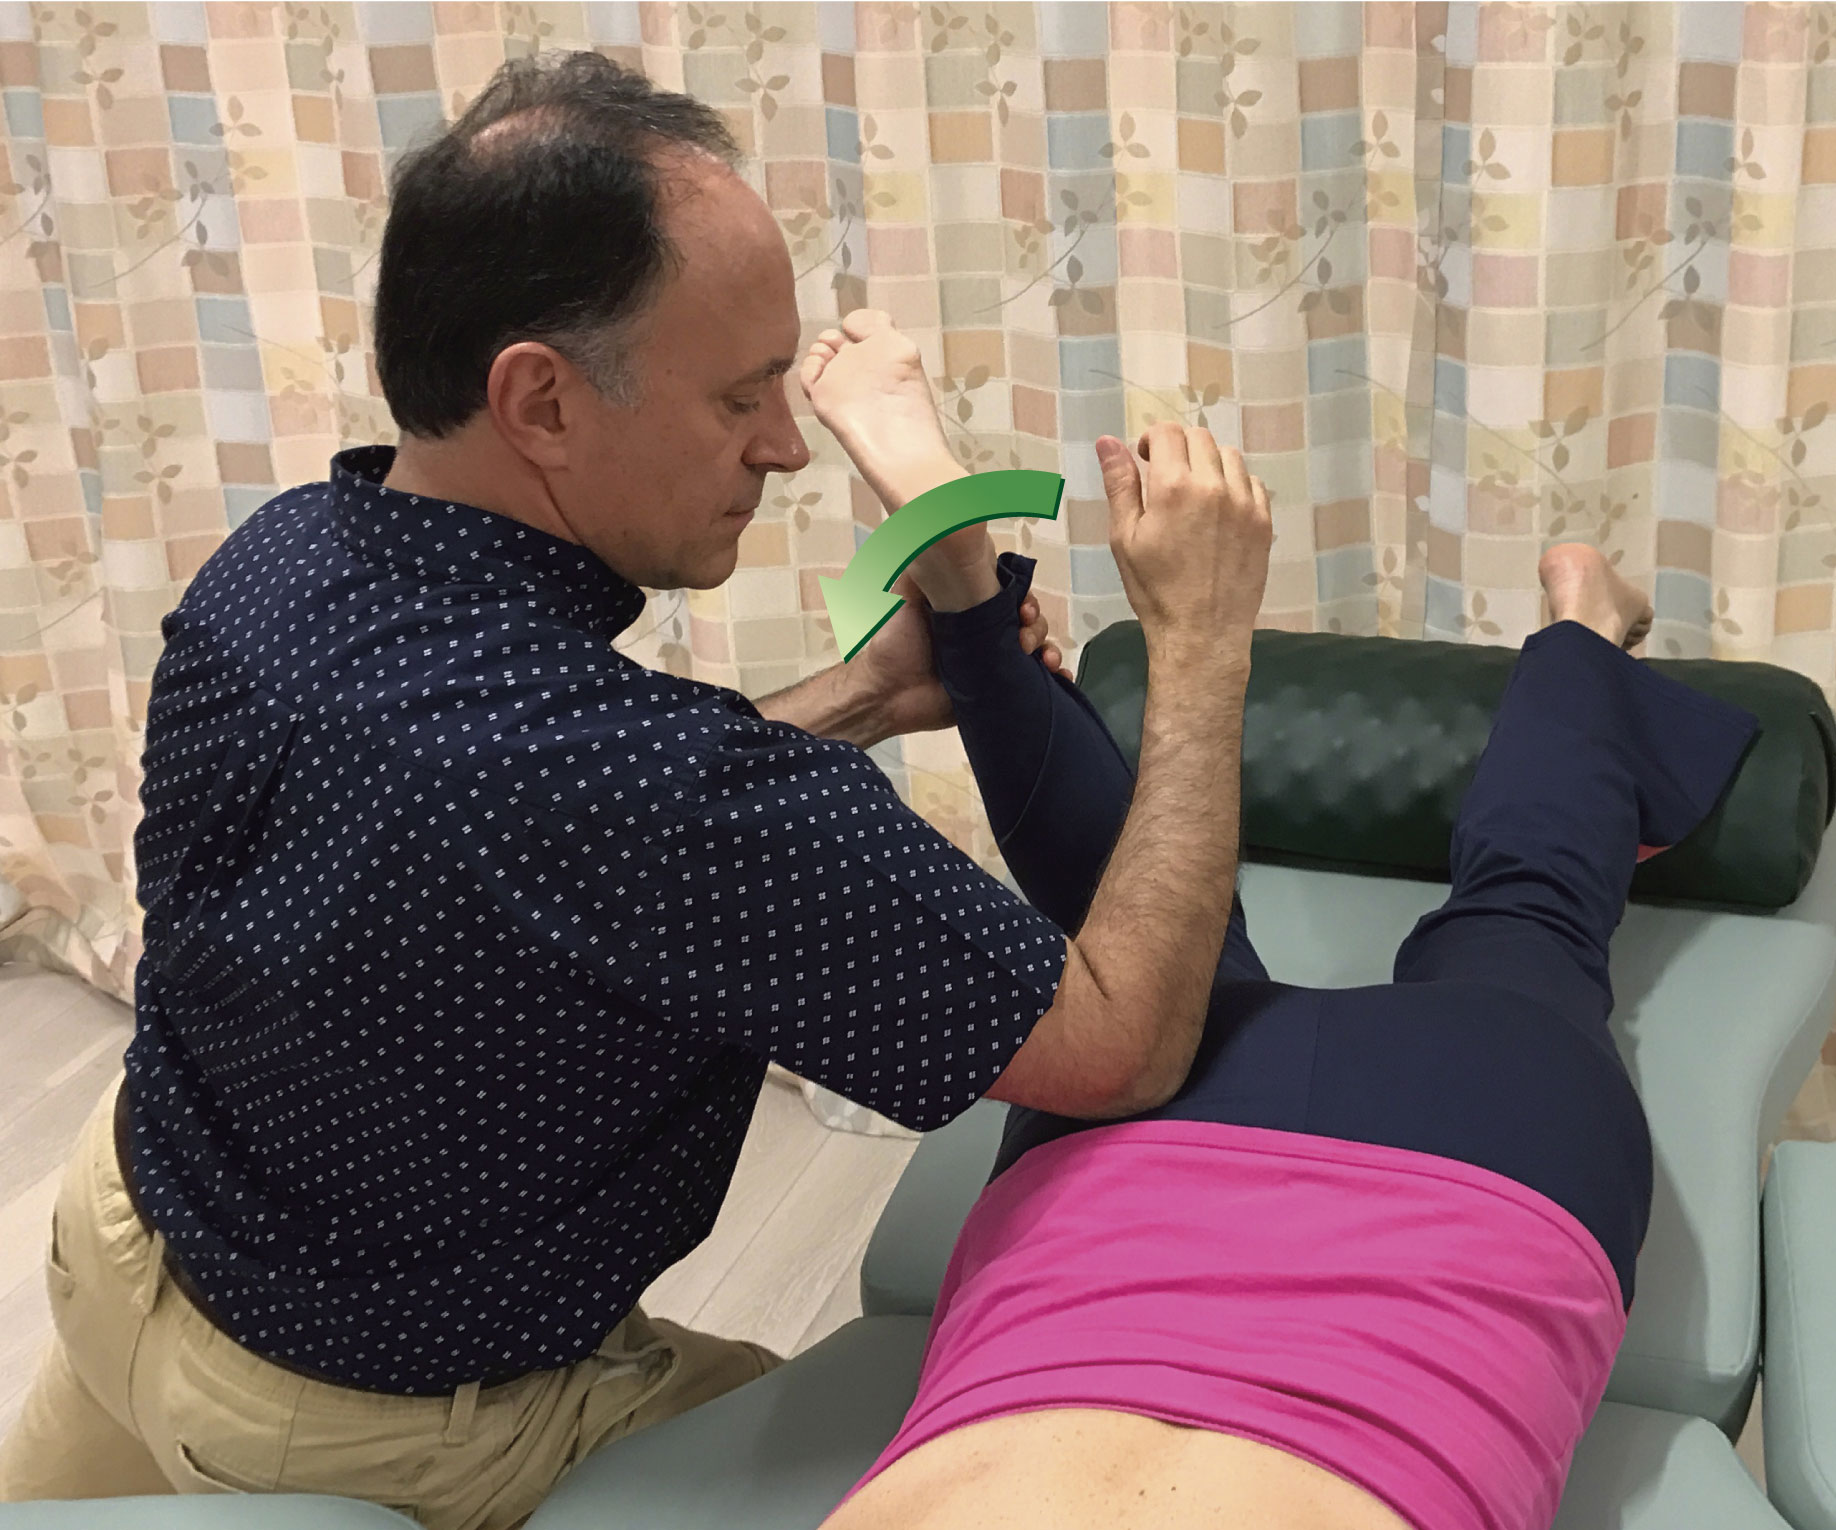 Figure 6. Various contacts used for the pin when performing pin and stretch technique. A, Thumb pad. B, Finger pads. C, Knuckles. D, Heel of palm. E, Elbow. F, Forearm.
Sometimes, the contour of the client’s body might dictate which contact to use. Figure 7 demonstrates pin and stretch for the right pectoralis minor (note: pectoralis minor is extremely important to treat in clients/patients who have upper crossed syndrome). If the heel of the hand is used as seen in Figure 7A, it might be uncomfortable for the therapist to hold the hand into extension at the wrist joint to avoid contacting the client’s breast tissue. For this reason, using finger pads contact as seen in Figure 7B might be preferable.
![]()
![]() Figure 7. Pin and stretch to the right pectoralis minor. A, Heel of hand contact. B, Finger pads contact.
Figure 7. Pin and stretch to the right pectoralis minor. A, Heel of hand contact. B, Finger pads contact.
Conclusion:
When working clinically with orthopedic manual therapy, we have so many choices when choosing how to treat our client. The challenge is to find the therapeutic tools that are the most effective at resolving the client’s condition. An excellent default method is to combine soft tissue manipulation with stretching of the target myofascial tissue. And when stretching is included in the treatment plan, depending on the region of the target myofascial tissue that is to be stretched, pin and stretch technique might be the optimal option toward focusing the stretching force. If you have not yet worked with pin and stretch technique, I recommend you begin to include it in your repertoire of treatment tools!
YOUR CONTINUING EDUCATION IN MANUAL THERAPY:
Philosophy of Clinical Orthopedic Manual Therapy Certification
What is most important in any Continuing Education program is marrying together the underlying science with the hands-on skills. This allows the therapists to understand and critically think so that they can creatively apply their manual therapy assessment and treatment techniques.
GOOD HANDS + GOOD MIND = GREAT THERAPIST!
— “Hands-On with Brains-on” — ☺
Unfortunately, many training programs tend to teach via cookbook recipes, which shuts down the brain and leaves the therapist helpless when the client’s presentation and response do not follow textbook recipes. For this reason, it is important to do your homework and find an excellent Manual Therapy Certification program.
Choices for Clinical Orthopedic Manual Therapy Certification programs:
Following are some well-known individuals and organizations that offer Clinical Orthopedic Manual Therapy Certifications.
(Note: Many other fine certifications exist. I have simply listed a few with which I am familiar that are excellent.)
- Art and Science of Kinesiology’s Clinical Orthopedic Manual Therapy (COMT) Certifications. There are two Introductory Level 1 Certifications and one Advanced Level 2 Certification.
- (Level 1) COMT Intensive Certification, which organizes the work throughout the body by region
- (Level 1) COMT Intensive Skillset Certification, which organizes the work by skillset
- (Level 2) COMT Master Class Certification
- Note: The Art and Science of Kinesiology is my (Joseph E. Muscolino’s) organization. For more information about me and The Art and Science of Kinesiology, please visit my website.
- Tom Myers’ KMI Training
- Whitney Lowe’s Academy of Clinical Massage
- Erik Dalton’s Myoskeletal Technique
Note: This article was originally published (in slightly modified form) in massage and bodywork magazine,
march/april 2017 issue.