This is the 9th in a series of 13 articles on Deep Pressure Massage Technique for the Low Back
Apply Pressure Perpendicularly
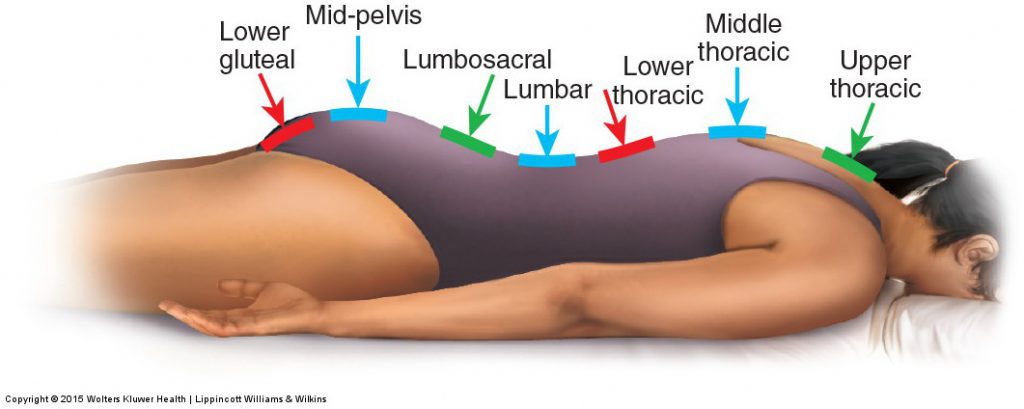
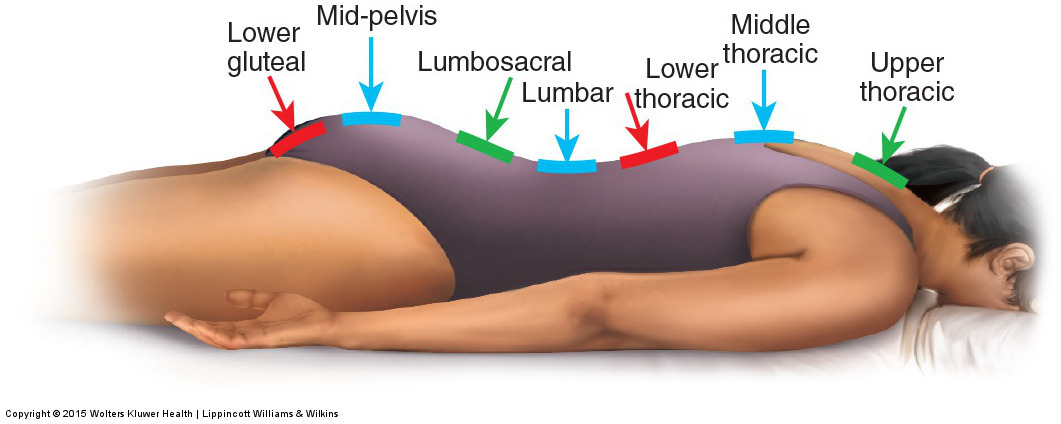
Figure 18. Contours of the client’s back and pelvis regions. The contours of the posterior surface of the client’s body, and perpendicular lines to these contours illustrating ideal lines of force, have been drawn. Permission Joseph E. Muscolino. Manual Therapy for the Low Back and Pelvis – A Clinical Orthopedic Approach (2013).
Maximal pressure for the effort used is achieved if the angle of your force into the client is perpendicular to the contour of the region being worked. To apply this concept of working perpendicularly, the client’s back and pelvis can be divided into separate regions based on the curve of the region and therefore where the contour of each region is oriented. Because these regions are all on the posterior side of the body, they are all oriented posteriorly. Therefore, it is important to place as much of your core (posteriorly) above the client as possible so that you are working vertically down (from posterior to anterior) into the client. However, it is important to also determine whether the contour of the region you are working is oriented purely posteriorly, posteriorly and superiorly, or posteriorly and inferiorly. The orientation for each of these regions has been shown in Figure 18. In each case, the contour has been outlined, and an arrow that is perpendicular to that contour has also been drawn in. These arrows represent the perpendicular application of force you need to work the client most efficiently.
Posterior vs. Posteroinferior vs. Posterosuperior
The upper thoracic and lumbosacral regions are oriented posteriorly and superiorly; therefore, applying a perpendicular force to these regions is best accomplished not only by placing your core above (posterior to) the client but also standing slightly superior to the region (Figs. 19A, E). The thoracolumbar and lower gluteal regions are oriented posteriorly and inferiorly; therefore, working these regions with a perpendicular force is best accomplished by placing your core above (posterior to) the client and standing slightly inferior to the region (Figs. 19C, G). The midthoracic, midlumbar, and midgluteal regions are oriented purely posteriorly; therefore, working these regions with a perpendicular force is best accomplished by standing directly above the region to be worked (Figs. 19B, D, F).
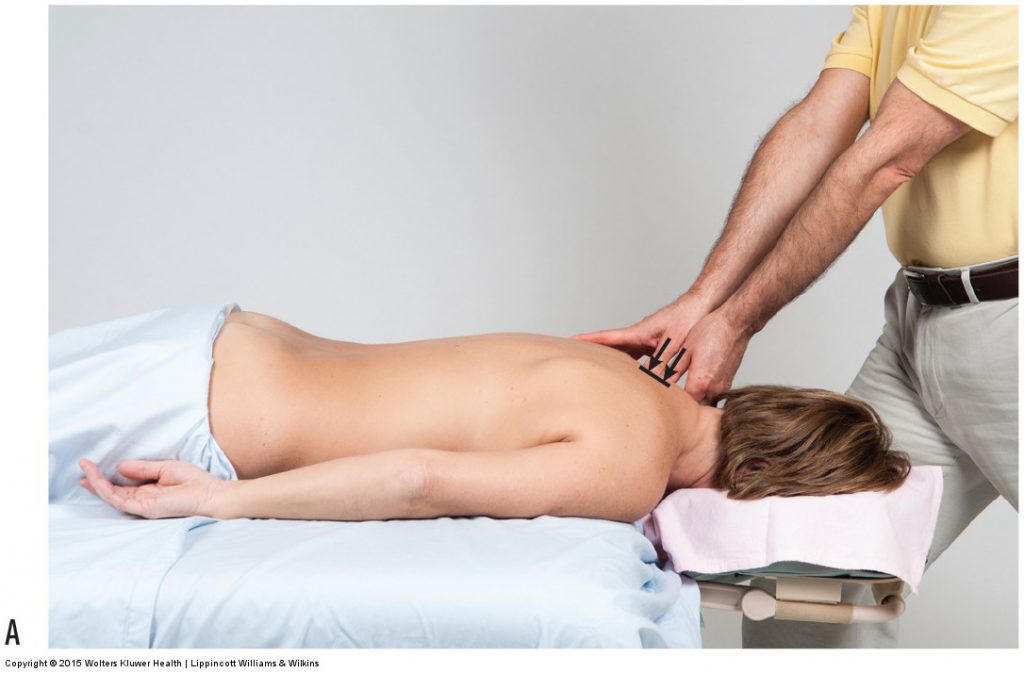
Figure 19. Therapist position and line of force when applying pressure perpendicular to the contour of the region being worked. (A) Upper thoracic. (B) Midthoracic. (C) Thoracolumbar. (D) Midlumbar. (E) Lumbosacral. (F) Midgluteal. (G) Lower gluteal. Permission Joseph E. Muscolino. Manual Therapy for the Low Back and Pelvis – A Clinical Orthopedic Approach (2013).
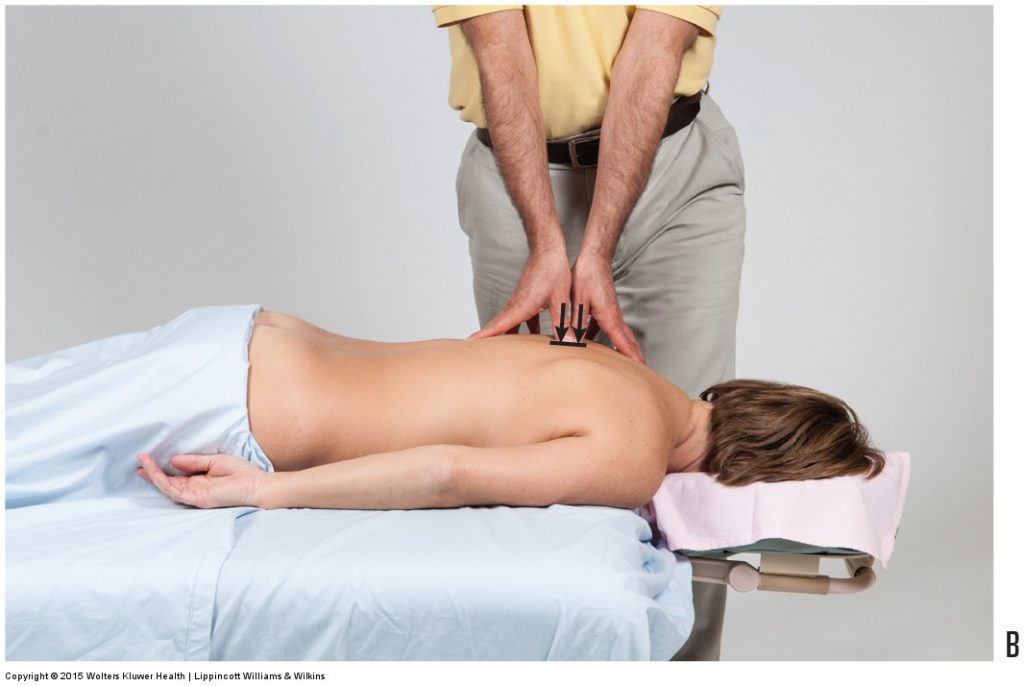
Figure 19B. Permission Joseph E. Muscolino. Manual Therapy for the Low Back and Pelvis – A Clinical Orthopedic Approach (2013).
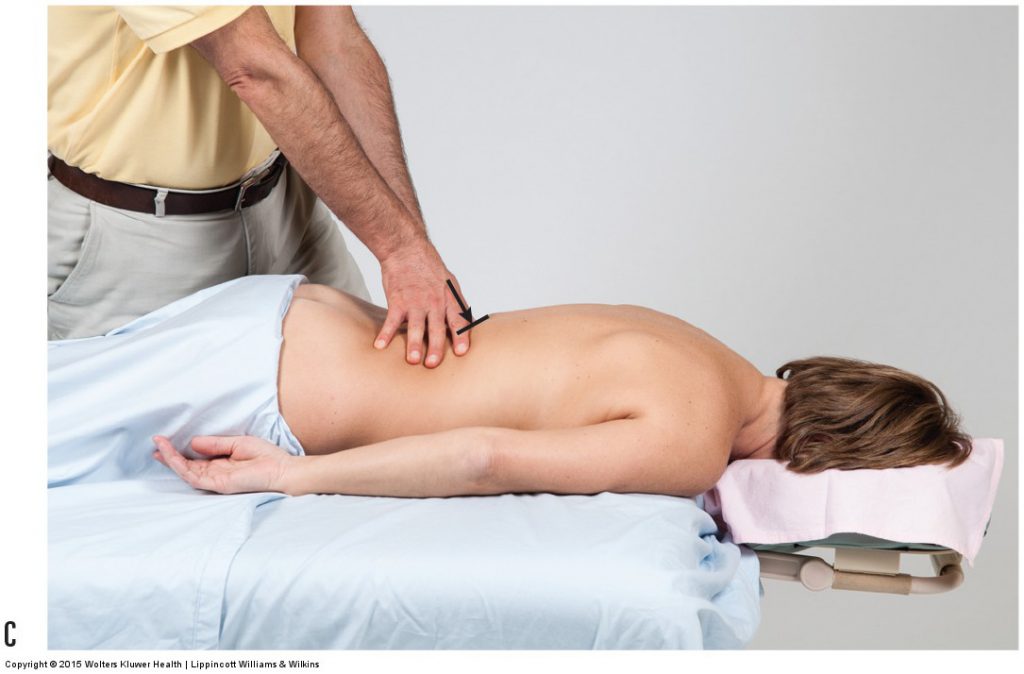
Figure 19C. Permission Joseph E. Muscolino. Manual Therapy for the Low Back and Pelvis – A Clinical Orthopedic Approach (2013).
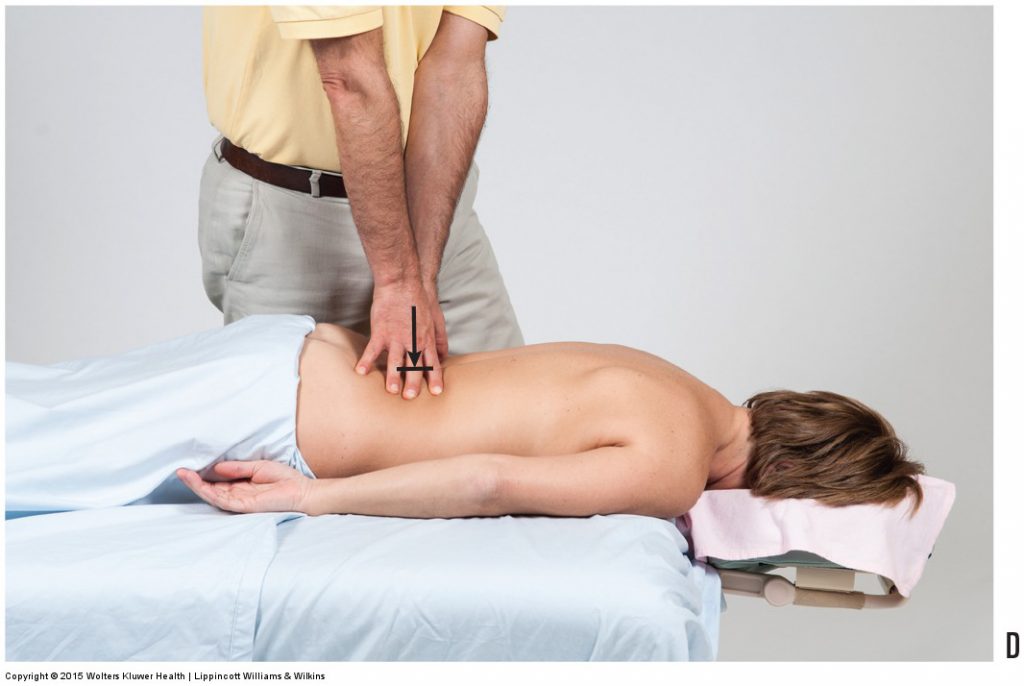
Figure 19D. Permission Joseph E. Muscolino. Manual Therapy for the Low Back and Pelvis – A Clinical Orthopedic Approach (2013).
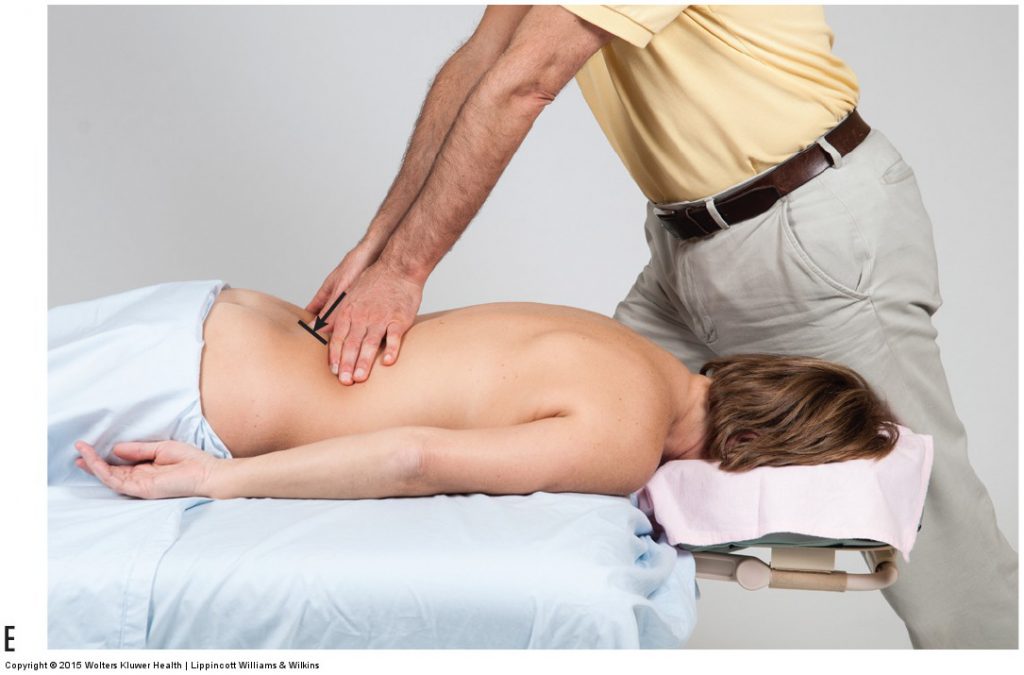
Figure 19E. Permission Joseph E. Muscolino. Manual Therapy for the Low Back and Pelvis – A Clinical Orthopedic Approach (2013).
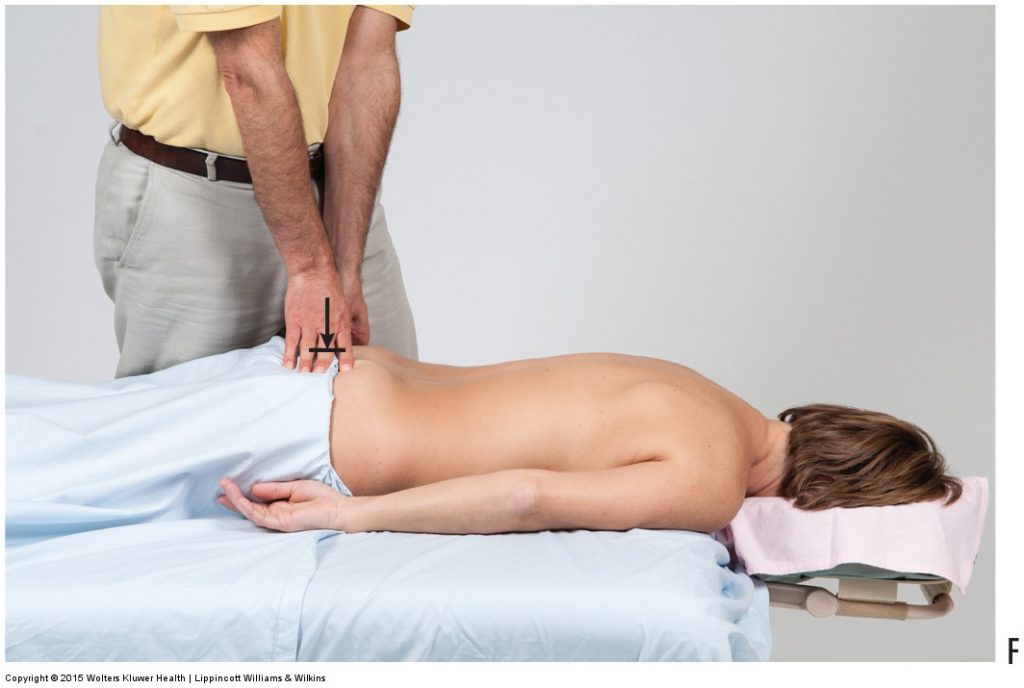
Figure 19F. Permission Joseph E. Muscolino. Manual Therapy for the Low Back and Pelvis – A Clinical Orthopedic Approach (2013).
Figure 19G. Permission Joseph E. Muscolino. Manual Therapy for the Low Back and Pelvis – A Clinical Orthopedic Approach (2013).
Static Compression vs. Stroke
Note: Working perpendicular to the contour of the client’s body is fine for static compression strokes, but is extremely difficult when a stroke is being done. To transition from perpendicular pressure for static compression to a stroke, it is necessary to back off from a perfectly perpendicular angle so that your contact can glide along the client’s skin. However, be careful to ease off only enough to glide with the stroke. Any more than that and pressure into the tissues will be unnecessarily lost.
Lateral Body Surface – Perpendicular is Horizontal
If the client is prone and you are working more laterally on the body, then the contour of the region being worked is oriented more laterally. This means that the contour of the region being worked is oriented more vertically, so you need to approach the region with your force oriented more horizontally.
Dropping Down with Your Core
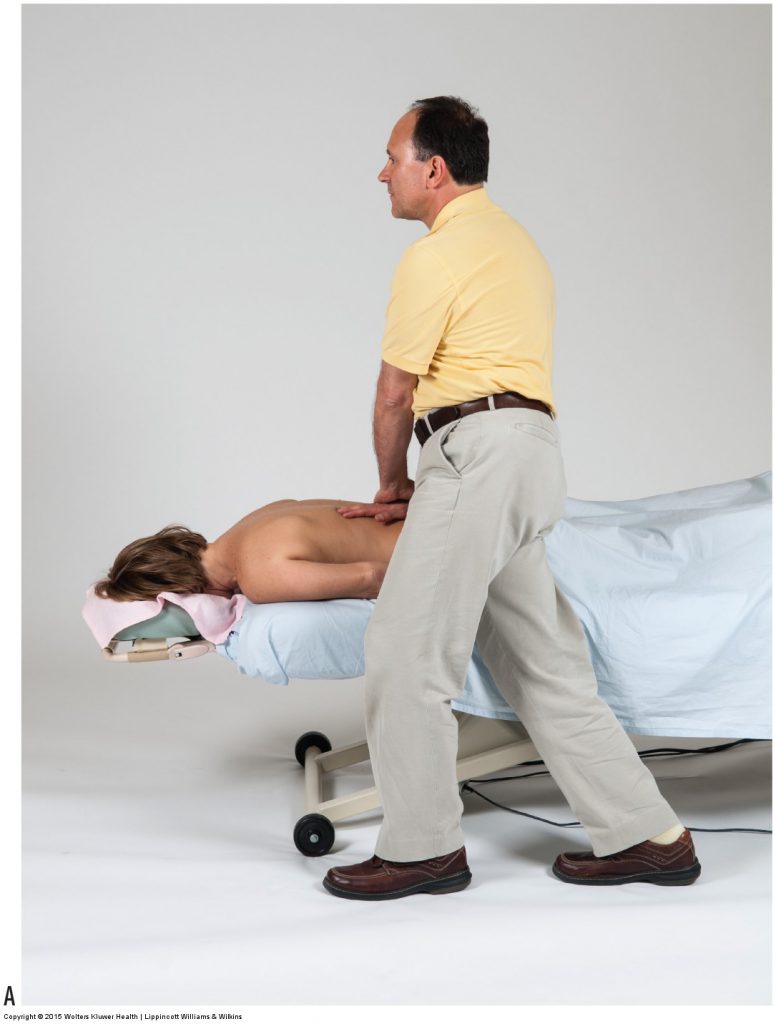
Figure 20. Dropping down into the client with body weight. Core body weight is transferred into the client by dorsiflexing the ankle joints and flexing the knee and hip joints. (A) Starting position. (B) End position. Permission Joseph E. Muscolino. Manual Therapy for the Low Back and Pelvis – A Clinical Orthopedic Approach (2013).
As stated earlier, force can be generated in two ways: by taking advantage of body weight via the force of gravity or by using muscle contraction. Because gravity is free and takes no effort, it should always be utilized as much as possible. Gravity only goes down, so to take advantage of it, you need to position your body above the client. You can then use your body weight by dropping down into the client. To position your body above the client, the table needs to be very low. The lower the table, the more of your body that you can position above the client, and therefore the more body weight you can use. With your core positioned above the client and in line with your stroke, you can generate deep pressure by dropping down into the client. This is accomplished by dorsiflexing the ankle joints and flexing the knee and hip joints (Fig. 4-20).
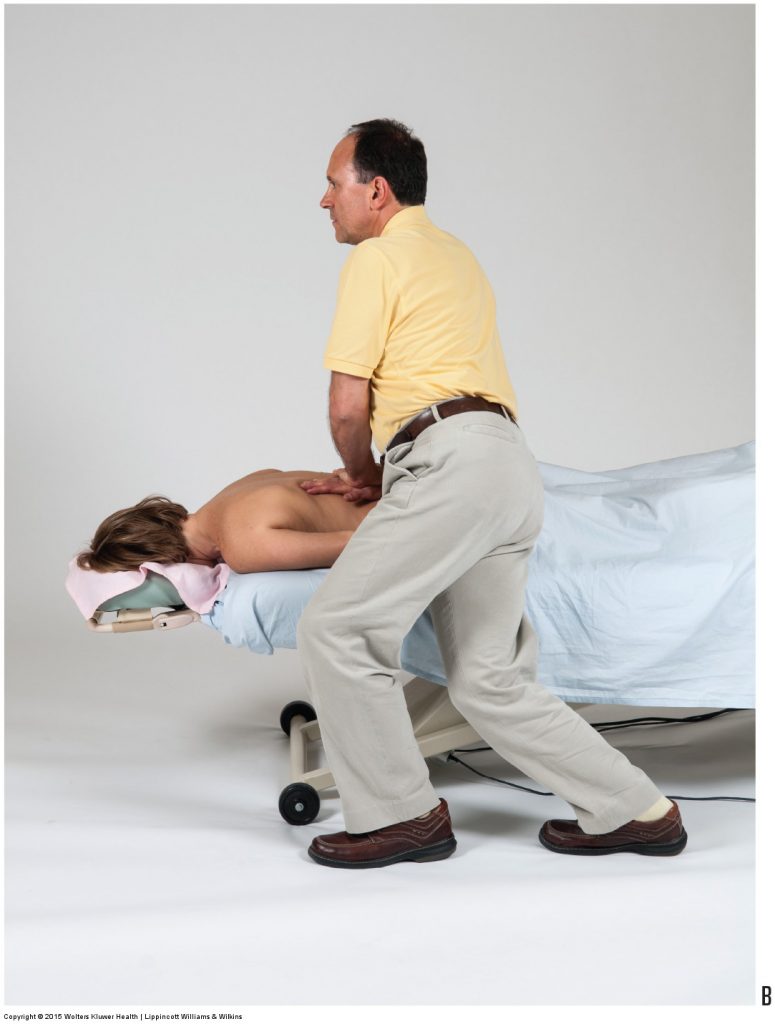
Figure 20B. Permission Joseph E. Muscolino. Manual Therapy for the Low Back and Pelvis – A Clinical Orthopedic Approach (2013).
This is the 9th of 13 articles on Deep Pressure Massage for the Low Back.
The thirteen articles are:
- Introduction to Deep Pressure Massage to the Low Back
- Deep Pressure Massage to the Low Back – Choosing the Right Table
- Deep Pressure Massage to the Low Back – Overview
- Deep Pressure Massage to the Low Back – Client and Therapist Positioning
- Deep Pressure Massage to the Low Back – Positioning the Feet
- Deep Pressure Massage to the Low Back – Choosing the Treatment Contact
- Deep Pressure Massage to the Low Back – Support Your Treatment Contact
- Deep Pressure Massage to the Low Back – Use Stacked Joints
- Deep Pressure Massage to the Low Back – Apply Pressure Perpendicularly
- Deep Pressure Massage to the Low Back – Use Body Weight
- Deep Pressure Massage to the Low Back – Tissue Tension Barrier
- Deep Pressure Massage to the Low Back – Deep Strokes
- Deep Pressure Massage to the Low Back – Forward Head Posture
(Click here for the blog post article: Sacroiliac Joint Medley of Assessment Tests.)