This is the 8th in a series of 13 articles on Deep Pressure Massage Technique for the Low Back
Stacked Joints
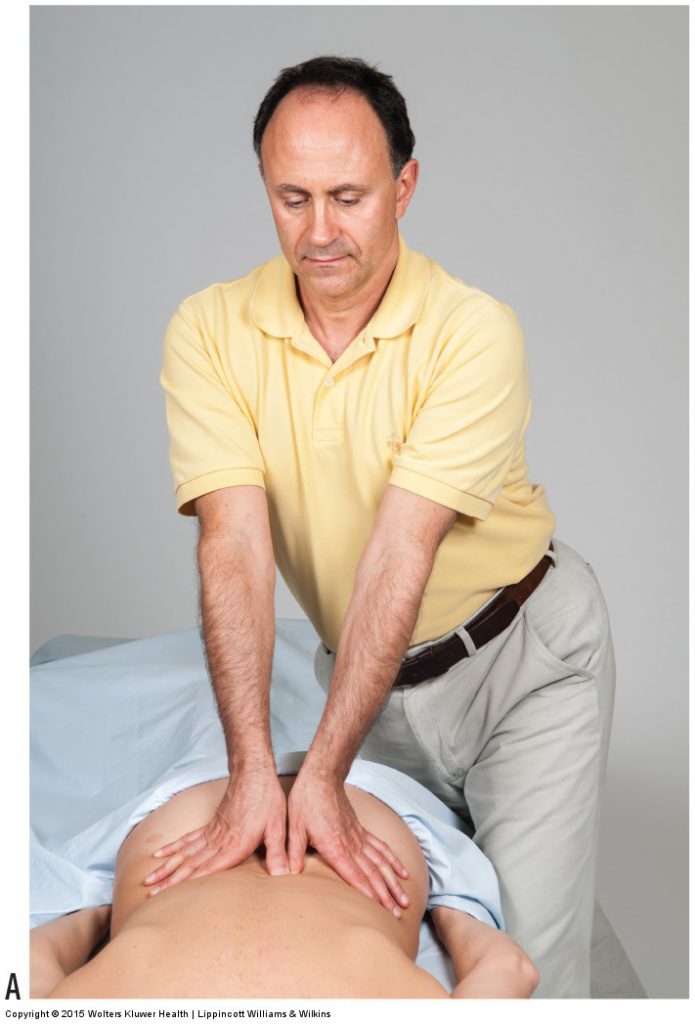
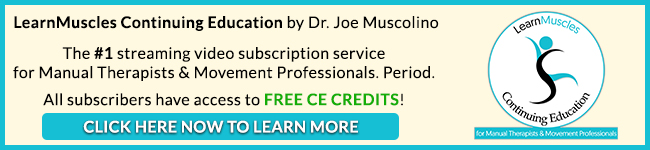
Figure 15. Stacking the upper extremity joints when working on the client (A–C). Upper extremity joints stacked with the thumb pad, finger pads, and fist treatment contacts, respectively. (D) If the elbow joints are fully extended/stacked when employing the palm contact, the wrist joints may be excessively torqued and injured. (E) Partially bending the elbow joints allows the wrist joints to be in a safer posture. Permission Joseph E. Muscolino. Manual Therapy for the Low Back and Pelvis – A Clinical Orthopedic Approach (2013).
Stacked joints are aligned in a straight line; in other words, the joints are extended as in anatomic position. This allows for the force from your core to travel through your upper extremity and into the client with little or no loss of strength. When working on the prone client’s low back and pelvis with the thumb or finger pads as the contact, your elbow, wrist, and thumb/finger joints should be stacked (Fig. 15A, B). When using the fist, the elbow and wrist joints should be stacked (Fig. 15C). The palm contact can be problematic because if the elbow joints are fully stacked / extended, the wrist joints will be extended to nearly 90 degrees (Fig. 15D). This can increase torque and perhaps lead to wrist injury. For this reason, it is advisable to slightly bend the elbow joints to protect the wrist joints (Fig. 15E). This will require more muscular effort because the triceps brachii musculature will be required to isometrically contract when exerting pressure; but triceps effort is preferable to potential wrist injury.
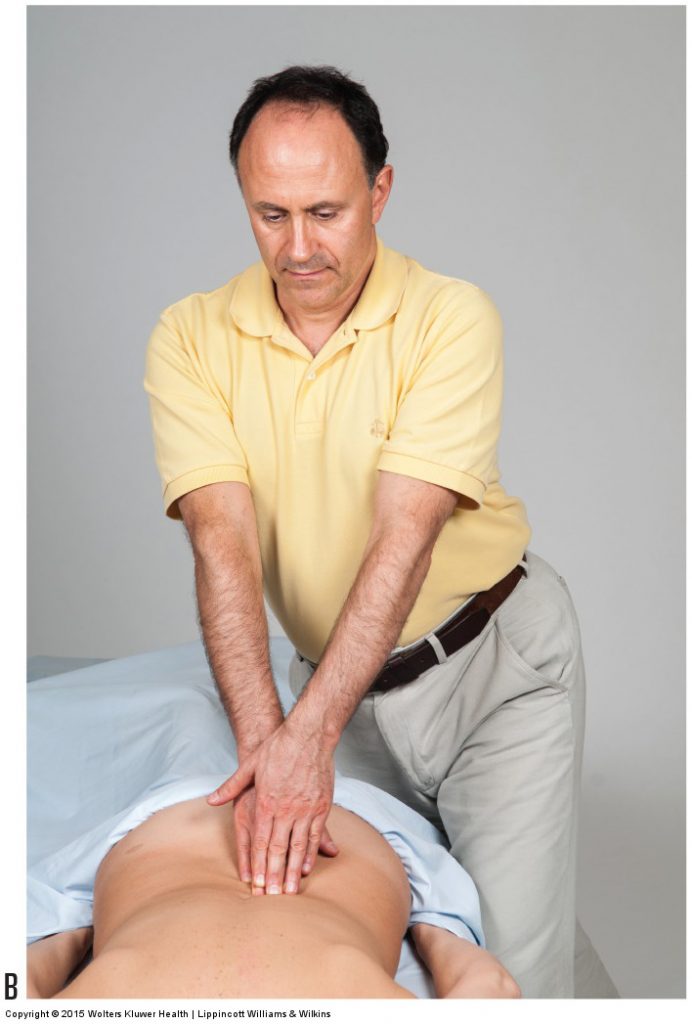
Figure 15B. Permission Joseph E. Muscolino. Manual Therapy for the Low Back and Pelvis – A Clinical Orthopedic Approach (2013).
Figure 15C. Permission Joseph E. Muscolino. Manual Therapy for the Low Back and Pelvis – A Clinical Orthopedic Approach (2013).
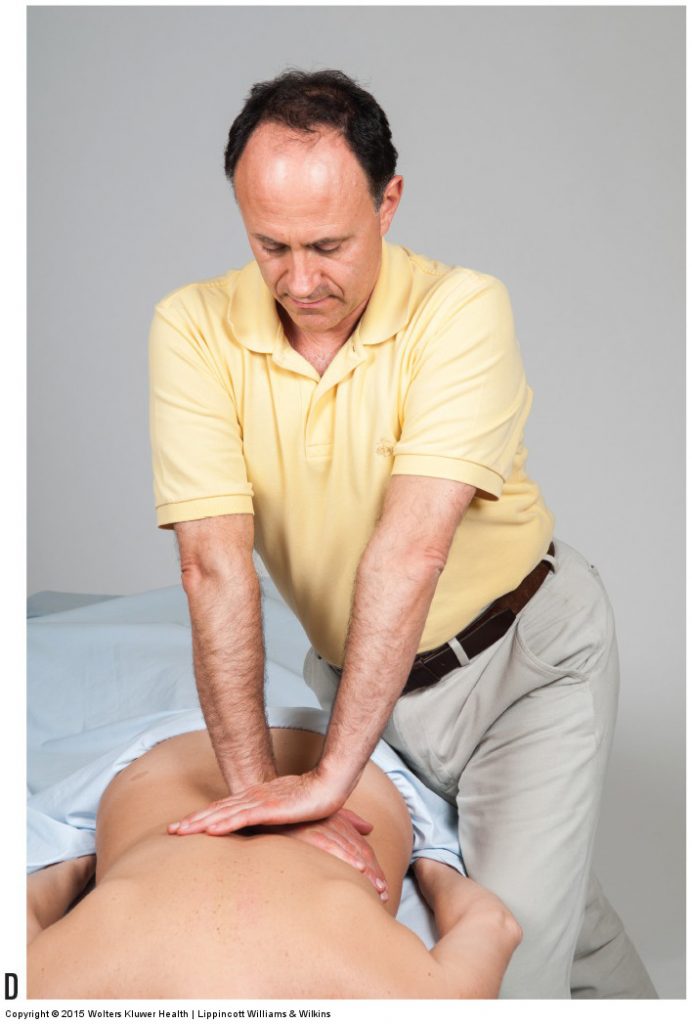
Figure 15D. Permission Joseph E. Muscolino. Manual Therapy for the Low Back and Pelvis – A Clinical Orthopedic Approach (2013).
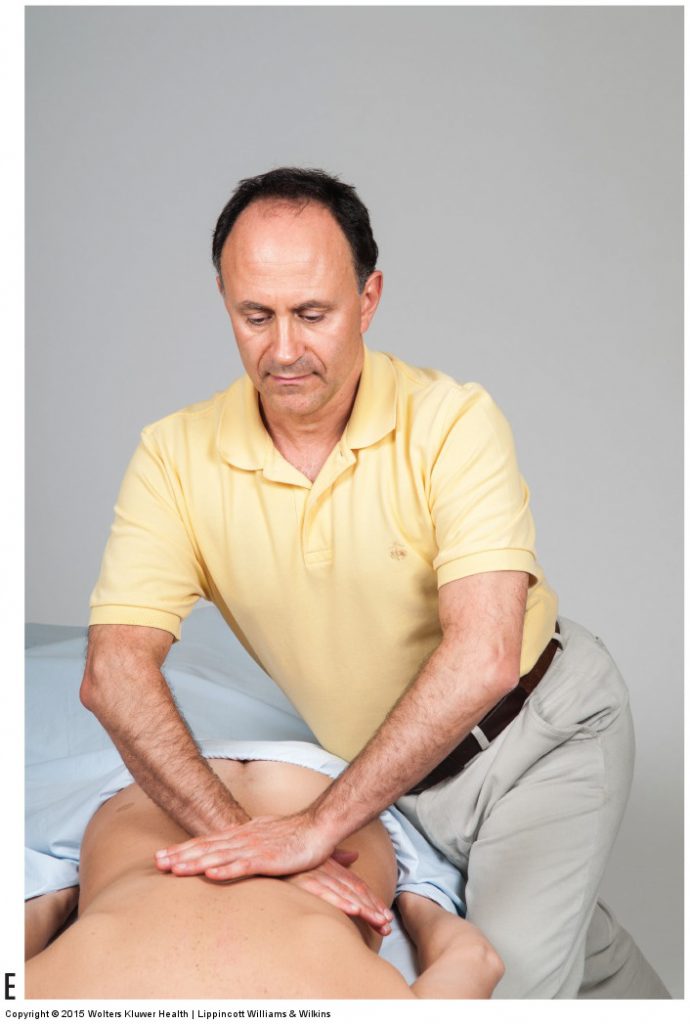
Figure 15E. Permission Joseph E. Muscolino. Manual Therapy for the Low Back and Pelvis – A Clinical Orthopedic Approach (2013).
Align Your Core with the Stroke
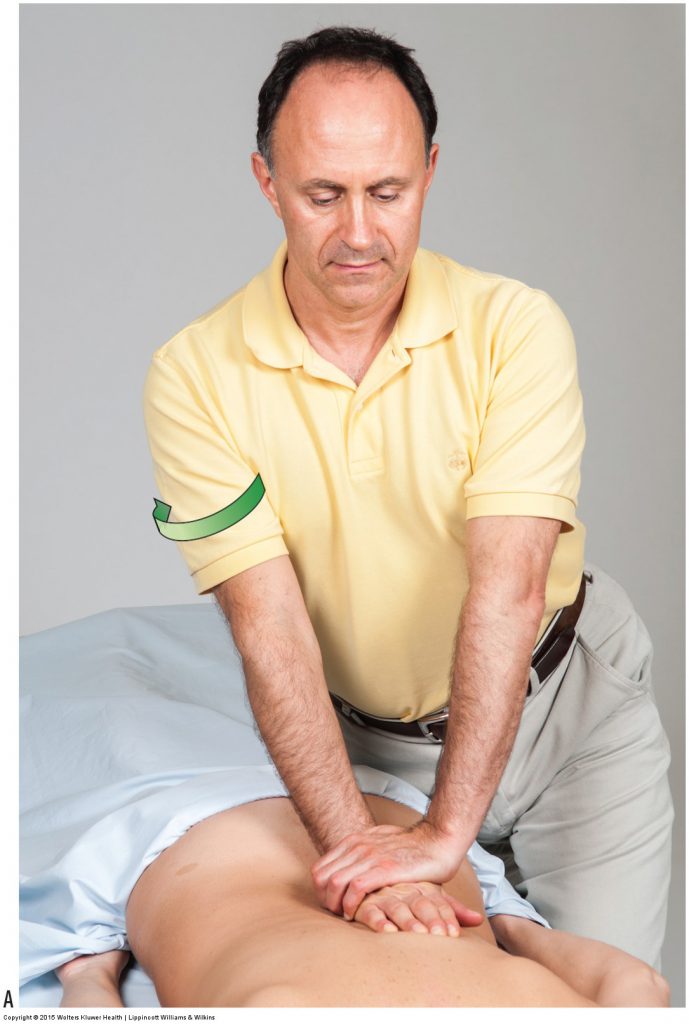
Figure 16. Place your upper extremities in front of your core. (A) Laterally rotating the arms at the glenohumeral joints helps to keep your elbows in front of your core. (B) The (upper) arms can be placed against the core for further support. Permission Joseph E. Muscolino. Manual Therapy for the Low Back and Pelvis – A Clinical Orthopedic Approach (2013).
Now that you have positioned the client on the table, adjusted where and how you are standing, braced your contact, and stacked your joints, it is important to make sure that your core is behind and in line with your stroke. This is accomplished by laterally rotating your arms at the glenohumeral joints so that your elbows are positioned in front of your core (Fig. 16A). Keeping the elbows in is an important aspect of strong and efficient body mechanics that allows you to work from the core. It is not necessary for the elbows to be all the way at the midline of the body, but they should be within the width of your shoulders. If the thumb or finger pads are being used as the contact, then the (upper) arms can be placed against the core/trunk. This will place the elbows just inside (and usually slightly above) your anterior superior iliac spine (ASIS) (Fig. 16B).
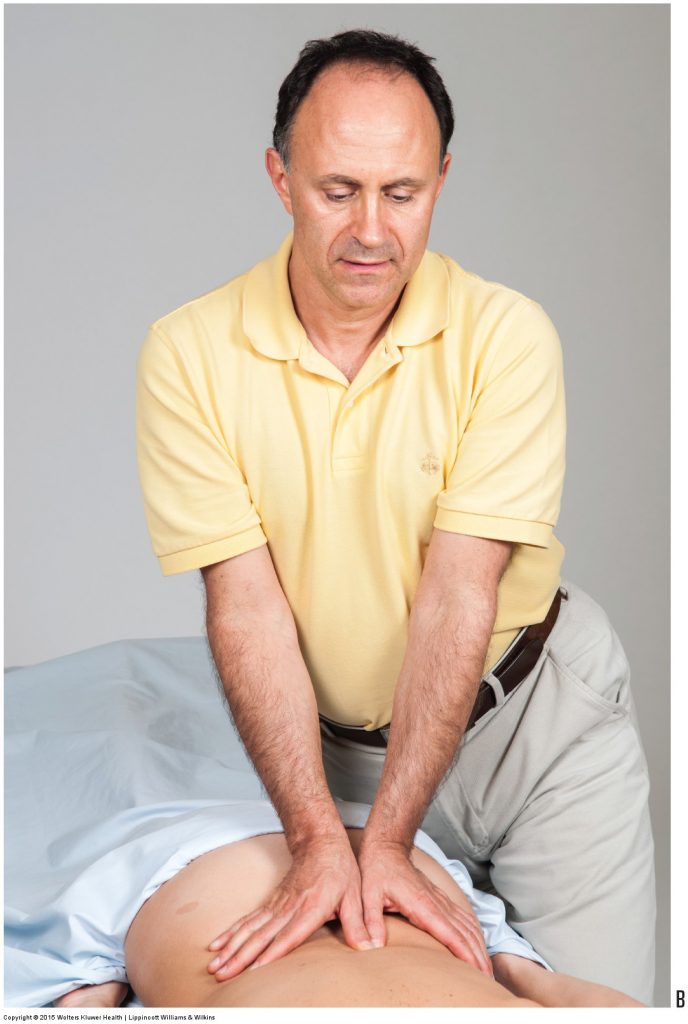
Figure 16B. Permission Joseph E. Muscolino. Manual Therapy for the Low Back and Pelvis – A Clinical Orthopedic Approach (2013).
Keep Your Elbows In
As stated, bringing the elbow in and placing the (upper) arm against the core can be extremely efficient for originating power from the core and transferring core strength through the forearm into the client. However, the elbow only needs to be far enough in to be against your core. Do not exaggerate this position and bring the elbow too far in toward the center of your body. Doing this would place an outward (valgus) torque force at the medial side of your elbow joint and might result in stress and damage to your flexor musculature common belly/tendon at the medial epicondyle of the humerus, resulting in “golfer’s elbow,” also known as medial epicondylitis, medial epicondylosis, or medial elbow tendinopathy. It can also compress and damage the triangular fibrocartilage at the ulnar side of the wrist joint.
Motion Comes from the Core
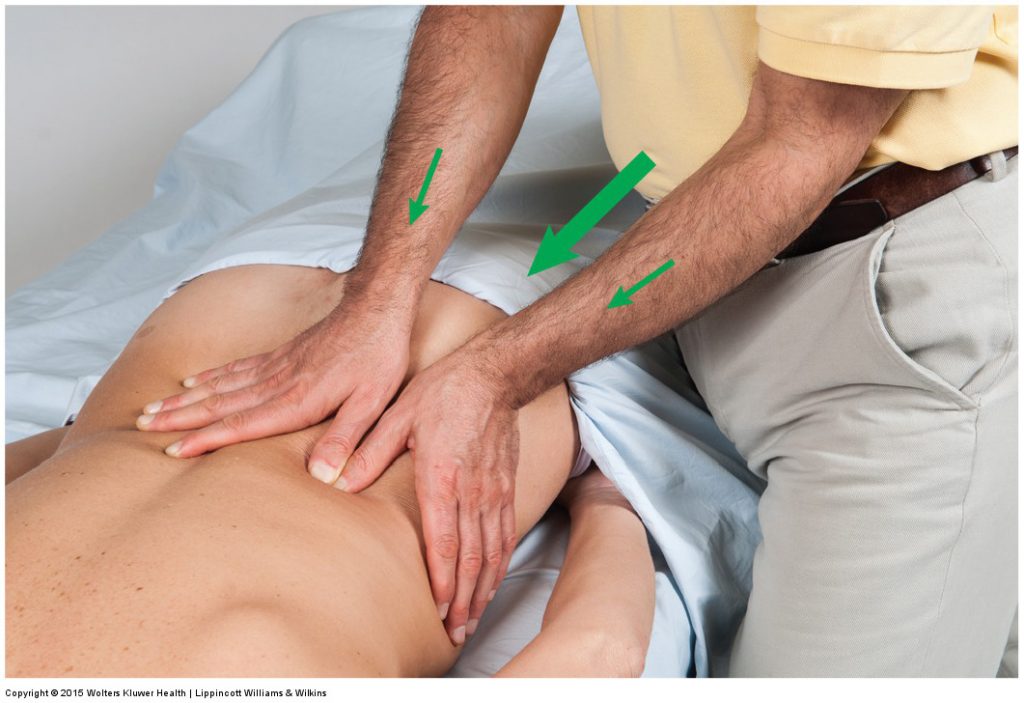
Figure 17. Generation of force from the core. Movement of the treatment contact should originate from the core of the therapist’s body. The orientation of the core can be visualized by imagining a line that emanates from your belly button. Permission Joseph E. Muscolino. Manual Therapy for the Low Back and Pelvis – A Clinical Orthopedic Approach (2013).
When performing the stroke, make sure that whatever motion you create with your core is transferred directly into your upper extremity. In this manner, your core and upper extremity should be one fixed unit so that for each millimeter your core moves, your upper extremity moves the exact same amount, and your hand presses into the client. To make sure that your core is in line with the stroke, you can visually draw a line in the direction that your belly button points and compare it with the line of your stroke, which travels through your forearm (Fig. 4-17). With your core in line with the stroke, it is possible to generate the force of the stroke by using your body weight and larger muscles of the core instead of the smaller muscles of the thumb, hand, forearm, or even shoulder.
This is the 8th of 13 articles on Deep Pressure Massage for the Low Back.
The thirteen articles are:
- Introduction to Deep Pressure Massage to the Low Back
- Deep Pressure Massage to the Low Back – Choosing the Right Table
- Deep Pressure Massage to the Low Back – Overview
- Deep Pressure Massage to the Low Back – Client and Therapist Positioning
- Deep Pressure Massage to the Low Back – Positioning the Feet
- Deep Pressure Massage to the Low Back – Choosing the Treatment Contact
- Deep Pressure Massage to the Low Back – Support Your Treatment Contact
- Deep Pressure Massage to the Low Back – Use Stacked Joints
- Deep Pressure Massage to the Low Back – Apply Pressure Perpendicularly
- Deep Pressure Massage to the Low Back – Use Body Weight
- Deep Pressure Massage to the Low Back – Tissue Tension Barrier
- Deep Pressure Massage to the Low Back – Deep Strokes
- Deep Pressure Massage to the Low Back – Forward Head Posture
(Click here for the blog post article: How Do We Treat Sacroiliac Joint Dysfunction with Manual Therapy?)