This blog post article is the sixth in a series of ten articles on Deep Pressure Massage of the Neck
Stacking the Upper Extremity Joints for Deep Pressure Massage

Figure 12. Tucking in the elbow and aligning the core with the stroke. (A) The therapist’s forearm is braced in front of the core with the elbow tucked inside the anterior superior iliac spine. (B) When performing the stroke, whatever motion is created with the pelvis should be transferred to the forearm of the treatment hand. (C) The alignment of the core with the stroke can be seen by drawing a line straight out from the therapist’s belly button and comparing it to the line of the forearm. Permission Joseph E. Muscolino. Advanced Treatment Techniques for the Manual Therapist: Neck (2013).
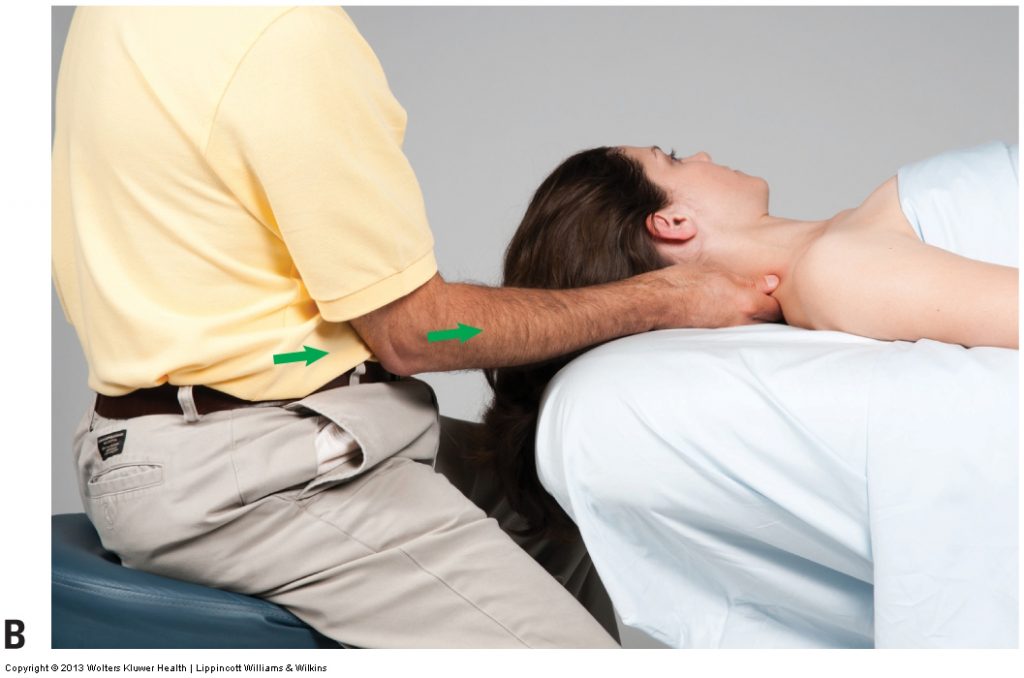
Figure 12B. Permission Joseph E. Muscolino. Advanced Treatment Techniques for the Manual Therapist: Neck (2013).
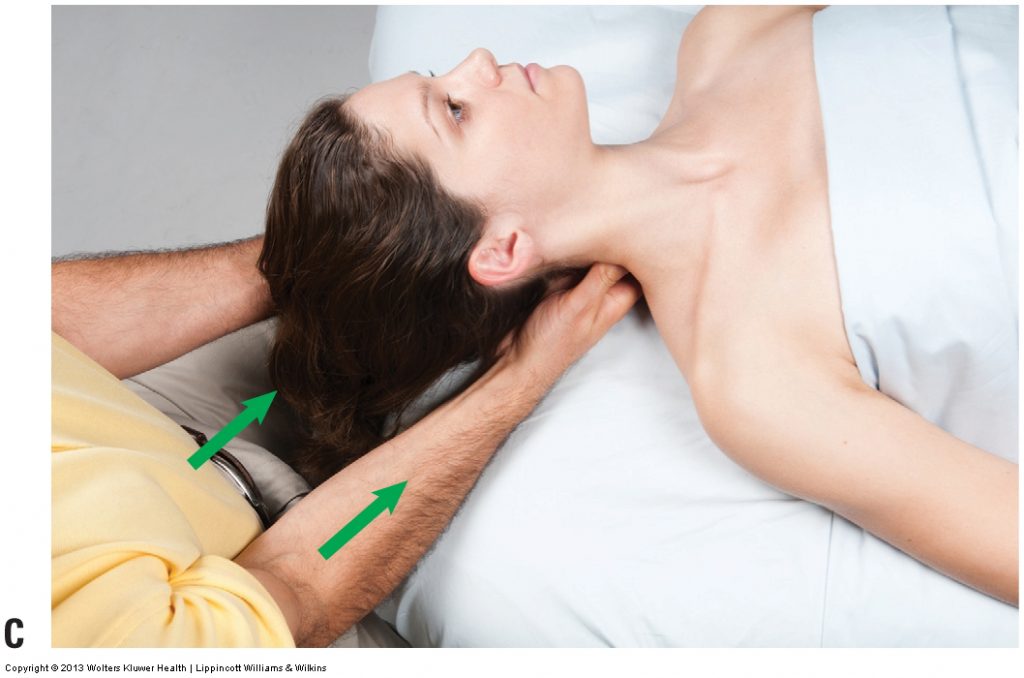
Figure 12C. Permission Joseph E. Muscolino. Advanced Treatment Techniques for the Manual Therapist: Neck (2013).
When performing deep pressure massage, it is extremely important to stack your joints. Stacked joints are aligned in a straight line; in other words, the joints are extended. This allows for the force from your core to travel through your upper extremity and into the client with little or no loss of strength and the greatest stability of the joints. When working on the supine client’s neck, your wrist joint must be stacked. If you are contacting the client with your thumb, it also needs to be stacked; if you are using your finger pads as the contacts, then the joints of your fingers need to be stacked. Note: When working from a seated position, it is usually not possible to stack the elbow joints because this would require us to sit too far from the client.
Aligning Your Core with the Stroke for Deep Pressure Massage
Now that you have positioned the client on the table and adjusted where you are sitting, to perform deep pressure massage, it is important to align your core with your stroke. This is accomplished by laterally (externally) rotating your arm at the shoulder (glenohumeral) joint so that your elbow is positioned in front of your core. Now lock your elbow into your core just inside (and usually slight above) your anterior superior iliac spine (ASIS). In effect, your (upper) arm will be flat against your trunk (Fig. 12A). If because of soft tissue mass (large breasts and/or abdomen), it is not possible to place you (upper) arm against your trunk, then the closer to your trunk as possible, the better.
When performing the stroke, make sure that whatever motion you create with your pelvis is transferred directly into your forearm. In this manner, your core and forearm should be one fixed unit so that for each millimeter your pelvis moves, your forearm moves the exact same amount and your hand presses into the client (Fig. 12B). To make sure that your core is in line with the stroke, visually draw a line in the direction that your belly button points and compare it with the line of your stroke, which travels through your forearm (Fig. 12C). With your core in line with your stroke, it is possible to generate the force of the stroke by using your body weight and the larger muscles of the core, instead of the smaller muscles of the thumb, hand, forearm, or even shoulder. In fact, in this position, the anterior deltoid does not have to contract and can be relaxed.
Leaning in with Your Core
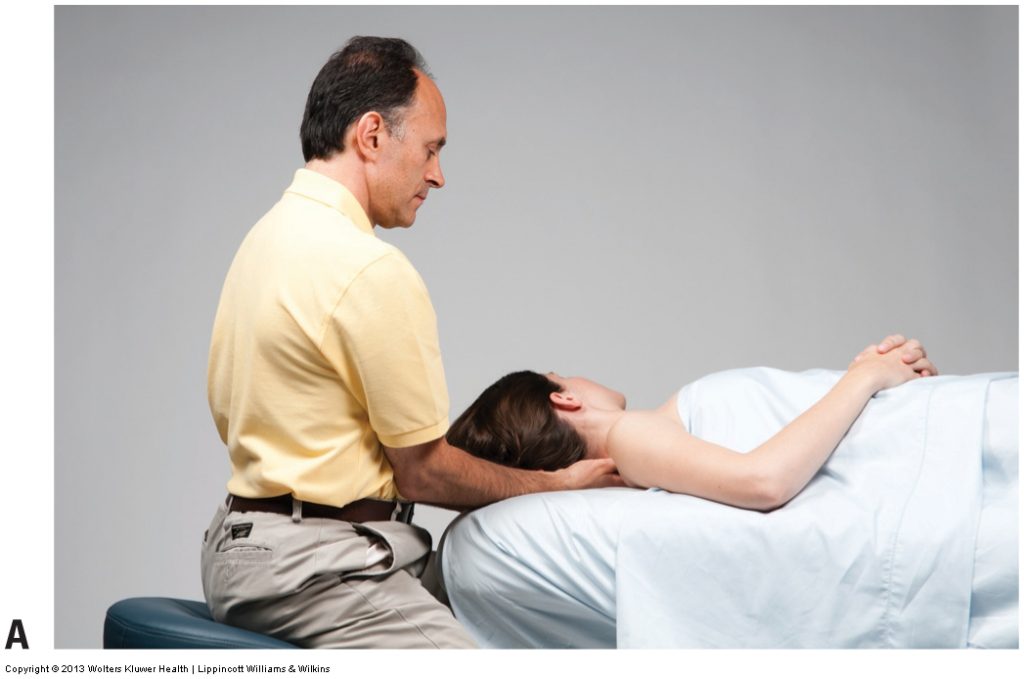
Figure 13. Rocking the pelvis to apply pressure. (A) Starting position. (B) The therapist leans in to apply pressure into the client by rocking the pelvis forward (anteriorly tilting the pelvis). Permission Joseph E. Muscolino. Advanced Treatment Techniques for the Manual Therapist: Neck (2013).
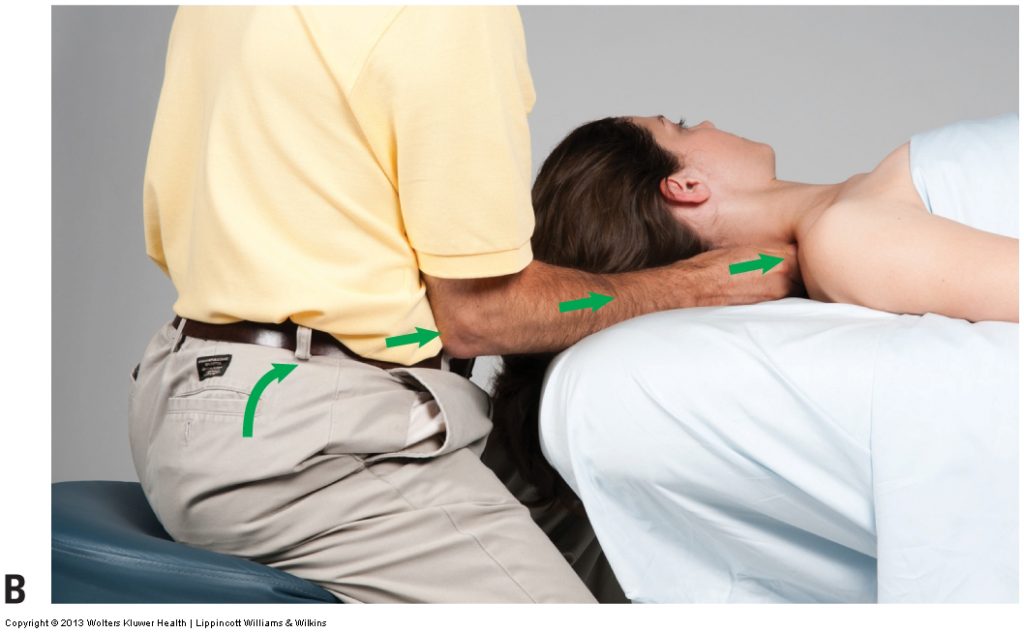
Figure 13B. Permission Joseph E. Muscolino. Advanced Treatment Techniques for the Manual Therapist: Neck (2013).
With your core positioned behind and in line with your stroke, you can generate deep pressure by leaning into the client with your core by anteriorly tilting your pelvis and slightly extending your spine (Fig. 13). There is an art to using your core to lean into the client when doing supine neck work. Leaning in when seated is a motion that is mostly horizontally forward and only slightly downward. It involves rocking (anteriorly tilting) your pelvis forward at the hip joints, and slightly extending the spine to keep the trunk faced forward. It is important to rock forward in the same line as your forearm. Imagining that you are a fencer and lunging forward with a sword can help to imprint the proper body mechanics for this motion (Fig. 14) (see Therapist Tip 4.4).
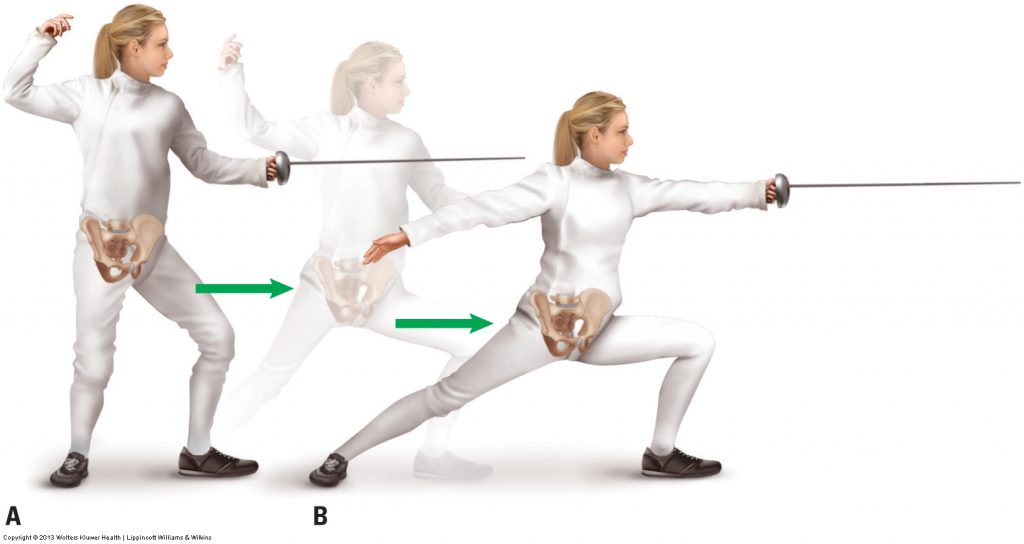
Figure 14. Analogy to lunging when fencing. To help with the body mechanics of leaning in with the core when seated, picture or practice lunging forward with the pelvis as if fencing. Note that the pelvis stays nearly level as the fencer lunges from A to B. Permission Joseph E. Muscolino.Advanced Treatment Techniques for the Manual Therapist: Neck (2013).
For deep pressure massage to the supine client’s neck to be effective, it is critically important that your elbow joint does not flex any further when you rock your pelvis forward to lean into the client (Fig. 15). If your elbow joint bends as you lean in, the force that your core is generating will dissipate and be lost at the elbow joint, and you will not succeed in generating deep pressure into the client.
Note: Lunging With a Sword
A common error in body mechanics is for the therapist to fall forward when rocking (anteriorly tilting) the pelvis to lean into the client. This also usually involves the elbow joint of your treatment hand bending when it should not. To help get the hang of how to properly rock the pelvis forward, it can be helpful to picture that you are fencing and lunging forward with a sword. When you lunge forward, picture the pelvis staying nearly perfectly horizontal as it moves forward (see Fig. 14). Practice this when standing; once it feels natural, then try to reproduce this motion when seated and working on your client.
Note: Watch Your Elbow Joint
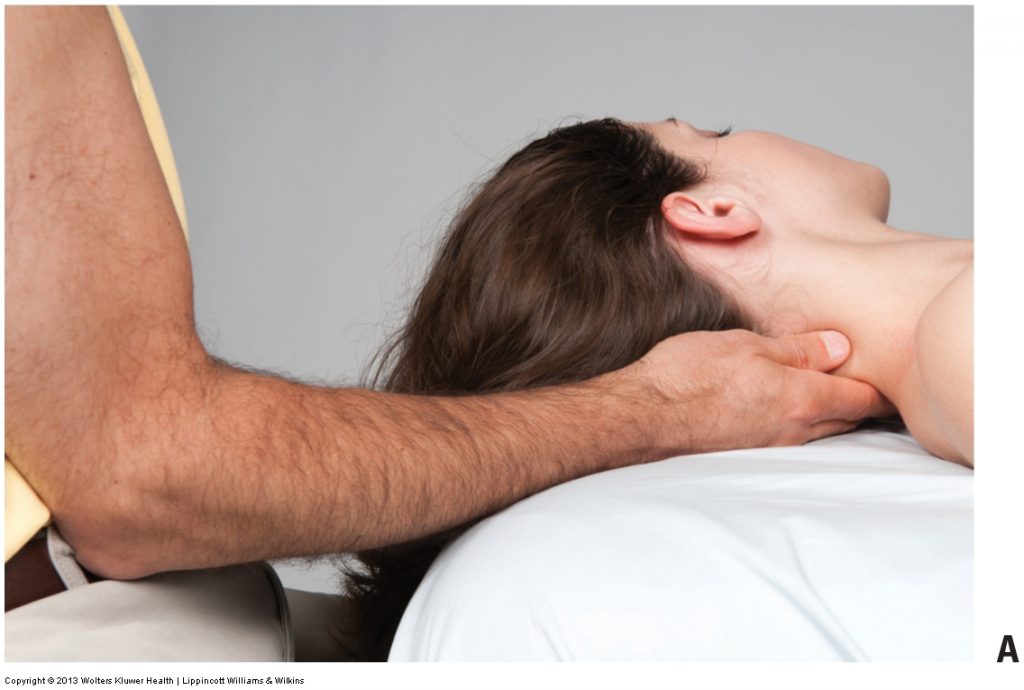
Figure 15. Do not let the elbow joint flex. (A) Starting position. (B) Posture of the elbow joint after leaning in with the core. Note that as the therapist leans in to apply pressure into the client’s neck, the elbow joint has not flexed (bent) any further. (C) The common biomechanical error of allowing the elbow joint to bend further when leaning in with the core. Permission Joseph E. Muscolino. Advanced Treatment Techniques for the Manual Therapist: Neck (2013).
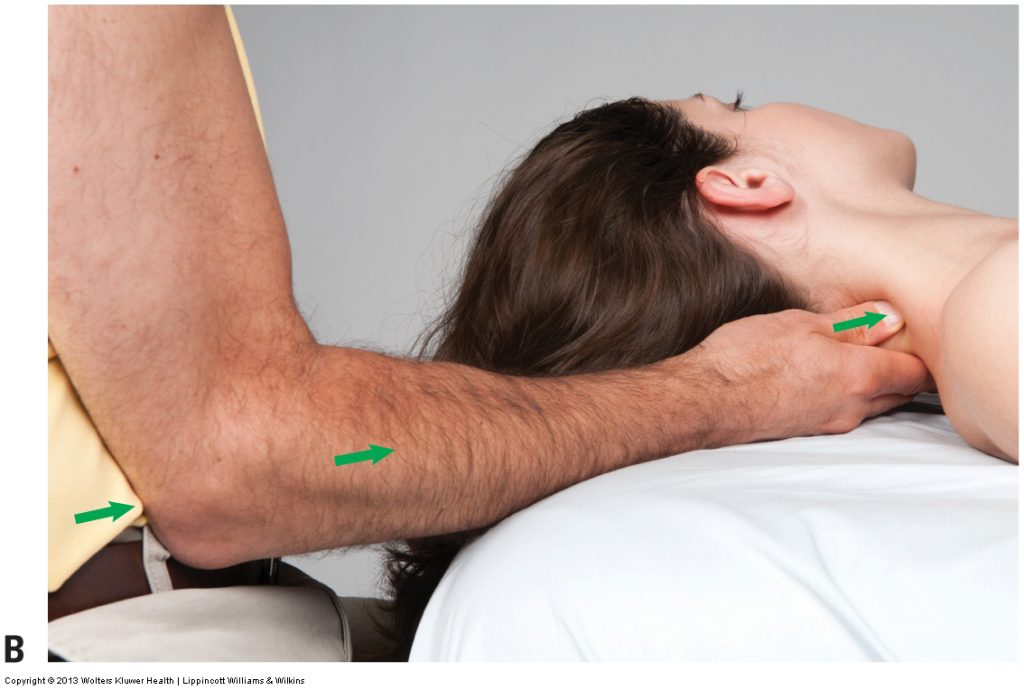
Figure 15B. Permission Joseph E. Muscolino. Advanced Treatment Techniques for the Manual Therapist: Neck (2013).
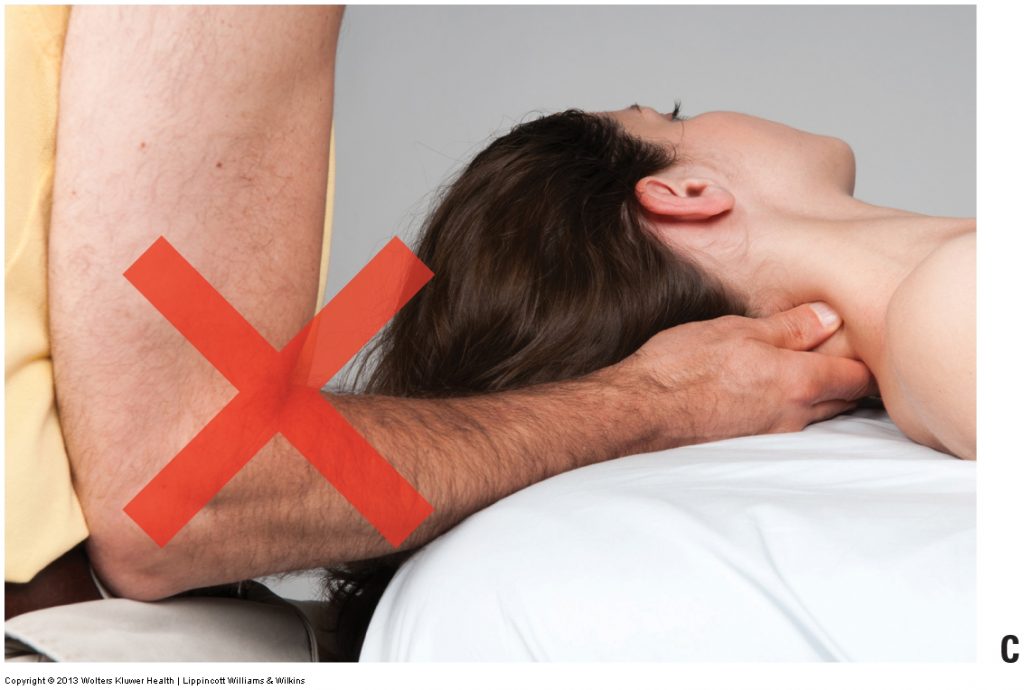
Figure 15C. Permission Joseph E. Muscolino. Advanced Treatment Techniques for the Manual Therapist: Neck (2013).
When working the supine neck, the elbow joint of your treatment side should be tucked into your core, ideally with the (upper) arm hugged against your trunk. In this position, the elbow joint is flexed so it is not stacked. Therefore, when you lean in with your core to apply pressure into the client’s neck, it is extremely important that you stabilize your elbow joint and not allow it to bend any further (see Fig. 15). The purpose of using your core to lean in is to transfer body weight force through your forearm and treatment hand contact, and then into the client. If you allow your elbow joint to bend further, even a small amount, you will lose some or all of that core force. This is probably the most common body mechanics error when working the supine neck and frustrates many therapists who cannot understand why they are leaning in with their core but the client is still not feeling appreciable pressure.
This blog post article is one of ten articles on Deep Pressure Massage Technique to the Neck.
The ten articles are:
- Introduction to Deep Pressure Massage Technique to the Neck
- Neck Deep Pressure Massage: Using Bodyweight and Muscular Effort
- Neck Deep Pressure Massage: Overview
- Neck Deep Pressure Massage: Step by Step – Positioning
- Neck Deep Pressure Massage: Step by Step – Contacts
- Neck Deep Pressure Massage: Step by Step – Use Your Core
- Neck Deep Pressure Massage: Step by Step – Apply Pressure Perpendiculary
- Neck Deep Pressure Massage: Step by Step – Engage the Tissues
- Neck Deep Pressure Massage: Step by Step – Deep Stroking Massage
- Neck Deep Pressure Massage: Prone and Side-Lying
(Click here for the blog post article: Treatment Strategy and Treatment Strategy for the Neck.)