This is the 7th in a series of 13 articles on Deep Pressure Massage Technique for the Low Back
Brace / Support Your Treatment Contact
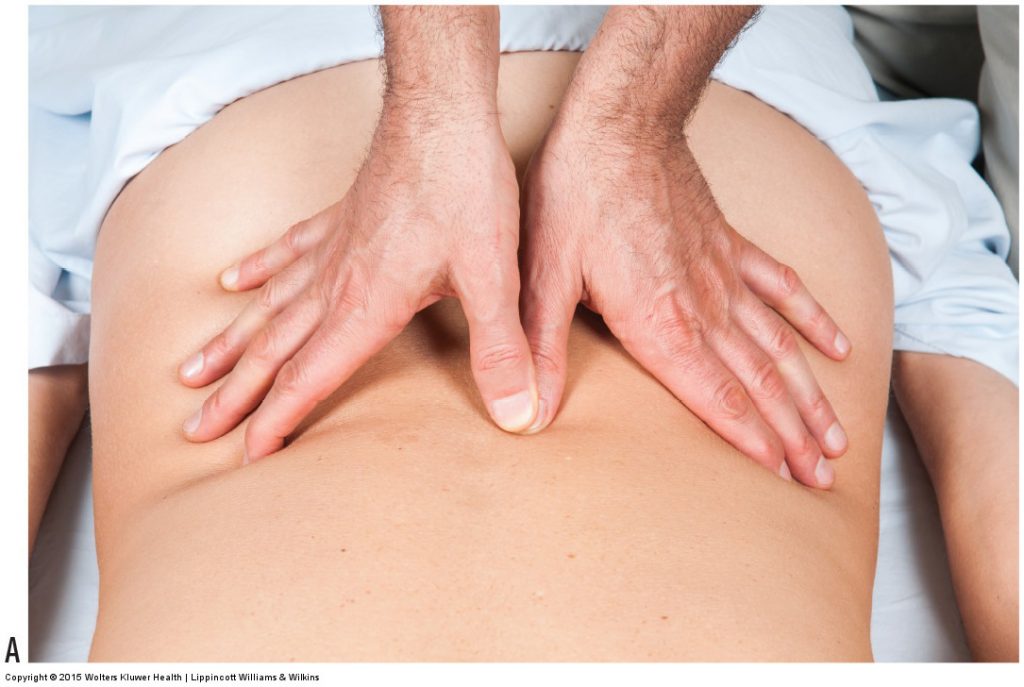
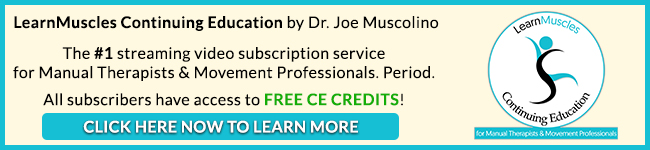
Figure 12. Bracing/supporting the thumb pad treatment contact. (A) The thumb pad of the other hand braces directly on the distal phalanx of the treatment contact thumb. (B, C) Bracing on the proximal phalanx or directly adjacent to the distal phalanx of the treatment contact thumb is not an effective brace. Permission Joseph E. Muscolino. Manual Therapy for the Low Back and Pelvis – A Clinical Orthopedic Approach (2013).
When employing deep pressure, it is extremely important to brace and support the treatment contact that meets the client. This both protects the joints and musculature of the treatment contact as well as allows for the brace hand to contribute to the generation of pressure, thereby increasing the depth of pressure. Bracing the contact means that the two hands must work together instead of each contacting the client separately. Less area of the client’s body will be covered this way, but stronger and more efficient pressure will be created at the area that is being worked, which is more important when deep work is needed.
Location of Brace / Support for Treatment Contact
When bracing the treatment contact, the precise location of the brace on the contact is extremely important. The brace should be placed on the contact directly over where the pressure is being exerted into the client. This is where the brace should be to effectively add to the pressure; it is also where the contact will be physically stressed and needs the bracing support to protect it from injury.
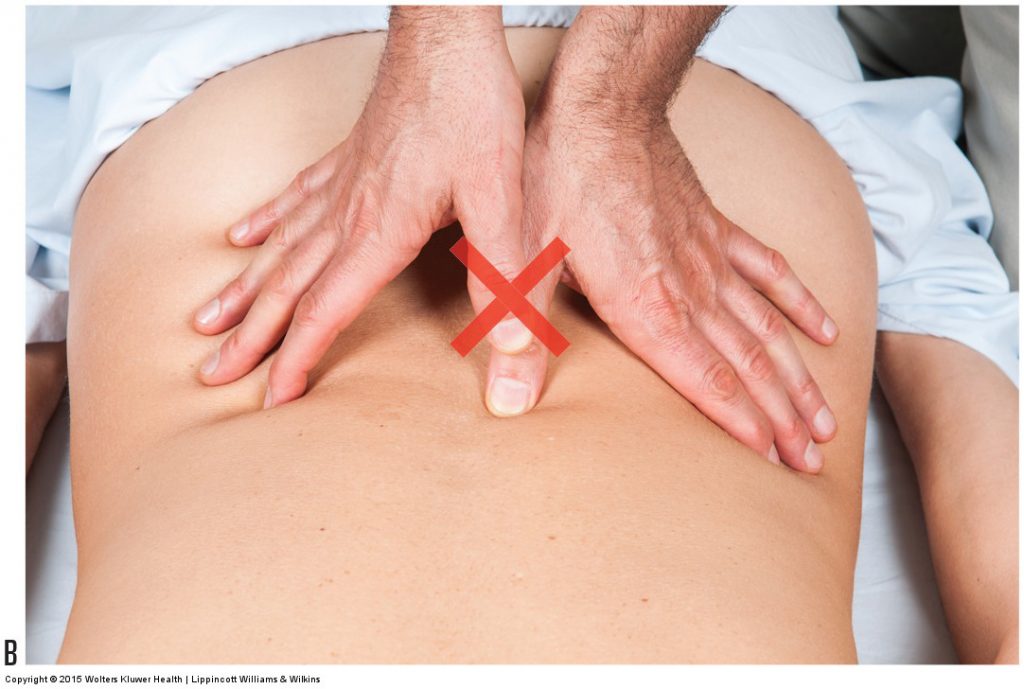
Figure 12B. Permission Joseph E. Muscolino. Manual Therapy for the Low Back and Pelvis – A Clinical Orthopedic Approach (2013).

Figure 12C. Permission Joseph E. Muscolino. Manual Therapy for the Low Back and Pelvis – A Clinical Orthopedic Approach (2013).
Bracing / Supporting the Thumb Treatment Contact
For example, if a thumb contact is being used as the treatment contact, the bracing should be over the distal phalanx of the contact thumb as seen in Figure 12A. When the thumb pad presses into the client, the client’s body pushes back into the therapist’s thumb, tending to hyperextend the thumb at the interphalangeal joint. Placing the brace thumb over the proximal phalanx of the contact thumb or next to the contact thumb as seen in Figures 12B and 12C will not effectively add to the pressure and will not protect the interphalangeal joint from hyperextension and eventual injury. Although it is common to use the thumb of the other hand as the brace to support the thumb contact, it is not the only body part that can be used as a brace. Any body part that can exert pressure on the distal phalanx of the contact thumb can be used as a brace. What is important is that the location where pressure is exerted into the client by the contact is braced and supported.
Bracing / Supporting the Finger Pad Treatment Contact
Similar to bracing the thumb pad treatment contact, bracing the finger pads contact should be done over the distal phalanges of the fingers that are contacting the client, usually the index, middle, and ring fingers. Finger pads of the other hand work well to brace the finger pads contact.
Bracing / Supporting the Palm Treatment Contact
Proper bracing of the palm treatment contact is extremely important. Because pressure when using the palm contact is exerted through the base of the palm (carpal region), the bracing needs to be placed over the carpal region of the contact hand. Unfortunately, therapists often incorrectly place the brace too far distal on the hand. A common brace for the palm contact is to use the other palm. When using this brace, be sure to place the carpal region of the brace hand directly over the carpal region of the contact hand. In Figure 13A, both hands are being held in extension at the wrist joint to clearly illustrate that the pressure from the brace hand is being exerted directly over the carpal contact on the client. Of course, when actually working on a client, it is important to let the hands relax as seen in Figure 13B so that the extensor musculature of the forearms is not fatigued.
Thumb Web Brace / Support for Palm Treatment Contact
Figure 13. Bracing the palm treatment contact. The palm of the other hand is shown as the brace in A and B. In A, both hands are shown extended at the wrist joint to illustrate that the pressure of the brace should be through the carpal region of the palm contact. When actually working on the client, the hands should be relaxed as seen in B. The thumb web of the other hand is shown as the brace in C and D. In C, both hands are shown lifted to illustrate that the pressure of the brace should be through the carpal region of the palm treatment contact. When actually working on the client, the hands should be relaxed as seen in D. Permission Joseph E. Muscolino. Manual Therapy for the Low Back and Pelvis – A Clinical Orthopedic Approach (2013).
Another brace for the palm treatment contact that is not used as often but offers a unique advantage over the palm brace is the thumb web. Similar to the illustration of the palm brace, Figure 13C illustrates the thumb web brace position with the hands lifted away from the client so that the exact placement and pressure can be easily seen; when working on the client, be sure to let the hands relax as seen in Figure 13D. The advantage of the thumb web brace is that it allows for an easy transition when changing from a full flat palm contact to the knife-edge (ulnar side of hand) contact. As the forearm supinates to transition from the full flat palm contact to the knife-edge contact, the thumb web brace can be easily altered to compensate. This allows for the pressure of the brace to always be directly over the contact on the client. The palm brace may work well when the contact palm is flat against the client but is difficult to use when the contact transitions to the hypothenar eminence or the knife-edge.
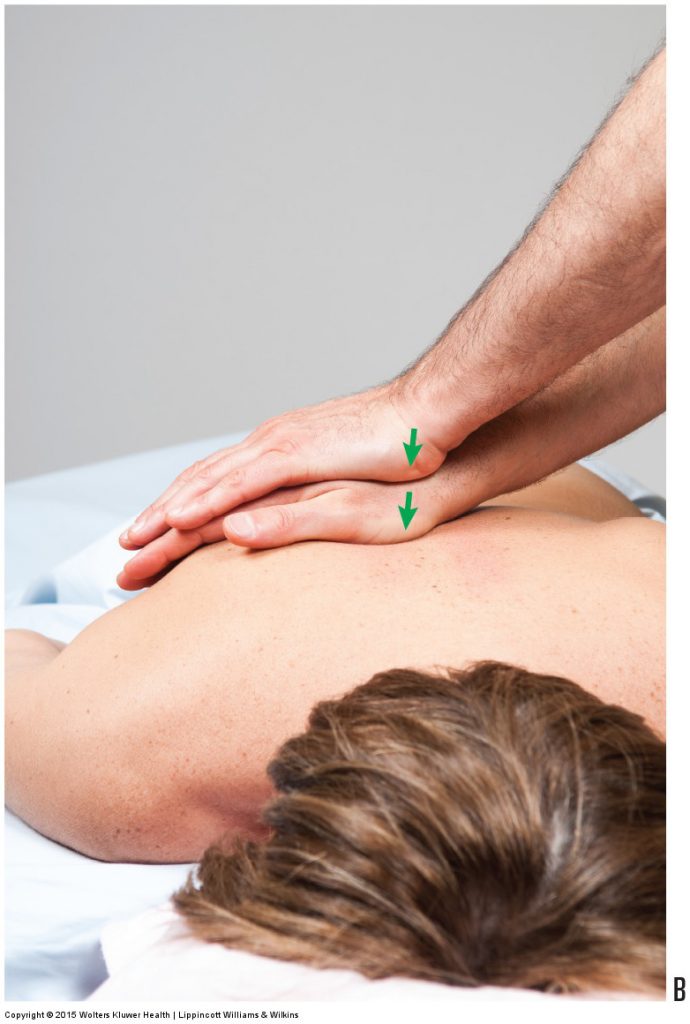
Figure 13B. Permission Joseph E. Muscolino. Manual Therapy for the Low Back and Pelvis – A Clinical Orthopedic Approach (2013).
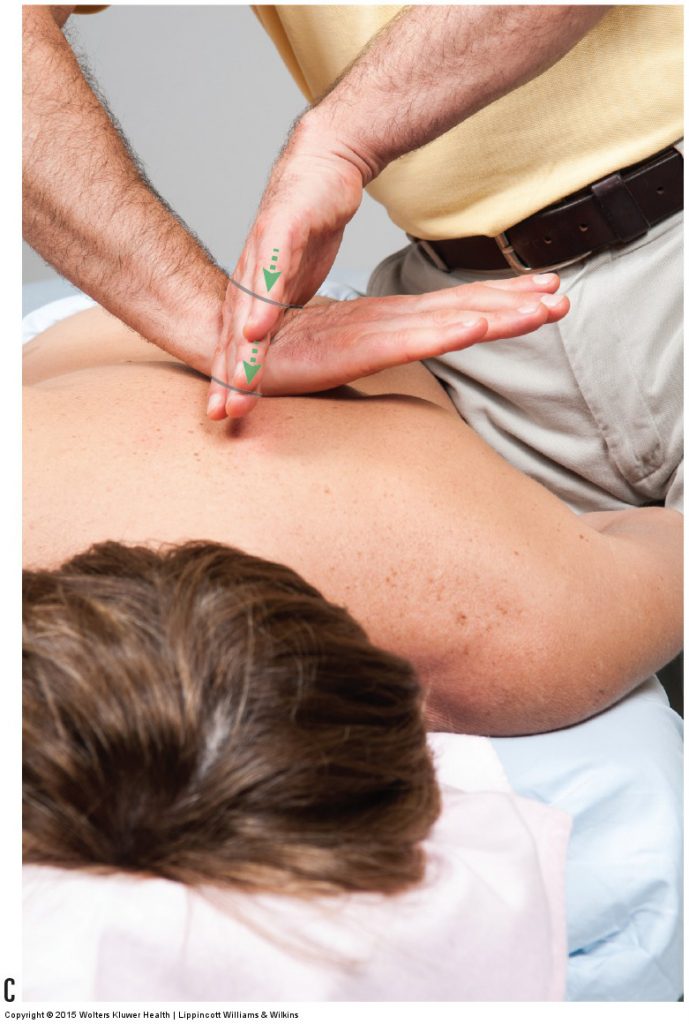
Figure 13C. Permission Joseph E. Muscolino. Manual Therapy for the Low Back and Pelvis – A Clinical Orthopedic Approach (2013).
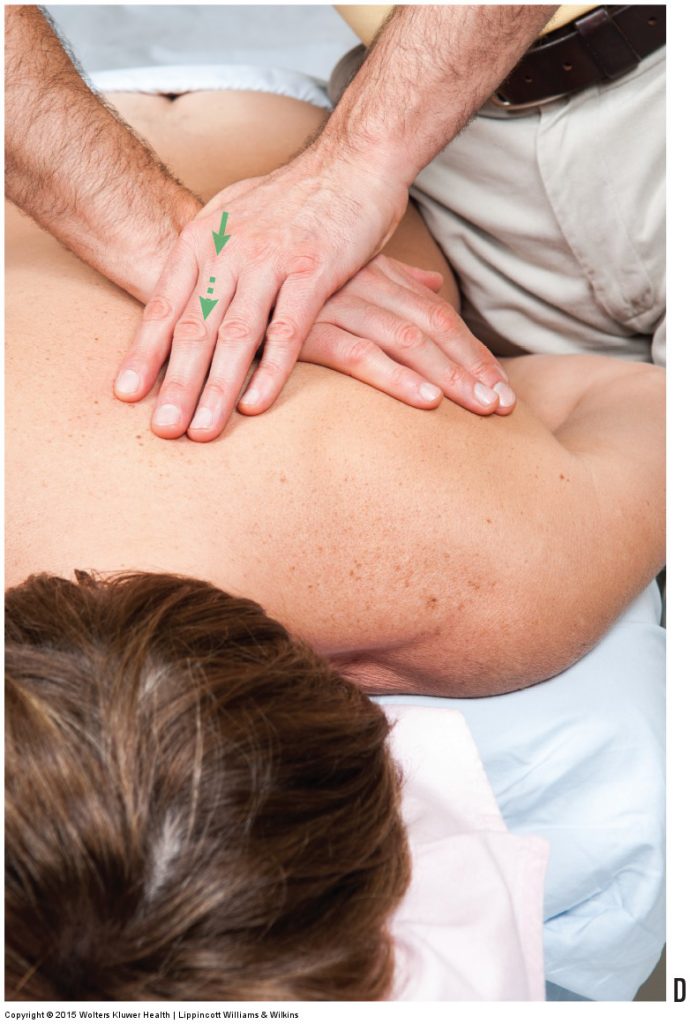
Figure 13D. Permission Joseph E. Muscolino. Manual Therapy for the Low Back and Pelvis – A Clinical Orthopedic Approach (2013).
Bracing / Supporting the Fist Treatment Contact
When using a closed fist to contact the client, the wrist joint can be braced and stabilized with the contact hand (see Fig. 9E).
Bracing / Supporting the Elbow and Forearm Treatment Contacts
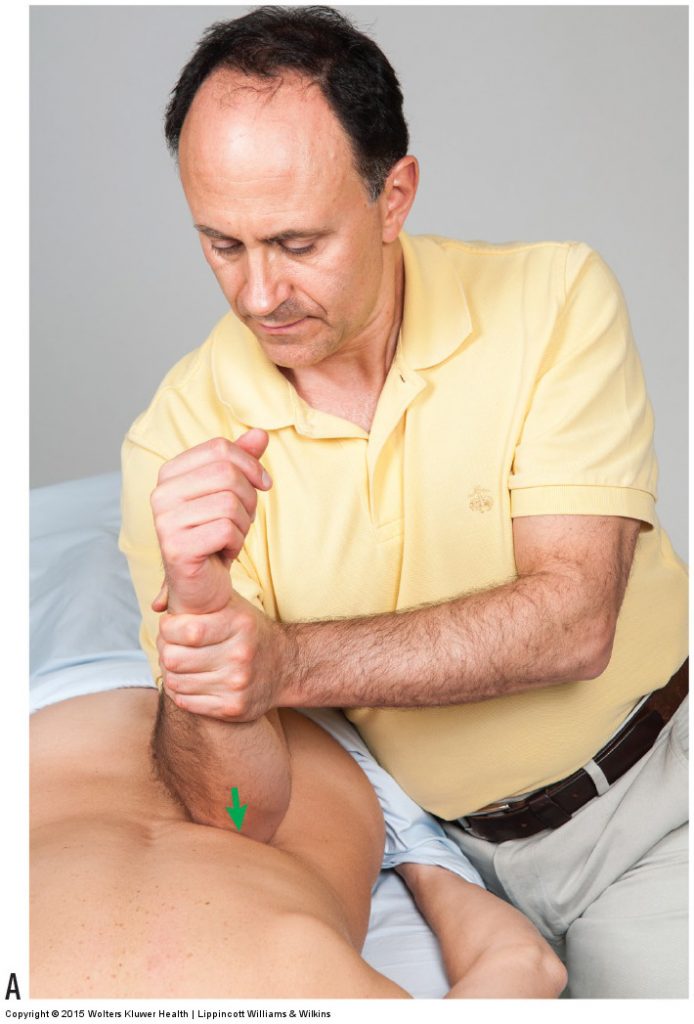
Figure 14. Bracing the elbow treatment contact. Bracing the elbow treatment contact by holding onto the distal forearm allows pivoting of the elbow, which can change the angulation of pressure into the client. Permission Joseph E. Muscolino. Manual Therapy for the Low Back and Pelvis – A Clinical Orthopedic Approach (2013).
Even larger and more powerful than the fist contact are the elbow and forearm treatment contacts. Even though the elbow and forearm contacts are the largest and most efficient for producing deep pressure, use of these contacts can be physically stressful on the therapist’s shoulder girdle musculature on the contact side because this musculature must function to stabilize the shoulder girdle as pressure is exerted into the client. Bracing that is done by the other side of the body can help to relieve the contact-side shoulder girdle musculature from having to work so hard. Bracing the elbow contact can be done by pressing down on the anterior surface of the elbow joint or by holding onto the distal forearm (Fig. 14A). Bracing and pressing down on the anterior elbow region is very effective at adding pressure into the client. Additional pressure can also be exerted when grasping the distal forearm; however, this brace position is especially effective at pivoting the forearm at the elbow joint so that the angulation of pressure into the client can be varied (Fig. 14B, C). When working with the forearm contact, bracing is accomplished by holding onto and pressing down onto the forearm.
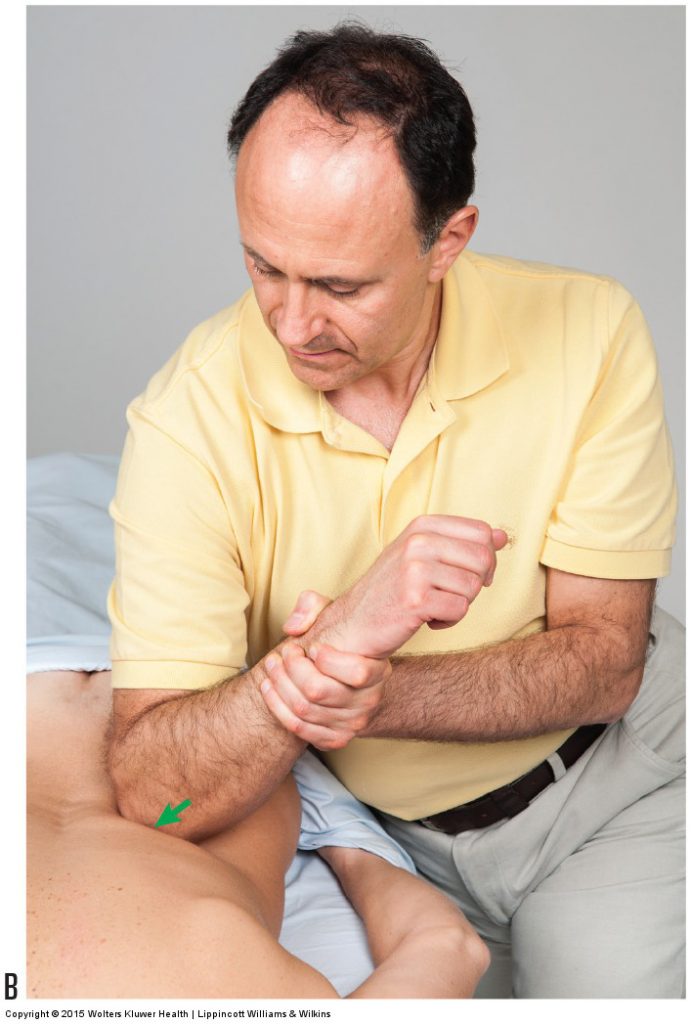
Figure 14B. Permission Joseph E. Muscolino. Manual Therapy for the Low Back and Pelvis – A Clinical Orthopedic Approach (2013).
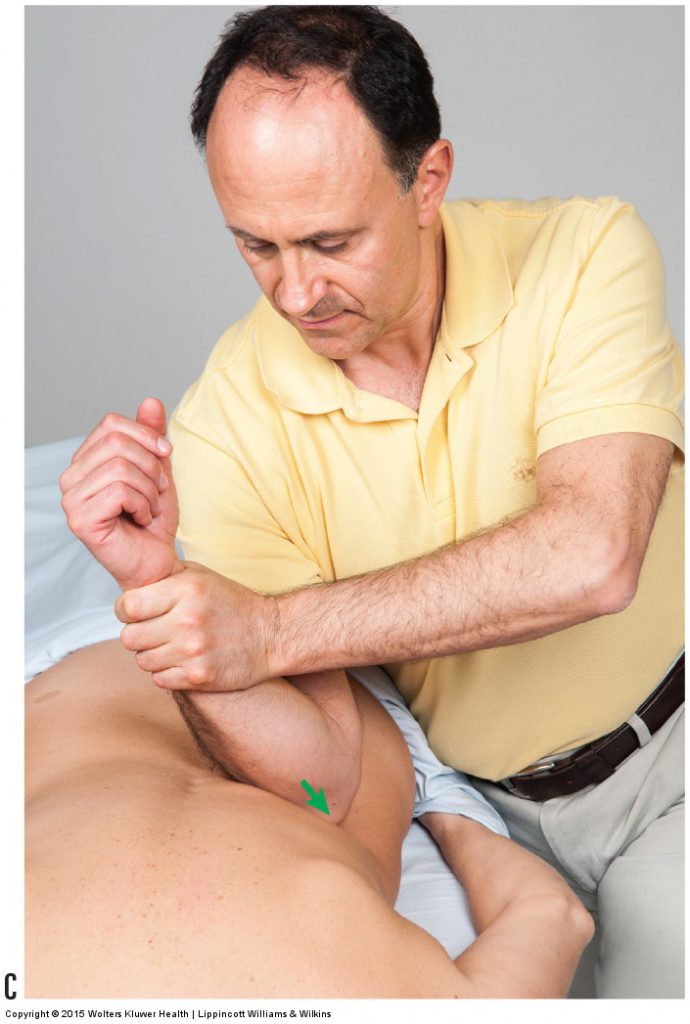
Figure 14C. Permission Joseph E. Muscolino. Manual Therapy for the Low Back and Pelvis – A Clinical Orthopedic Approach (2013).
This is the 7th of 13 articles on Deep Pressure Massage for the Low Back.
The thirteen articles are:
- Introduction to Deep Pressure Massage to the Low Back
- Deep Pressure Massage to the Low Back – Choosing the Right Table
- Deep Pressure Massage to the Low Back – Overview
- Deep Pressure Massage to the Low Back – Client and Therapist Positioning
- Deep Pressure Massage to the Low Back – Positioning the Feet
- Deep Pressure Massage to the Low Back – Choosing the Treatment Contact
- Deep Pressure Massage to the Low Back – Support Your Treatment Contact
- Deep Pressure Massage to the Low Back – Use Stacked Joints
- Deep Pressure Massage to the Low Back – Apply Pressure Perpendicularly
- Deep Pressure Massage to the Low Back – Use Body Weight
- Deep Pressure Massage to the Low Back – Tissue Tension Barrier
- Deep Pressure Massage to the Low Back – Deep Strokes
- Deep Pressure Massage to the Low Back – Forward Head Posture
(Click here for the blog post article: Transversospinalis (lumbar and thoracic) Group Trigger Point.)