This is the 10th in a series of 13 articles on Deep Pressure Massage Technique for the Low Back
Use Body Weight
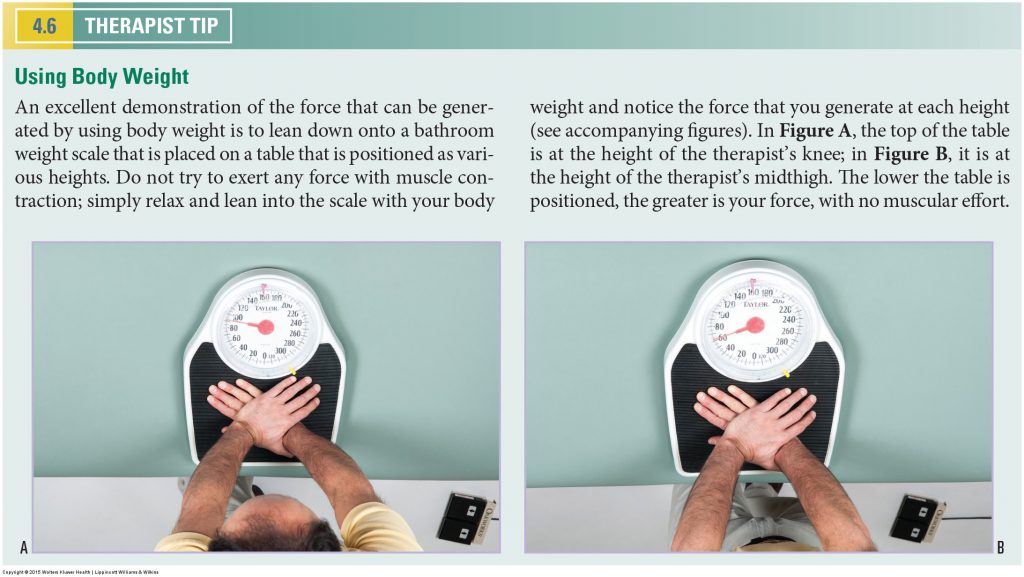
Bathroom Scale. Permission Joseph E. Muscolino. Manual Therapy for the Low Back and Pelvis – A Clinical Orthopedic Approach (2013).
An excellent demonstration of the force that can be generated by using body weight is to lean down onto a bathroom weight scale that is placed on a table that is positioned as various heights. Do not try to exert any force with muscle contraction; simply relax and lean into the scale with your body weight and notice the force that you generate at each height (see accompanying figures). In Figure A, the top of the table is at the height of the therapist’s knee; in Figure B, it is at the height of the therapist’s midthigh. The lower the table is positioned, the greater is your force, with no muscular effort. Body weight is free, so why not take advantage of it?
Use Larger Muscles
Dropping down and leaning into the posterior surface of the client with your core primarily involves using your body weight. However, it is often necessary to also contract muscles to add to the pressure generated from body weight. When choosing which muscles to contract and use, less effort is expended if you work with the larger, stronger proximal muscles instead of the smaller distal ones. In ascending order of size and strength, the muscles of the upper extremity and axial body that can be used are the muscles of the thumb/fingers, wrist joint, elbow and radioulnar joints, glenohumeral joint, shoulder girdle, and finally the muscles of the core, which comprise the trunk and pelvis. Choosing the larger proximal muscles of your core will decrease fatigue and the possibility of injury.
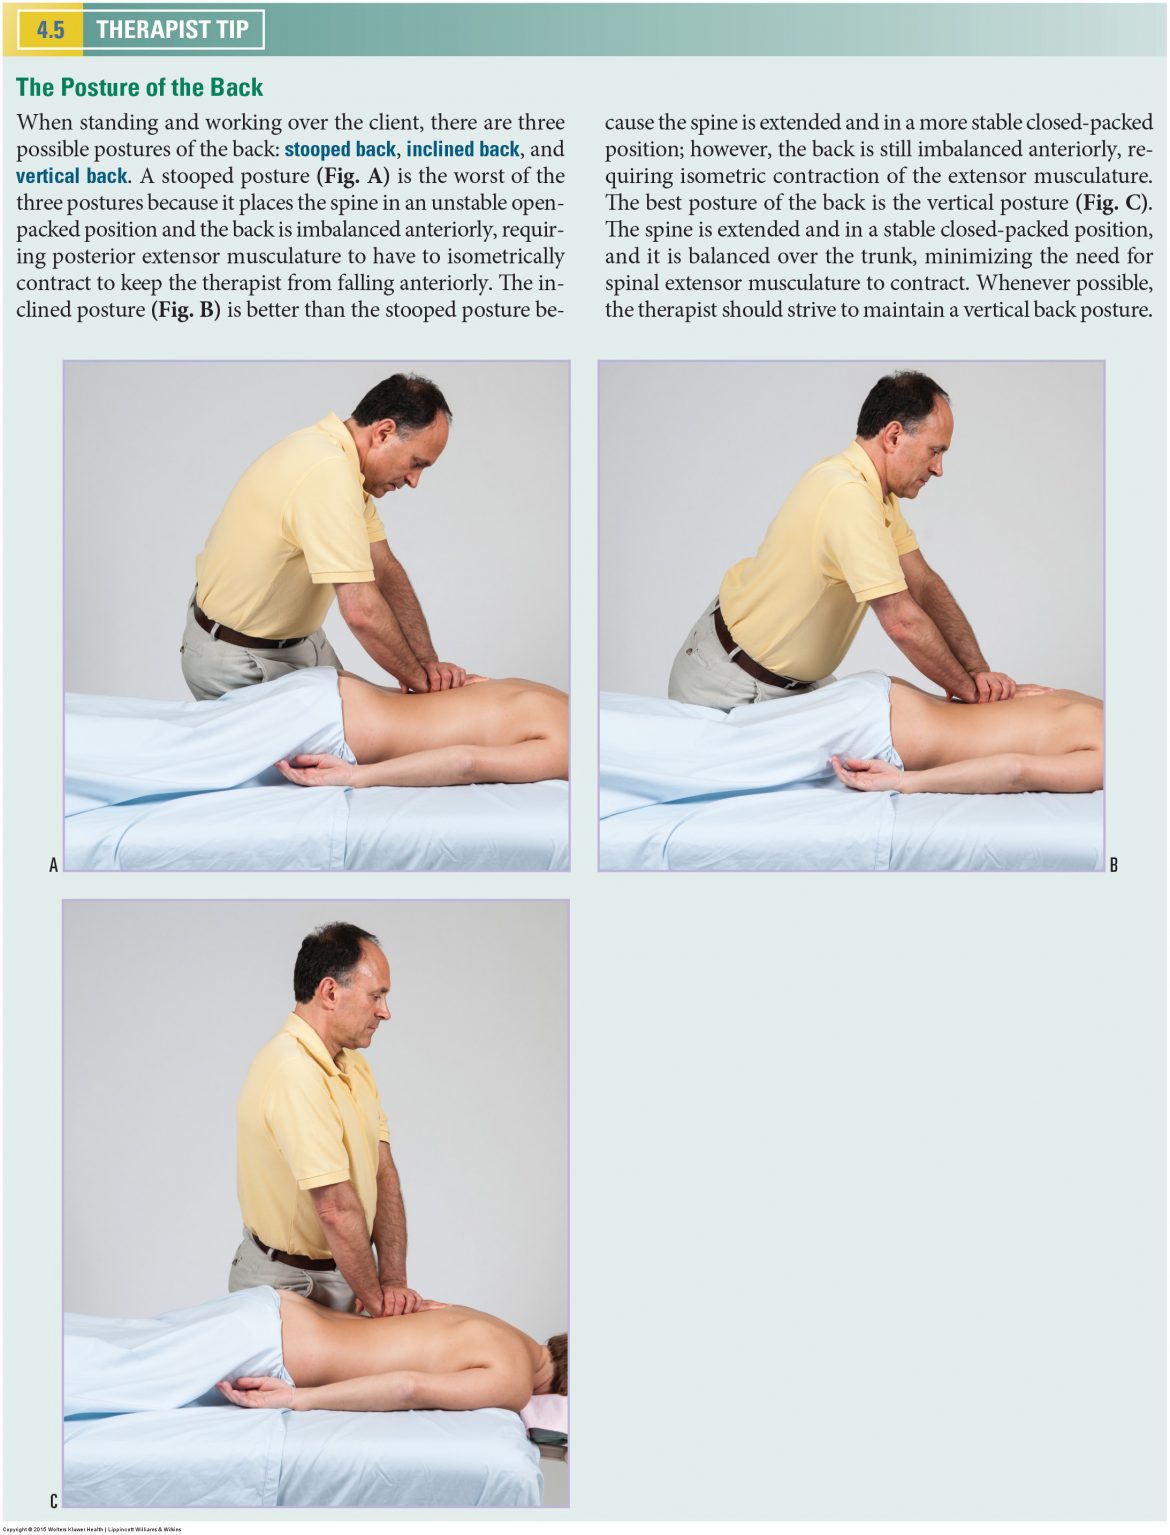
The Posture of the Back
When standing and working over the client, there are three possible postures of the back: stooped back, inclined back, and vertical back. A stooped posture is the worst of the three postures because it places the spine in an unstable open-packed position and the back is imbalanced anteriorly, requiring posterior extensor musculature to have to isometrically contract to keep the therapist from falling anteriorly. The inclined posture (Fig. B) is better than the stooped posture because the spine is extended and in a more stable closed-packed position; however, the back is still imbalanced anteriorly, requiring isometric contraction of the extensor musculature. The best posture of the back is the vertical posture (Fig. C). The spine is extended and in a stable closed-packed position, and it is balanced over the trunk, minimizing the need for spinal extensor musculature to contract. Whenever possible, the therapist should strive to maintain a vertical back posture.
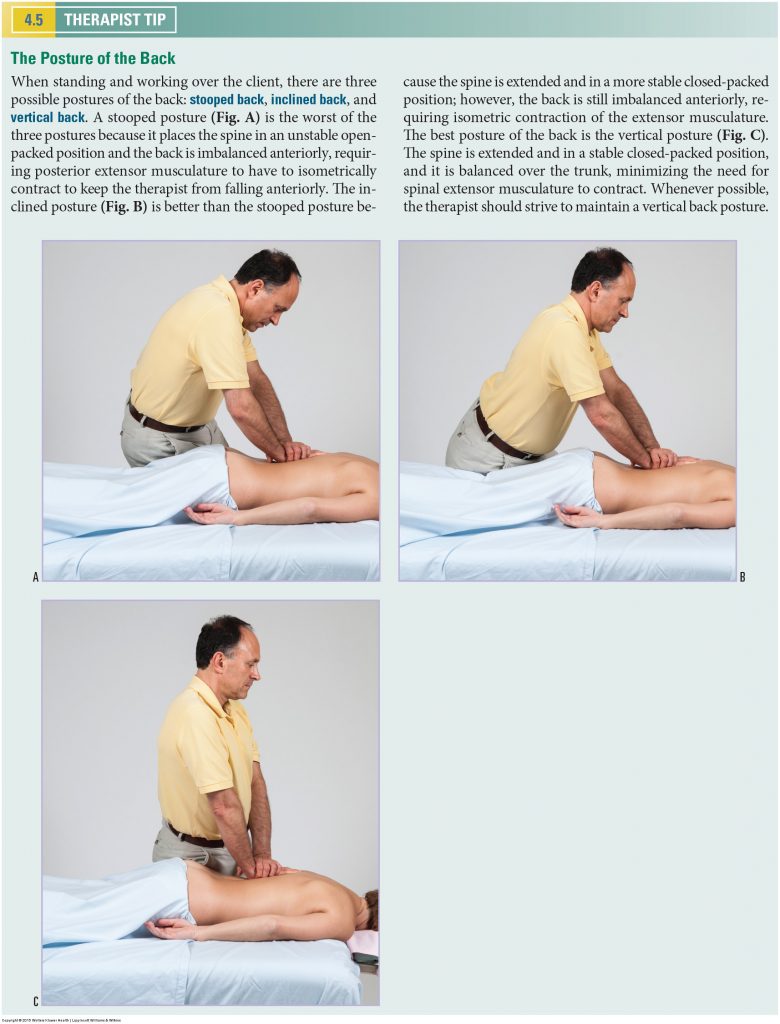
Back Postures. Permission Joseph E. Muscolino. Manual Therapy for the Low Back and Pelvis – A Clinical Orthopedic Approach (2013).
Letting the Shoulder Girdles Rise
When the table height is too high, it is common for the therapist to have to contract musculature to elevate the shoulder girdles when working on the client. This is considered to be poor posture because it stresses the body by requiring scapular elevation musculature such as the upper trapezius and levator scapulae to overwork by isometrically contracting. For this reason, a general rule of body mechanics is that the shoulder girdles should be relaxed and down. However, there are times when it is fine to have the shoulder girdles elevated. If you are working with deep pressure down into the client with the table adequately low, as you press into the client, the client’s body presses back up into your contacts, causing your shoulder girdles to passively rise. In these cases, it is less effortful/stressful for your body to simply let the shoulder girdles rise than to isometrically contract scapular depression musculature to hold them down. The essence of good posture is minimizing stress to the tissues. Having the shoulder girdles relaxed and up is less stressful than contracting to hold them down. Having said that, if you choose to contract musculature to hold down (depress) the shoulder girdles, it could be considered good exercise for the associated musculature. Just don’t try to do too much too quickly. Take time to develop and strengthen these muscles.
Pushing a Box
A common error in body mechanics when pushing off with the lower extremity in back is for the therapist to rise up as he pushes off. This is counterproductive to generating pressure into the client because rising upward would move the core of your body away from the client. Your client is in front of you and usually a bit lower. Therefore, it is important to learn to push off with the lower extremity in back and push forward and somewhat downward.
To help get the hang of this motion, it can be useful to picture yourself pushing a large box that is on the floor. When you prepare to push the box, you intuitively crouch down and dorsiflex the ankle joint and flex the knee and hip joints of the lower extremity in back. Then as you push the box, you naturally plantarflex the ankle joint and extend the knee and hip joints in back as you dorsiflex the ankle joint and flex the knee and hip joints in front. As you push the box forward, you would not rise upward. Rather, you would keep the pelvis more level. Practice this when standing; once it feels natural, try to reproduce this motion when working on a client. If any alteration is made, actually drop your pelvis as you push forward so that you push forward and downward into the client.
Pushing Off with the Lower Extremity
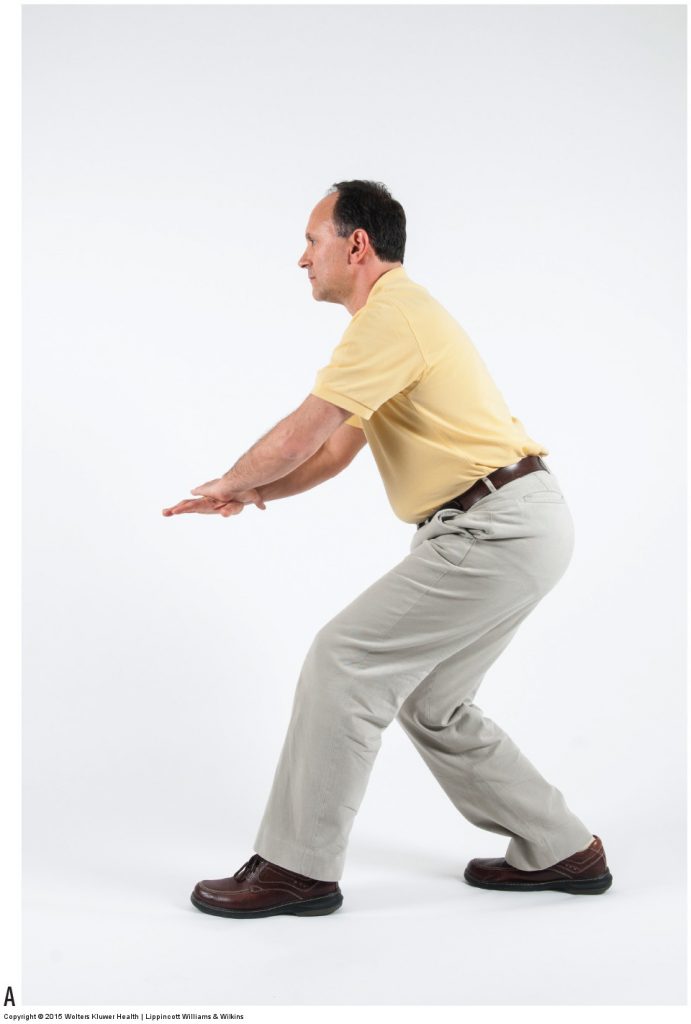
Figure 21. Generating pressure into the client by pushing off with the lower extremity in back. (A) Starting position. (B) Pushing off involves plantarflexing the ankle joint, extending the knee joint, and extending the hip joint.Permission Joseph E. Muscolino. Manual Therapy for the Low Back and Pelvis – A Clinical Orthopedic Approach (2013).
If the surface contour of the client that you are working is oriented somewhat laterally (e.g., the quadratus lumborum or lateral paraspinal musculature), then you need to approach the client more horizontally. A horizontal line of force does not allow for the use of body weight, so muscle contraction is necessary. Less effort is exerted for the same pressure if larger muscles are used. When working somewhat horizontally, it is wise to take advantage of the large musculature of the lower extremity. To do this, the feet should be in a sagittal plane stance, with the rear foot oriented somewhat parallel with the front foot. This allows for the best use of large musculature oriented in the sagittal plane. (If the rear foot is turned outward, as therapists often do, the sagittal plane musculature will not be in line with the stroke, and power will be lost.) Now use the lower extremity in back to push off the floor and into the client. Many therapists are excellent at using the plantarflexor muscles of the ankle joint but neglect to take advantage of the large musculature of the knee and hip joints. To use these massive muscles, it is important to first assume a somewhat crouched position by flexing the knee and hip joints. Then when you push off into the client by plantarflexing the ankle joint, you simultaneously extend the knee joint with the quadriceps femoris musculature and extend the hip joint with gluteal musculature and hamstrings. To make sure that you do not rise up as you push off, it is necessary to simultaneously dorsiflex the ankle joint and flex the knee and hip joints of the lower extremity that is in front. This allows you to push off forward and also slightly downward into the client (Fig. 21).
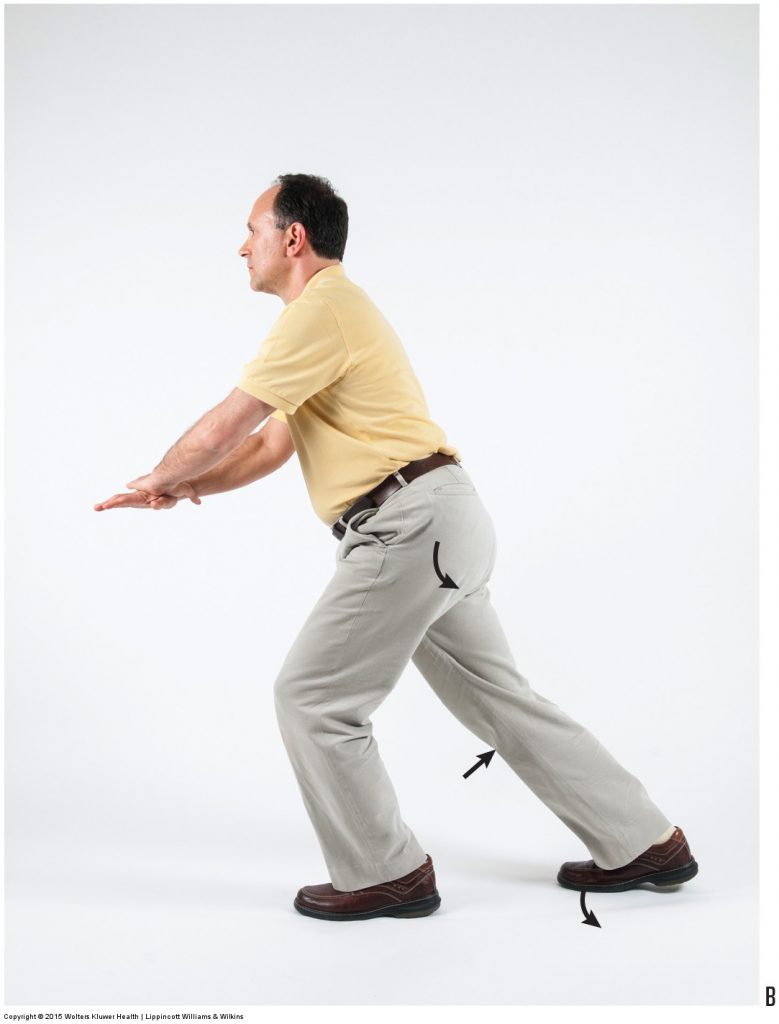
Figure 21B. Permission Joseph E. Muscolino. Manual Therapy for the Low Back and Pelvis – A Clinical Orthopedic Approach (2013).
This is the 10th of 13 articles on Deep Pressure Massage for the Low Back.
The thirteen articles are:
- Introduction to Deep Pressure Massage to the Low Back
- Deep Pressure Massage to the Low Back – Choosing the Right Table
- Deep Pressure Massage to the Low Back – Overview
- Deep Pressure Massage to the Low Back – Client and Therapist Positioning
- Deep Pressure Massage to the Low Back – Positioning the Feet
- Deep Pressure Massage to the Low Back – Choosing the Treatment Contact
- Deep Pressure Massage to the Low Back – Support Your Treatment Contact
- Deep Pressure Massage to the Low Back – Use Stacked Joints
- Deep Pressure Massage to the Low Back – Apply Pressure Perpendicularly
- Deep Pressure Massage to the Low Back – Use Body Weight
- Deep Pressure Massage to the Low Back – Tissue Tension Barrier
- Deep Pressure Massage to the Low Back – Deep Strokes
- Deep Pressure Massage to the Low Back – Forward Head Posture
(Click here for the blog post article: Lower Crossed Syndrome.)