This is the 12th in a series of 13 articles on Deep Pressure Massage Technique for the Low Back
Static Compression
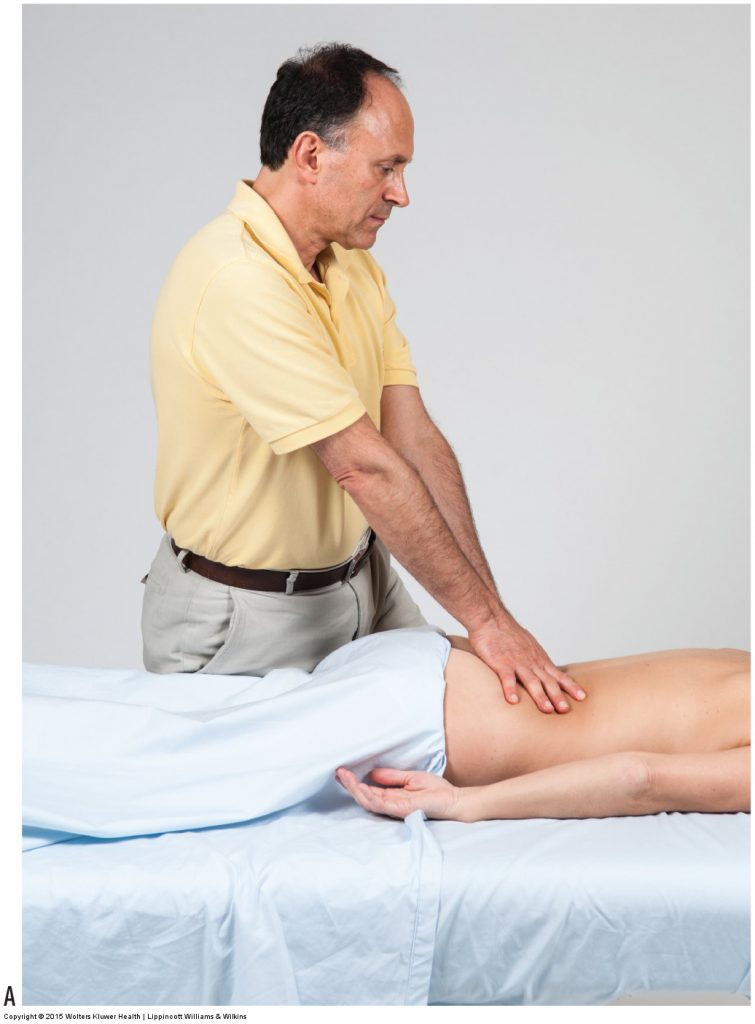
Figure 22. Transitioning from static compression to a short deep stroke. (A) Starting position. (B) Movement of the stroke should originate from the core. Permission Joseph E. Muscolino. Manual Therapy for the Low Back and Pelvis – A Clinical Orthopedic Approach (2013).
All of the guidelines presented thus far in this series of blog post articles are meant to perfect your body mechanics when applying sustained compression into any one spot on the client. This in no way is meant to advocate sustained compression as the treatment technique of choice. It is simply easier to learn how to optimize your body mechanics by focusing on one area of the client at a time.
Transitioning to Deep Strokes (Deep Short Strokes)
To transition from sustained pressure in one static location to work with deep strokes (deep stroking massage), in which your pressure is moved from one point to another, and maintain proper body mechanics while doing this, it is necessary to glide your treatment contact from the initial point of contact to the adjacent region. This will require backing off from meeting the client’s body at a perfect perpendicular angle so that you can be slightly horizontal and glide along the client’s body (however, do not back off any more than is necessary to allow for the glide; otherwise, pressure into the client’s tissues will be unnecessarily lost).
Motion Originates From the Core
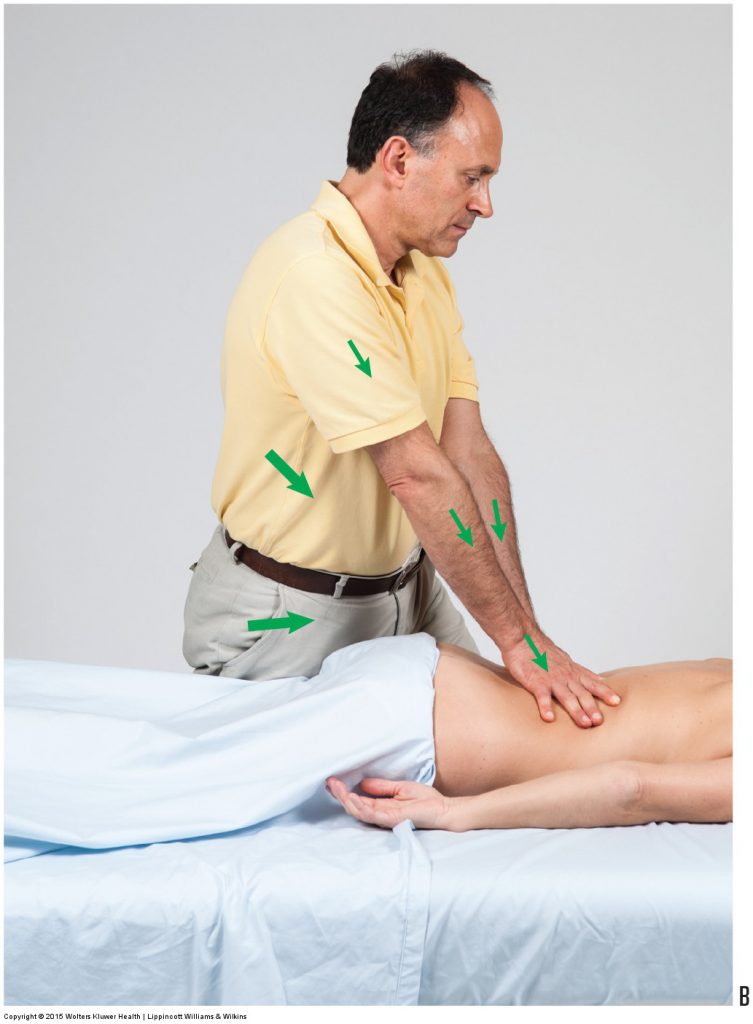
Figure 22B. Permission Joseph E. Muscolino. Manual Therapy for the Low Back and Pelvis – A Clinical Orthopedic Approach (2013).
It is also very important to emphasize that the motion for deep strokes should not come from moving your contact (e.g., your thumb or fingers) but must originate from your core or lower extremities. With stacked joints, this core motion will translate into motion of your treatment contact along the client (Fig. 22A, B). However, it is important to keep these deep strokes short because the farther you reach from your initial point of contact, the more difficult it is to maintain proper body mechanics. Short, deep strokes between 1 and 6 inches in length allow you to preserve optimal body mechanics.
Treating Myofascial Trigger Points
A trigger point (TrP) is a small focal area of tenderness that can refer pain or other symptoms to a distant site. When a TrP occurs in muscular tissue, it involves a small area of contraction that is tender and can refer; this is called a myofascial TrP, or, in lay terms, a muscle knot. Bodywork treatment for TrPs has classically been done with techniques known as ischemic compression and sustained compression. In ischemic and sustained compression, pressure is applied directly to the TrP and is held for a sustained period of time, usually 10 seconds or more (generally, greater pressure is applied with ischemic compression than sustained compression). However, in recent years, many authorities on TrPs (including Simons and Travell in Myofascial Pain and Dysfunction: The Trigger Point Manual, 2nd ed. Vol 1: Upper Half of Body [Lippincott Williams & Wilkins, 1999] and Davies in The Trigger Point Therapy Workbook: Your Self-treatment Guide for Pain Relief, 3ed. [New Harbinger Publications, 2013]) have advocated short deep strokes instead of sustained pressure techniques. Not only are short deep strokes usually more comfortable for the client and easier on your thumbs, it seems to do a better job of increasing local arterial circulation, which is needed to truly heal a TrP. Short strokes need to be only approximately an inch or two in length and are usually repeated 30 to 60 times in 1 minute. Pressure should be deep, but because the pressure is not constantly held on the TrP, it is usually better tolerated by the client. If you have not yet tried deep stroking massage for the treatment of TrPs, give this approach a try and see how your results compare with those of sustained compression techniques.
Transitioning to Long, Deep Strokes
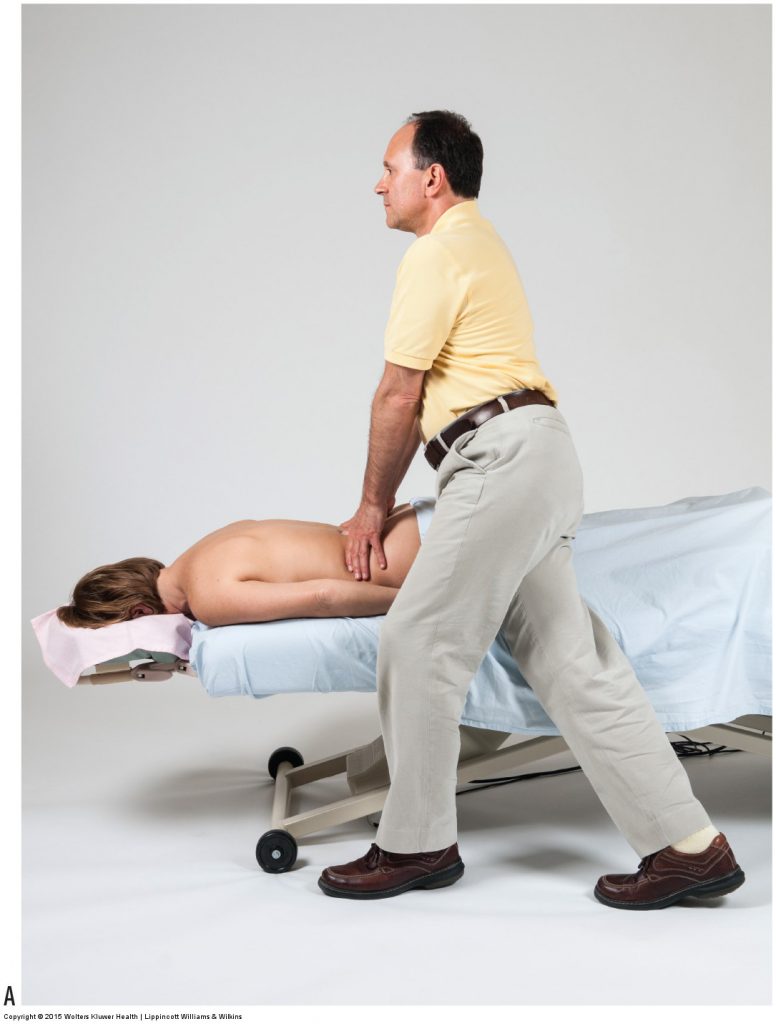
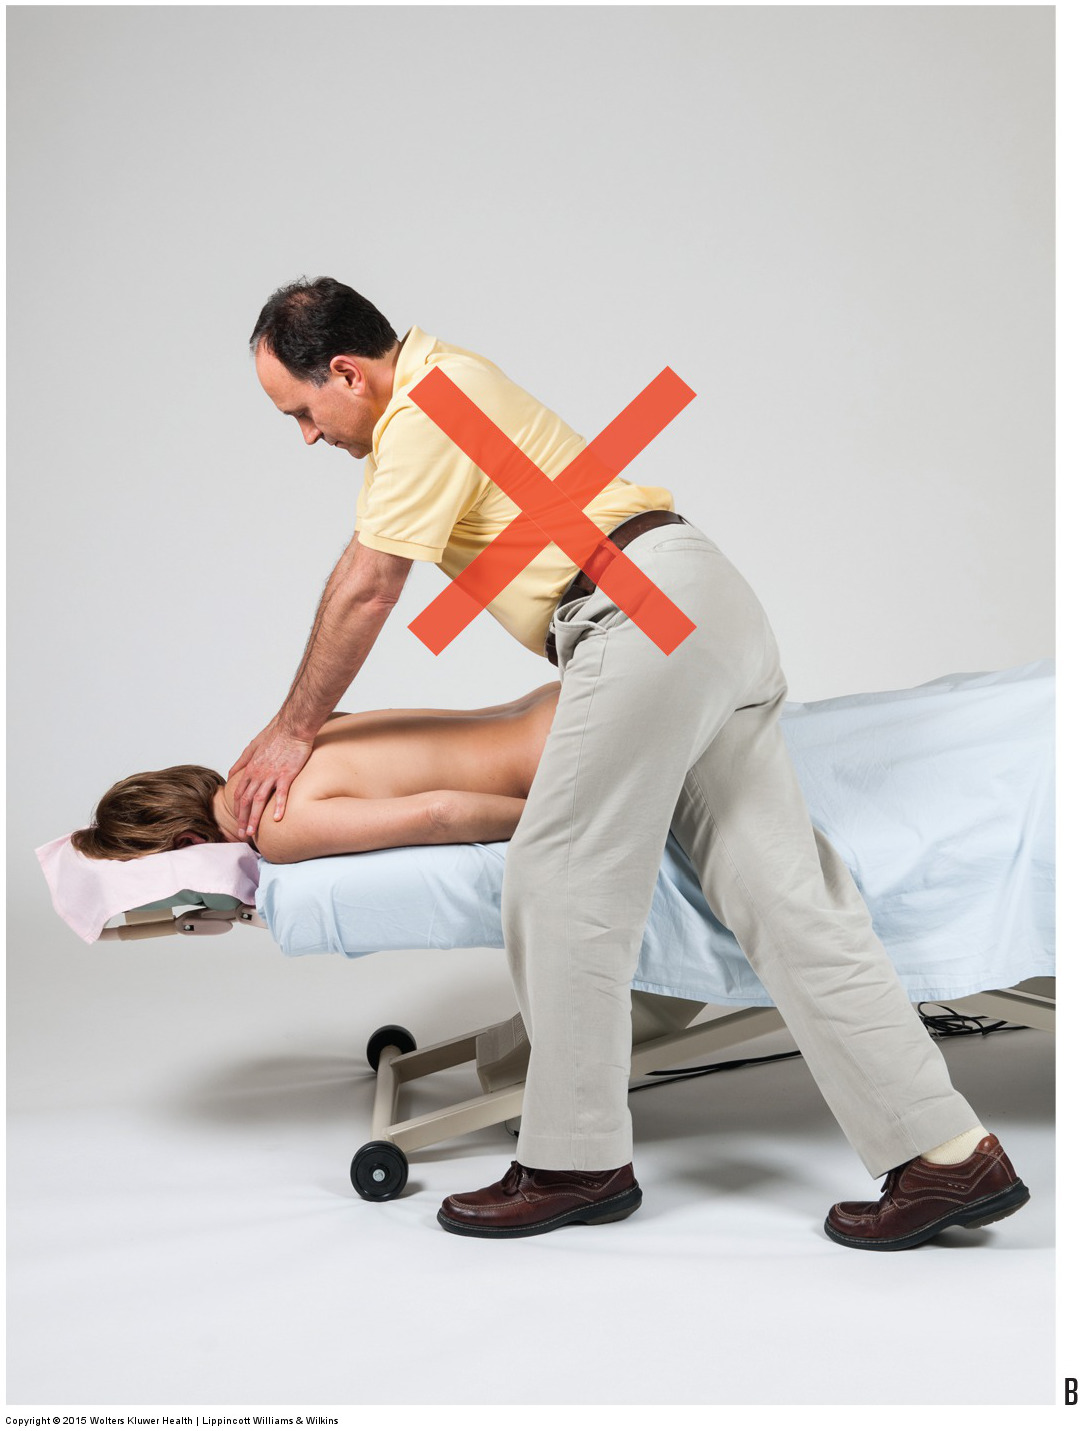
Figure 23. Body mechanics for a long deep stroke. (A) Ideal body mechanics at the beginning of a long stroke. (B) If the feet remain planted in the same position as a long stroke is performed, body mechanics will suffer by the end of the stroke. Permission Joseph E. Muscolino. Manual Therapy for the Low Back and Pelvis – A Clinical Orthopedic Approach (2013).
Good body mechanics are performed by positioning your body as close to the region being worked as possible. This allows you to place your core over the area where pressure is being applied so that body weight can be used (Fig. 23A). However, if ideal body positioning and mechanics are used to contact the client at one point on her body and then you remain with your feet planted in the same spot as a long stroke is performed, it is inevitable that your body mechanics will suffer by the end of the stroke. Your trunk will no longer be vertical and positioned over the client’s body, you will not have the ability to efficiently generate strength, and you will be in an imbalanced position that requires isometric contraction by back musculature to keep you from falling (Fig. 23B). For these reasons, whenever you want to perform a long, deep strokes up the client’s back, it is necessary to move your feet as the stroke is performed.

Figure 23B. Permission Joseph E. Muscolino. Manual Therapy for the Low Back and Pelvis – A Clinical Orthopedic Approach (2013).
Application
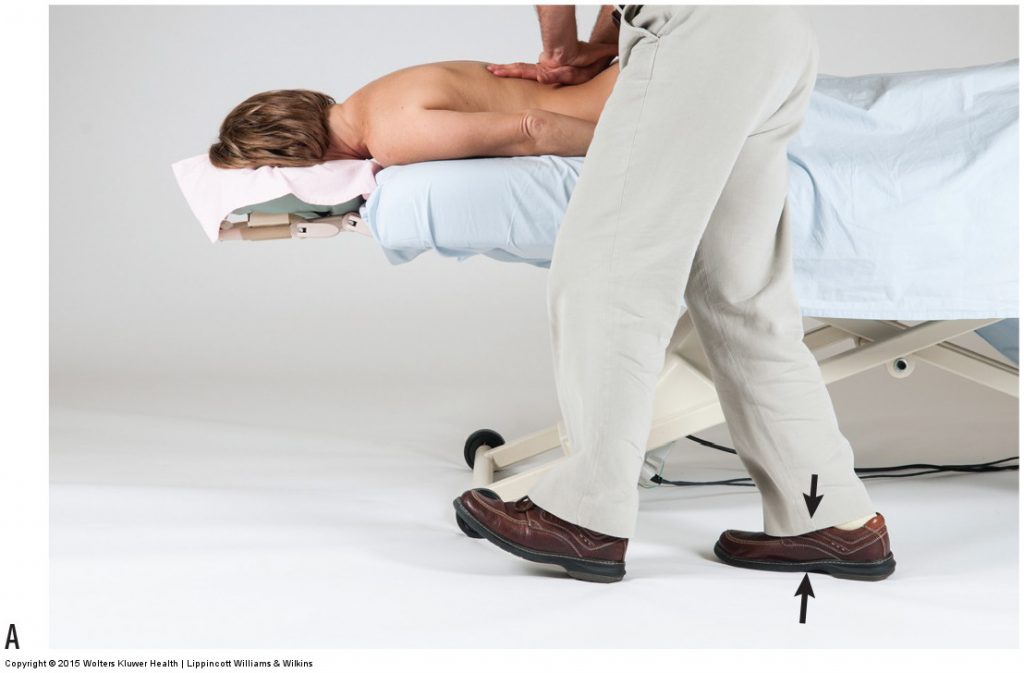
Figure 24. Ideal body mechanics during long deep strokes involve moving the feet and shifting the balance of the body’s weight as the stroke is performed. (A) At beginning of the short stroke, the therapist’s body weight is balanced over the right (rear) foot. (B) Weight is shifted to the left (front) foot. (C) Right foot is repositioned to be next to the left foot, and body weight is shifted to the right foot. (D) Left foot is repositioned to be farther in front, and body weight is shifted onto the left foot.Permission Joseph E. Muscolino. Manual Therapy for the Low Back and Pelvis – A Clinical Orthopedic Approach (2013).
Illustrating short deep strokes on the client’s left side, you begin the stroke with a sagittal stance and your weight balanced over the right (rear) foot (Fig. 24A). As you gradually move up the client’s back with the stroke, you gradually transfer your weight onto your left (front) foot (Fig. 24B). You now reposition your right foot to be next to the left foot and then shift your weight onto the right foot (Fig. 24C). You can now reposition your left foot to be farther in front (Fig. 24D). As you continue to gradually move up the client’s back with the stroke, you repeat this process, again gradually shifting your weight from the right (rear) foot onto the left (front) foot. If you perform a very long stroke from the client’s lumbosacral spine to the top of the thoracic spine, this protocol will usually need to be done approximately two to three times. This protocol allows your core to always be over the region being worked so that you can always take advantage of body weight.
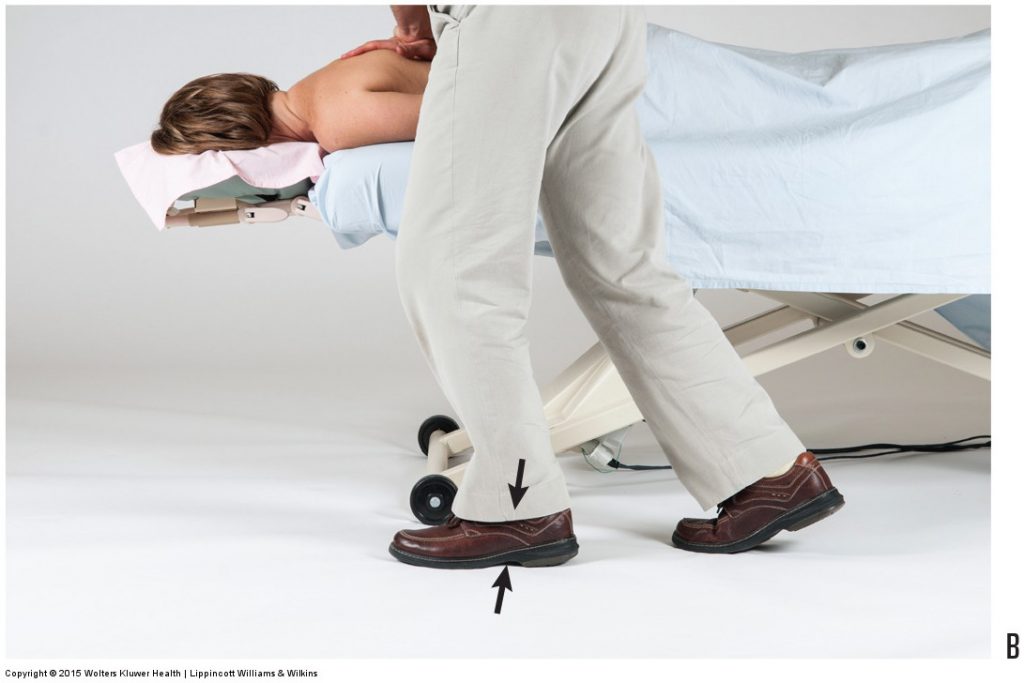
Figure 24B. Permission Joseph E. Muscolino. Manual Therapy for the Low Back and Pelvis – A Clinical Orthopedic Approach (2013).
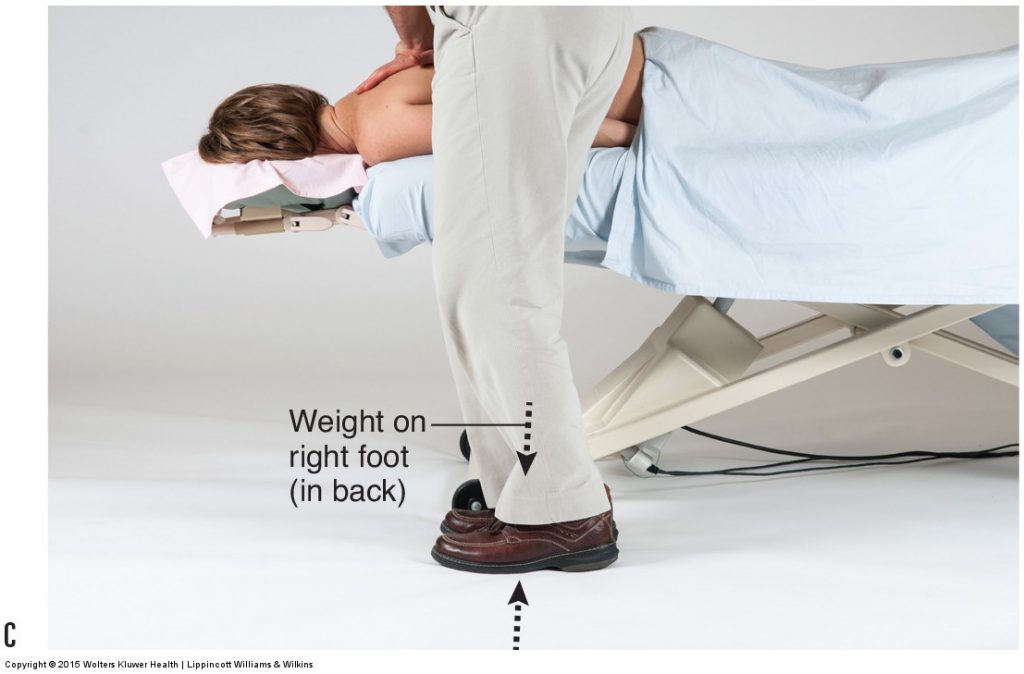
Figure 24C. Permission Joseph E. Muscolino. Manual Therapy for the Low Back and Pelvis – A Clinical Orthopedic Approach (2013).

Figure 24D. Permission Joseph E. Muscolino. Manual Therapy for the Low Back and Pelvis – A Clinical Orthopedic Approach (2013).
Completing the Stroke – Upper Thoracic Region
When you reach the top of the client’s trunk, if you want to complete the deep stroke without an interruption in the application of deep pressure, you need to make sure that your core is superior to the client’s trunk (just lateral to the face cradle) and you drop/lean backward with your body weight against the top of the client’s back/shoulder (see Fig. 24D). Whereas for the entire length of the stroke, you were leaning your core body weight forward and down onto the front foot, at the end, you need to lean your core body weight backward and down onto the rear foot. This allows for the stroke to be completed without having to reorient your body 180 degrees around to face the foot end of the table to press onto the top of the client’s back/shoulder. The more you practice gracefully transferring your body weight from foot to foot as you move your feet up the table, the smoother you can perform one long, deep stroke up the client’s back.
This is the 12th of 13 articles on Deep Pressure Massage for the Low Back.
The thirteen articles are:
- Introduction to Deep Pressure Massage to the Low Back
- Deep Pressure Massage to the Low Back – Choosing the Right Table
- Deep Pressure Massage to the Low Back – Overview
- Deep Pressure Massage to the Low Back – Client and Therapist Positioning
- Deep Pressure Massage to the Low Back – Positioning the Feet
- Deep Pressure Massage to the Low Back – Choosing the Treatment Contact
- Deep Pressure Massage to the Low Back – Support Your Treatment Contact
- Deep Pressure Massage to the Low Back – Use Stacked Joints
- Deep Pressure Massage to the Low Back – Apply Pressure Perpendicularly
- Deep Pressure Massage to the Low Back – Use Body Weight
- Deep Pressure Massage to the Low Back – Tissue Tension Barrier
- Deep Pressure Massage to the Low Back – Deep Strokes
- Deep Pressure Massage to the Low Back – Forward Head Posture
(Click here for the blog post article: Sprains and Strains (Whiplash) of the Neck.)